Crystal Cave is a location in Dark Souls and Dark Souls Remastered. This area is where you are able to take revenge on Seath the Scaleless and contains numerous invisible paths that you must find by watching the falling crystal snow hit the invisible ground. It is accessed through The Duke's Archives.

General Information
- Previous: The Duke's Archives
- Next: Demon Ruins
- Recommended Levels: Any
- Bosses: Seath the Scaleless
Video Walkthrough
Crystal Cave Map
(WIP)
NPCs in the area
Bosses
Items
Consumables
- Soul of a Hero
- Purging Stone
- Humanity
- Twin Humanities
- Large Soul of a Lost Undead
- Large Soul of a Nameless Soldier
- Large Soul of a Proud Knight
- Large Soul of a Lost Undead
- Purple Moss Clump
- Blooming Purple Moss Clump
- Soul of a Nameless Soldier
- Egg Vermifuge
- Divine Blessing
- Repair Powder
- Transient Curse
Weapons, Spells & Armor
- Moonlight Greatsword (cut the tail from Seath the Scaleless)
- Broken Pendant
- Dung Pie
- Prism Stone
- Copper Coin
- Gold Coin
- Silver Coin
Upgrade Materials
- Red Titanite Chunk
- Titanite Chunk
- Twinkling Titanite
- White Titanite Chunk
- Green Titanite Shard
- Large Titanite Shard
- Demon Titanite
- Dragon Scale
- Blue Titanite Chunk
Keys & Other
- Blue Titanite Slab
- Blue Titanite Chunk
- Humanity
- Twinkling Titanite
- Large Titanite Shard
- Titanite Chunk
Enemies
Full Crystal Cave Walkthrough
The Entrance
You'll easily see the Crystal Cave from the inner garden of The Duke's Archives. If you would rather not have to fight all the Crystal Golems on your way through the garden, as you can quite easily out-run them. Head straight for the opening and start making your way down the crystal walkways.
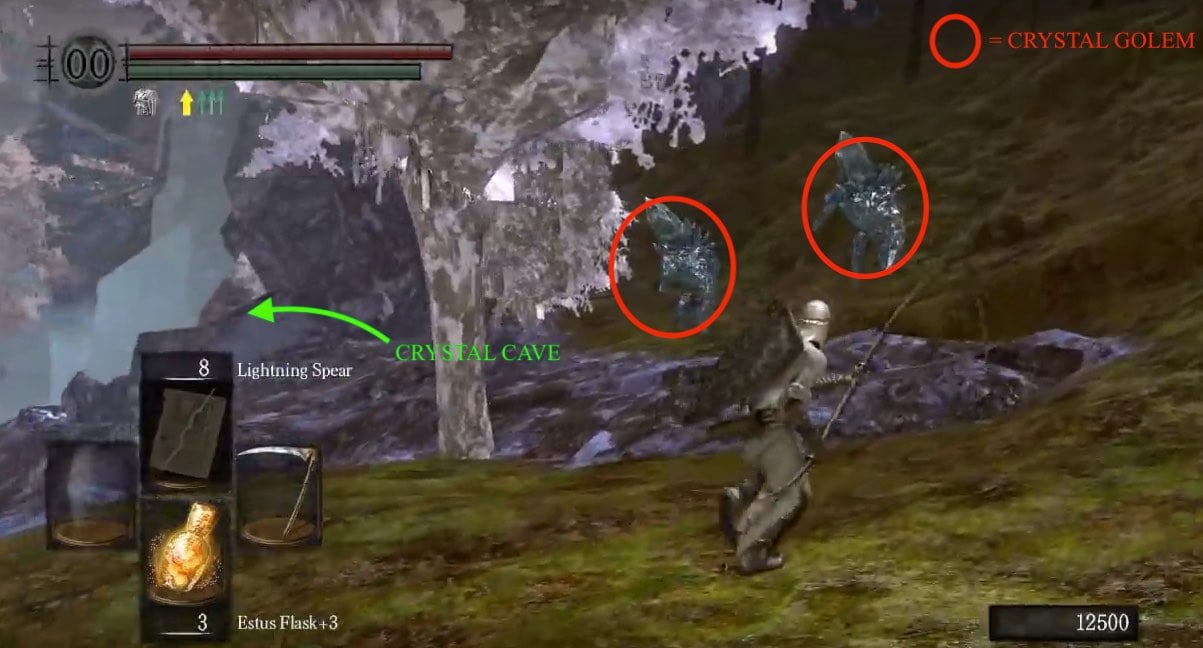
However if you wish to explore around, you can pick up a few nifty items, and pick off a few Crystal Golems. Head right to find a Blue Titanite Chunk. In the middle of the wooded area, you can find the Crystalline Set (armor worn by Crystal Knights). Heading forward and left, will lead you to two Crystal Golems blocking the entrance to the Cave.
Invisible Crystal Paths
Inside the cave, after making it past the first Crystal Golem (again, if you run past him he will stop chasing you eventually) you will reach a point where the crystal walkway makes a Z shape, but don't follow this path just yet. Before you turn the first corner of the Z shape, on the left you will notice an opening with some snow falling and hitting thin air - or so it would seem. The snow is actually hitting one of the Crystal Cave's invisible paths.
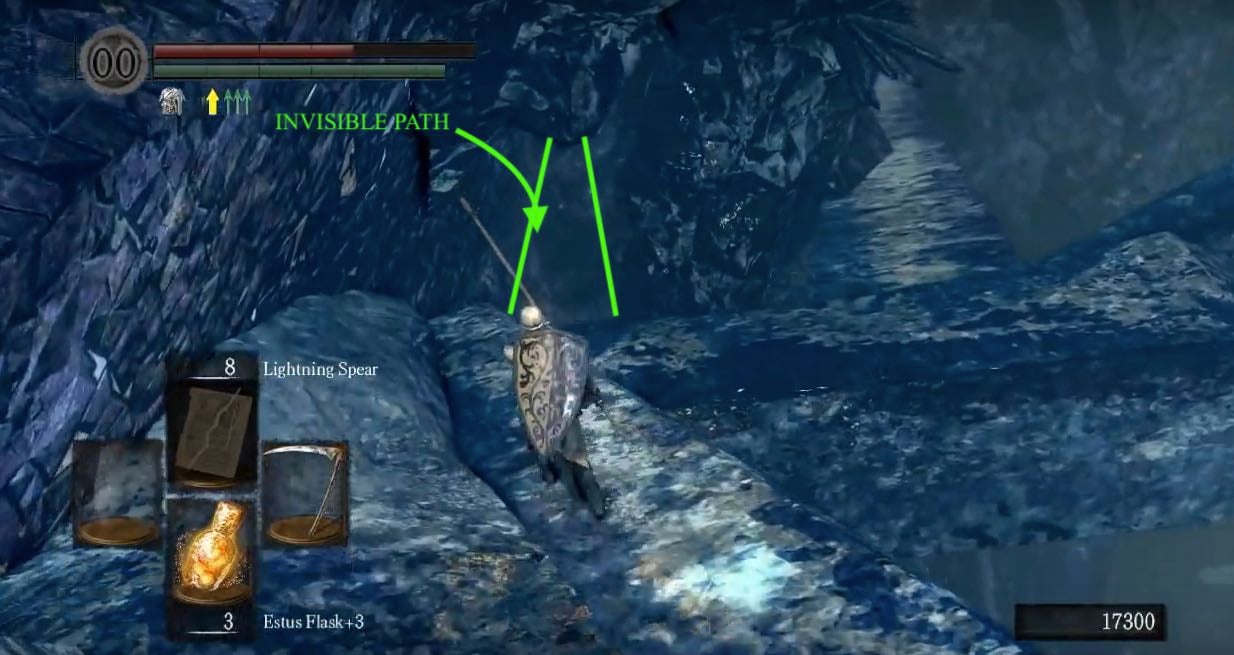
Note: The invisible paths are completely transparent walkways that are placed around the cave. You will need to traverse at least two of them to proceed deeper into the cave, and generally, get harder to cross the deeper you go. While there are a couple that are unavoidable, a good sum lead to non-essential secrets, such as this first one. The snow that you see falling is the signifier that such a walkway is present and it helps greatly in crossing them. As the snow hits the walkway you'll be able to determine where it is safe to walk. Prism Stones are also invaluable for crossing some of the latter ones, as they let you know if the area in front of you can be walked on and also then leave a colored marker at the point where it dropped, creating a trail that you can easily follow should you need to go back across the same path again - it would be advisable to save them for a secret invisible path you'll encounter later.
This first invisible path is in a straight line, and if you simply follow it forward you'll find Humanity on a dead body. After that, continue down onto the platform just below to reach the path you just deviated from. You will come across a Moonlight Butterfly perched on a ledge. There's a few of these scattered around the cave and it's highly advised to simply ignore them, as they will attack relentlessly if you attack or move close to them.
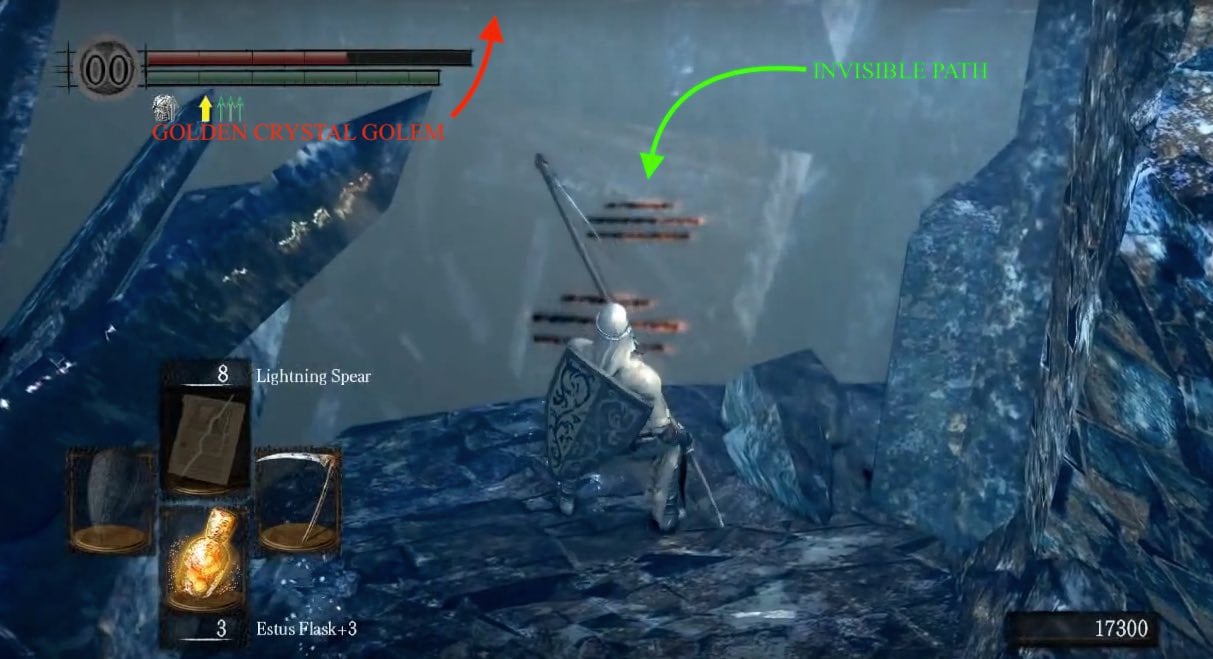
Continue away from the Butterfly and you will what appears to be a dead end cliff, if not for the Orange Guidance Soapstones and falling snow signaling another invisible path. Before you go to cross it though, have a look out over the edge on the left as you approach the start of the invisible path and you should notice a Golden Crystal Golem waiting on a large crystal walkway. If you fought the one in Darkroot Basin or the one just outside the Crystal Cave in the garden of The Duke's Archives, then you'll know that these guys are very powerful - so be careful.
Taking on the Golden Golems
It's in your best interest to lure the Golden Crystal Golem over to you rather than attempting to fight it on the narrow walkway it's on, or on the invisible path that leads to that walkway. So, use arrows to grab its attention and it'll then start heading over to you so you can fight it on a larger area of solid ground. ( Tip: For an easy kill, wait at the edge close-by to where the invisible path ahead starts and keep firing arrows at it while it comes across the invisible path - there's a possibility that it'll attempt a jump attack at you from the path and fall to its death in the process). Once it's dead, head across the invisible path, this one goes in a straight line directly toward the large crystal walkway ahead, but again only walk where you can see the snow land, because you can easily fall off if you're not careful.
Once you make it across the invisible path you'll be on the large crystal walkway, head to the end and drop off the platform on the left, and onto the invisible platform with an Orange Guidance Soapstone. Once you land, make a quick 180 degree turn to reveal a tunnel behind you and run inside to quickly kill the three Crystal Lizards in here before they disappear. ( NOTE: If they disappeared before you got them all, a quick quit-and-reload will make them reappear so you can get them.)
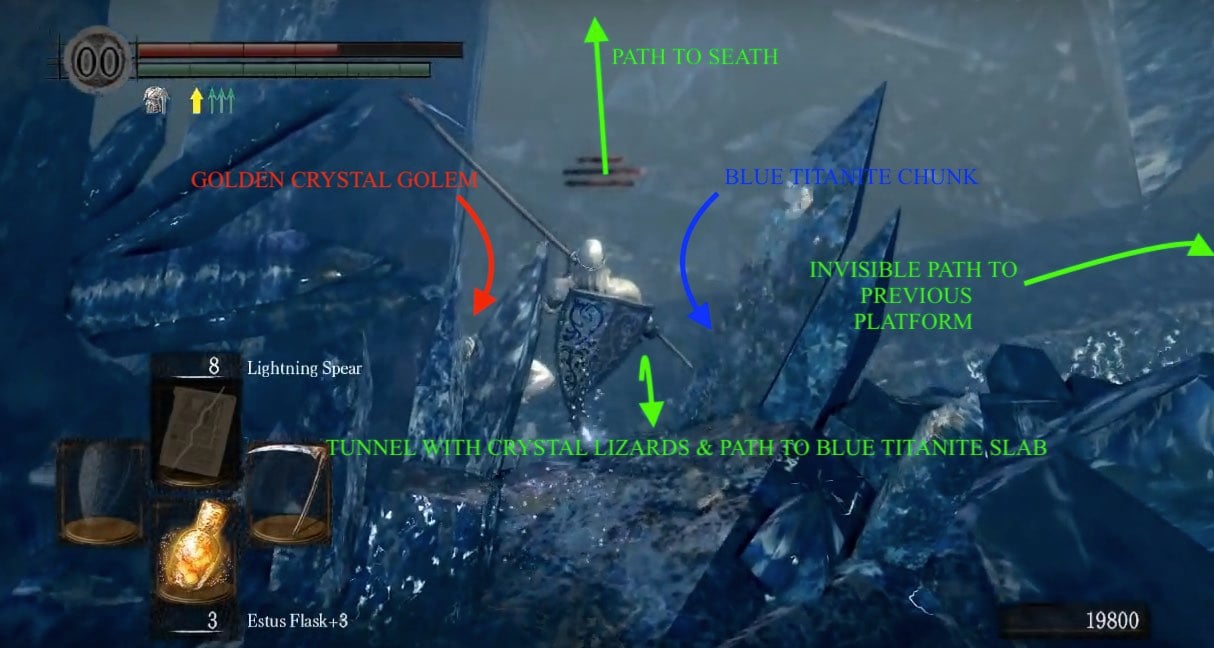
Back out onto where you initially landed, you'll see a Golden Crystal Golem directly below you. There is no need to engage this one (it will leave you alone as long as you leave it alone), however if you are feeling brave and/or feel the need for the Blue Titanite Chunk on the corpse next to the Golem, reach it by carefully walking off the right side of the invisible walkway. The limited space for this fight makes it quite tough, so good luck! Tip: you can use the same strategy you used on the first Golem here by going up the invisible path leading up to the platform formerly holding the first Golden Crystal Golem.
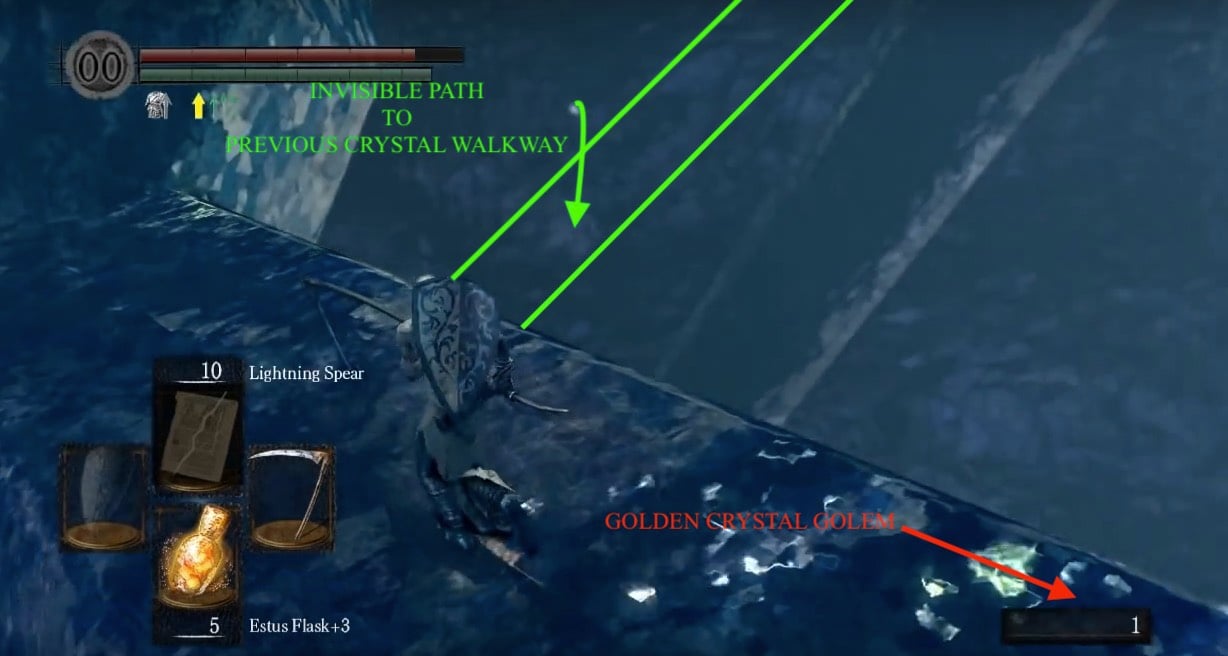
Beware that this walkway is very easily to slip off of - one side is slightly steeper than the other, so avoid that side of the walkway to avoid falling. Head back up the invisible path that brought you down here and then make your way across the crystal walkway at the top until you reach solid land again - be careful not to slip off while making your way across.
Deeper into the Cave
Return to the invisible platform directly above where the second Golden Crystal Golem stood and continue through to the other end of the tunnel to find another invisible path, but this one is not straight like the other ones - this path is full of sharp turns and bends. The key here is patience, only moving when you are certain - even if it means waiting a bit. Since the falling snow may be a little harder to use as a guide, Prism Stones are extremely helpful in determining where is safe to walk and they will also make the journey back much easier due to the trail they leave. Once at the other end, you will reach another crystal beam where you will find a Blue Titanite Slab - so it's absolutely worth the journey.
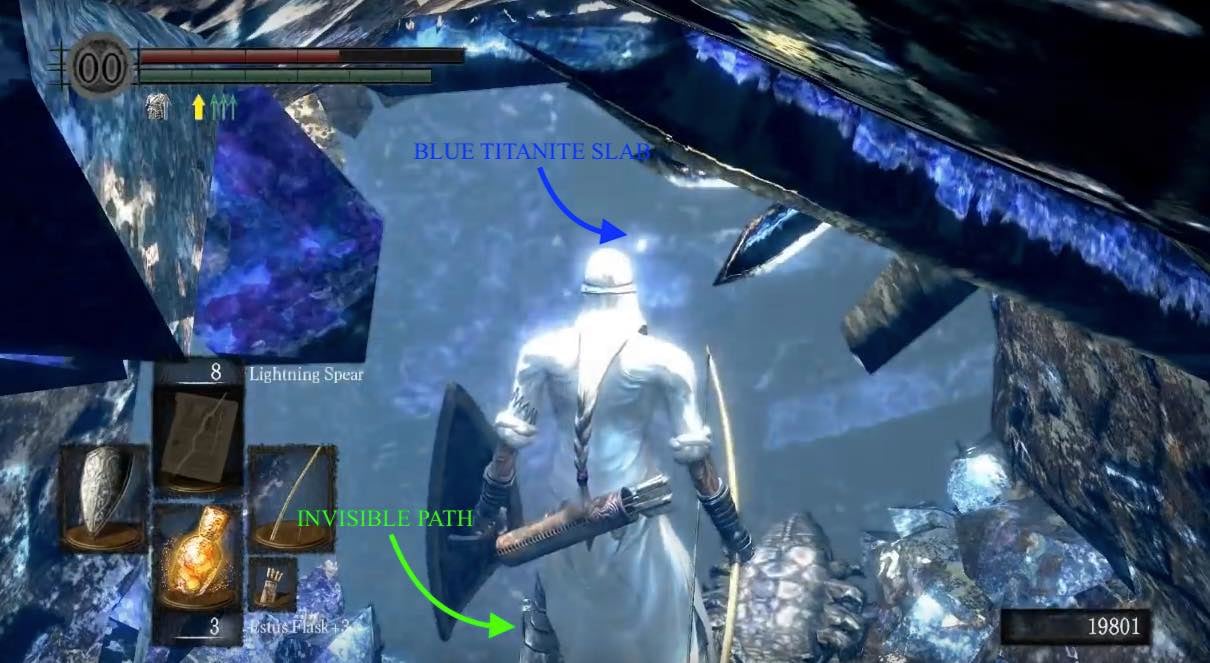
TIP: If you find yourself short on Prism Stones, a more resourceful alternative requires a bow and arrows. Proceed slowly, shooting an arrow a meter or two forward every few steps to ensure there is a ground in front of you. Wherever there isn't, turn and fire the arrows wherever you think the path may lead, and follow the path that sticks.
The Path to Seath
Head back to the tunnel and out the other end to the invisible path you fell onto before taking the above detour. Again, you can simply ignore the Moonlight Butterfly on your left. This invisible path goes in a straight line, but you should still make use of the falling snow for assistance if you feel you need it. When you reach solid land again you'll see the cave ahead where you should proceed, but before you go in, take a left and look around for a corpse holding a Soul of a Hero - be warned though that when you pick it up you may incite the aggro of the nearby Moonlight Butterfly, so ensure you're quick to run into the cave behind you, once you pick it up.
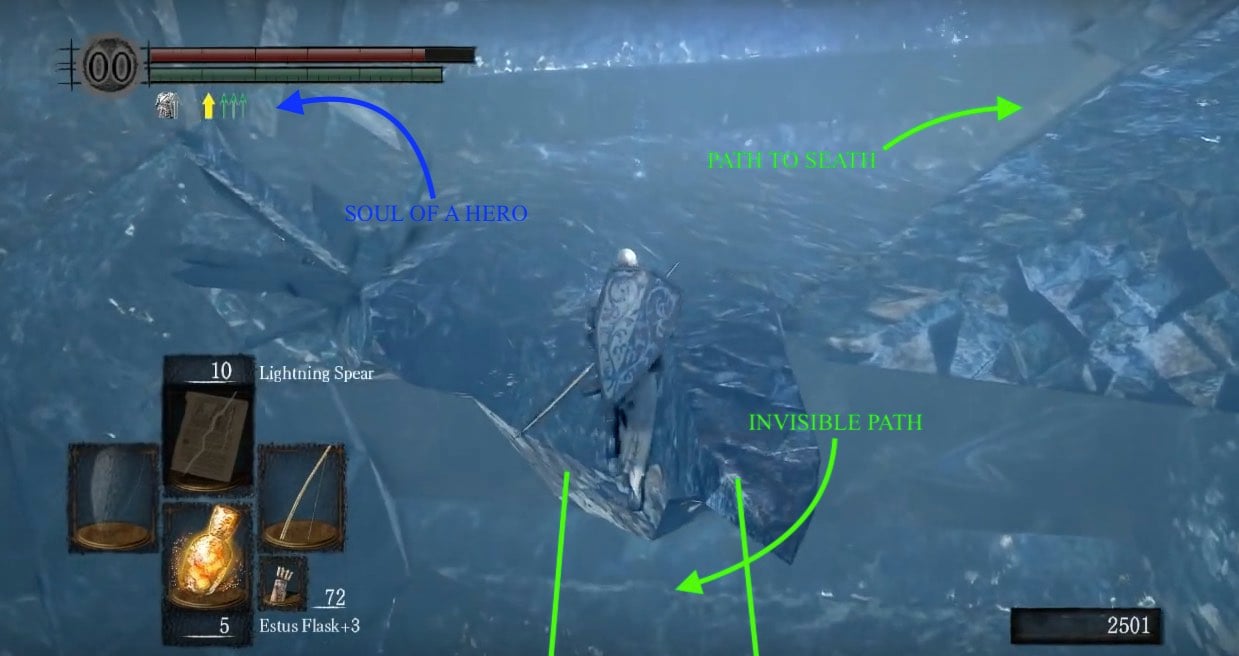
Inside this cave you will come across some Man-Eater Shells. If you visited Ash Lake then you'll know that these things can take a lot of punishment and dish it out too, so don't let yourself get mobbed by several of them. Lure them one at a time (Pyromancy is very helpful in disposing them efficiently). As you enter their area, beware of the one hiding in a little alcove to the left, you do not want to get attacked from behind. Alternatively, you can just run past them and head in to the large cave to trigger the Seath boss battle. If this is the first time you have been here, the Man-Eater Shells will follow you into the boss arena as there's no fog gate, but Seath's attacks can kill them if they do. However, if you have died already fighting the boss in this arena, a fog gate will appear in front of the arena for all subsequent attempts and the Shells will be unable to follow you through.
NOTE: When fighting Seath, attack the tip of his tail, until you cut it off to acquire the Moonlight Greatsword.
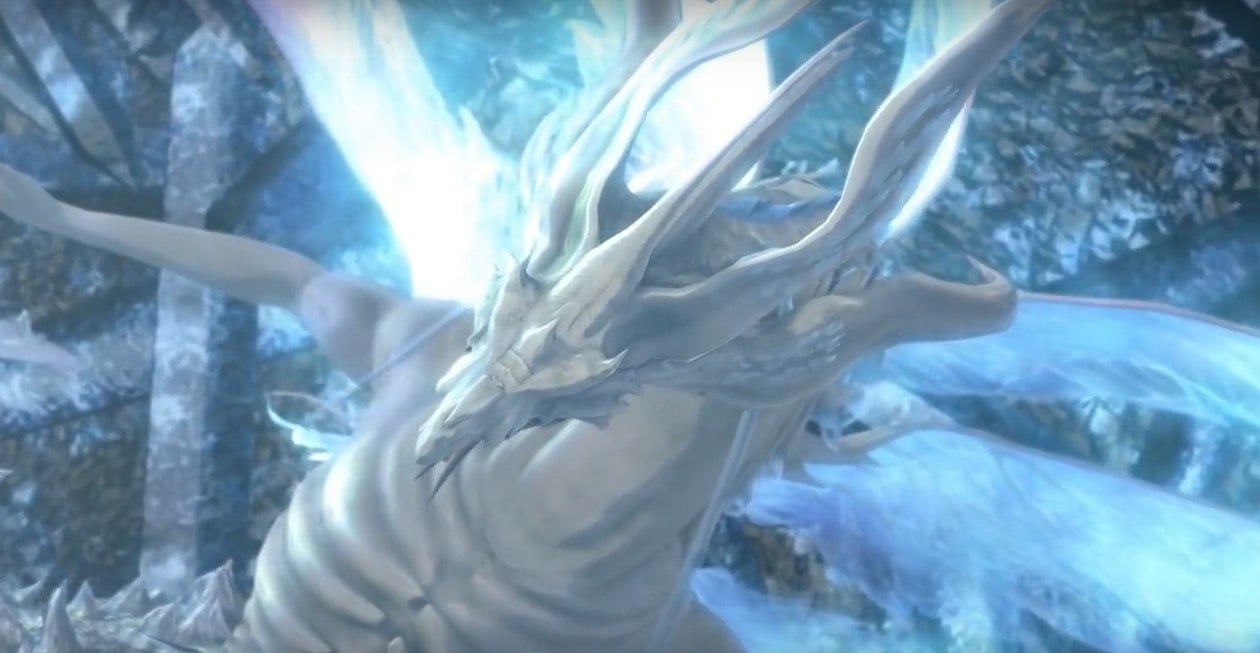
Boss Battle : Seath the Scaleless
NOTE: Once you defeat Seath, remember to go back and visit the room where you fought him in the The Duke's Archives again to get some valuable treasure and also face off against a hollowed Big Hat Logan , if you've followed his quest-line correctly. To this end, rest at the bonfire that has appeared in Seath's arena unlocking the warp, and do NOT use the Homeward miracle or a Homeward Bone, if you dont rest at the bonfire you will have to run through the entire area again to get back to the bonfire.
With Seath's Lord Soul collected, use a bonfire to warp to the Chaos Servant bonfire in Quelaag's Domain to continue on to the next area - the Demon Ruins.
Speed Run Walkthrough
A fast walkthrough of how to get to the end of the level the fastest, picking up only essential items goes here.Notes & Trivia:
- The Crystal Cave may have inspired the Bloodborne area: "Altar of Despair."
 Anonymous
thank you for the red circles i never could have guessed where the crystal golems were

 Anonymous
This area used to terrify me but once you realize the invisible paths are fairly wide and perfectly straight it's actually very easy to rush through. The golden golem on that narrow slippery path is the real boss, not Seath.

 Anonymous
It's just me or you also spend all your Orange Soapstone message limit to permanently mark spots on ivisible bridges?

 Anonymous
I suddenly got why the pathways are invisible. Both golems and Seath are blind so it doesn't really matter to them lol

 Anonymous
traversing the area took 4 hours. killing the boss took 40 seconds. the real bosses were the level designs we fought along the way

 Anonymous
god I hate this place, one tread too close to a slope at a cursed angle, and you get shunted sideways to your death like you're wearing ice blocks on your feet

 Anonymous
This boss is annoying because of the bloody path towardsd him. Unnecessary long, made difficult by an invisible path and a crowd of clamps that you need to carefully take down one after another cause they can basically 2-3 hit you if you're not a tank. At least with O+S and other bosses you're there real quick to give it another go, improve your fighting technique etc, but this is just unnecessarily TEADEOUS and after 5 times feels like AGES cause the path to him is so ****ing long.

 Anonymous
I once tried using Slumbering Dragoncrest & Ring of Fog to sneak by everything and it mostly works. Except when I took off RoF to get the slab. Halfway to the slab, the first Golden Golem jumped down on the walkway and scared the **** outta me

 Anonymous
 Anonymous
This boss is so garbage, Its a marathon to get to Seath, he can curse in the front, and deal massive dmg in the back. Do I need to mention the healing crystal behind him that reappears everytime you die oh wait I just did because it's that dumb. Whats worst is that the crystal cave is just a hole in a ground full of crystals, a boring place for a dumb boss, how fitting. (Please Excuse My Ranting, I'm gonna go take a Chill Pill. Have a Nice Day)

some wiki author has PTSD from Golden Crystal Golems. every mention of them has outright warnings that they're super dangerous and to be careful. it's dark souls bro, we know.

 Anonymous
Useless weird factoid: If you hit the crystals/walls in the clam room with a thrust attack it makes the demon souls shield blocking sound effect.

 Anonymous
 Anonymous
my god do ya´ll can´t walk straight or what? getting the slab is kinda difficult but the path to seath is just walk straight two times.

 Anonymous
Despite the death pits and the clams, i found the design of the area fascinating, is like the whole area has gradually been corrupted by seath's crystal

 Anonymous
Worst ****ing area.
Ever.
Invisible pathways just screams "we've run out of ideas!"
 Anonymous
If you go with a bow you can mark your safely with aim and arrow then walk, if you want to leave a mark, use prism but the bow/aim/shoot/walk is faster, wooden arrow my friends

 Anonymous
Why does this guide tell us not to rest at the bonfire in Seath’s arena? You can warp from it rather than use a homeward bone and if you light it but don’t rest at it it’ll not be available to warp to, what the?

 Anonymous
what the fk did they think when making the map full of hidden pathway like this one?

 Anonymous
 Anonymous
 Anonymous
After balancing over invisible crystals with meticulous precision, only a small step away from death, fighting heavily armored crystal boys in a narrow space, running to the fog gate and meanwhile being overpowered by giant shells, you don't exactly feel proud

 Anonymous
F*** this place. Worse than Lost Izalith. If only there weren't instakill invisible paths.

 Anonymous
Want to point out the note at the bottom isn't accurate. Don't know if it's different in the remaster than vanilla Dark Souls, but the two warpable bonfires for Seath's whole zone are the Crystal Cave bonfire and the Duke's Archive bonfire right next to the shortcut and Big Hat Logan. So you can just warp from Seath's bonfire right back to the bonfire closest to Big Hat Logan. Plus, you have to rest at -- not just light -- the Crystal Cave bonfire in order to warp to it later. If you use a Homeward Bone instead, you'll need to run back through the whole Crystal Cave area to rest at the bonfire later.
So yeah, DON'T use a Homeward Bone instead of resting at the Crystal Cave bonfire. Just rest and warp to the Duke's Archive bonfire.
 Anonymous
 Anonymous
I'm so pissed that my dumbass couldn't figure out that the paths that were invisible had the crystals falling down on it. Other than that pretty cool place to be.

 Anonymous
I've always liked crystal themed areas in games, dunno why, ever since crystal snail in megaman x2 I think. Dark souls is pretty breathtaking the first time you walk down. After the umpteenth time walking down though after sliding off things that look solid, falling through cracks in invisible platforms or being shot at by butterflies that stay out of range and never rest, it's become less awe inspiring and honestly can kind of go ***** itself. Though it is all really pretty.

 Anonymous
*****. This. Level. Filled to the *****ing brim with the stuff people give the later games endless***** for.

 Anonymous
 Anonymous
the bonfire in Quelaag's Domain is called Daughter of Chaos in remastered

I aggro'd the first Golden Golem, headed back up to the solid area at the beginning of the invisible path- opposite where the first Moonlight Butterfly is resting- and found that the Golem couldn't progress any further than the beginning of the invisible path, letting me strike it will enough room to dodge or roll backwards to avoid its attacks with solid ground at my back. If you are falling to your death battling it further down, this may make it easier to deal with :)

 Anonymous
"one side is slightly steeper than the other, so avoid that side of the walkway to avoid falling." Which side?

 Anonymous
Does anyone have summon signs for the Seath fight? I'm trying to get his tail, but proving quite difficult.

 Anonymous
Okay but is there any ways to make it less hard ? Even the golems are falling throught the cracks of the invisible bridges and it's starting to be annoying as *****.

 Anonymous
If i haven't completed logan quest line before killing seath can i do it after and then fight logan?

 Anonymous
no no no..... big hat logan isn't in crystal cave.... he's in blighttown.

 Anonymous
If I finish Siegmeyer of Catarina's quest-line before heading to the inner garden of The Duke's Archives, will the golden crystal golem in the center of the garden disappear?

 Anonymous
I'm I the first person to discover this? Alternatively you can shoot the invisible floor with arrows instead of using prism stones as a guide. This is a much more reliable method since you can aim the arrows.

 Anonymous
People talk about how lazy and rushed the Demon Ruins and Lost Izalith are, but i'll be honest with you, I feel the same way about the Crystal Cave. It felt like the devs were rushed to make the area fun but challenging and rather than actually populate it with enemies and such that would make for a fun level, they figured "INVISIBLE PATHWAYS! NO BONFIRE! DUMB CLAM ENEMIES THAT HIT FOR RIDICULOUS DAMAGE AND CAN GLITCH INTO THE BOSS ROOM!"
In case you hadn't gathered, I particularly dislike the Crystal Cave.
 Anonymous
I was using prism stones to mark my path for the slab and I threw one down or said there was ground there so I tried to walk forward and fell off lol


Pain in the arse. Pretty though.
2
+10
-1