

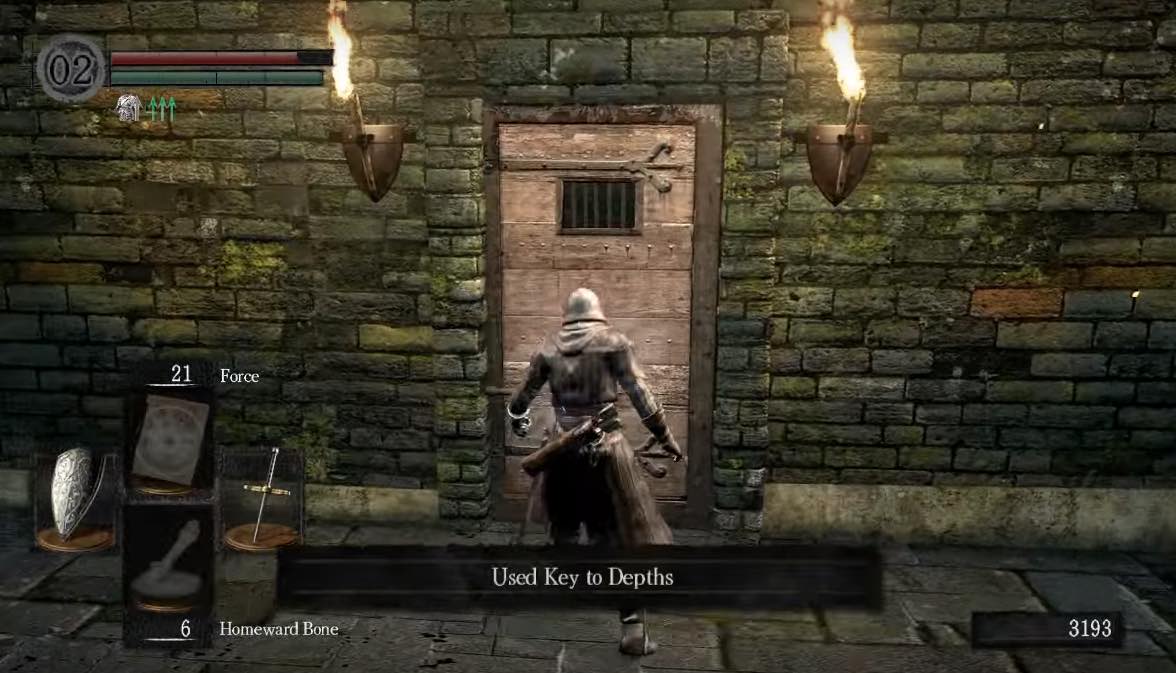
The Depths is an area in Dark Souls and Dark Souls Remastered, accessed from Lower Undead Burg. The door leading down to it is unlocked by the Key to Depths, which is obtained by beating the Capra Demon. It serves as the gateway to Blighttown once you defeat the area's boss.

General Information
- Previous: Lower Undead Burg
- Next: Blighttown
- Recommended Levels: 20+
- Boss: Gaping Dragon
Video Walkthrough
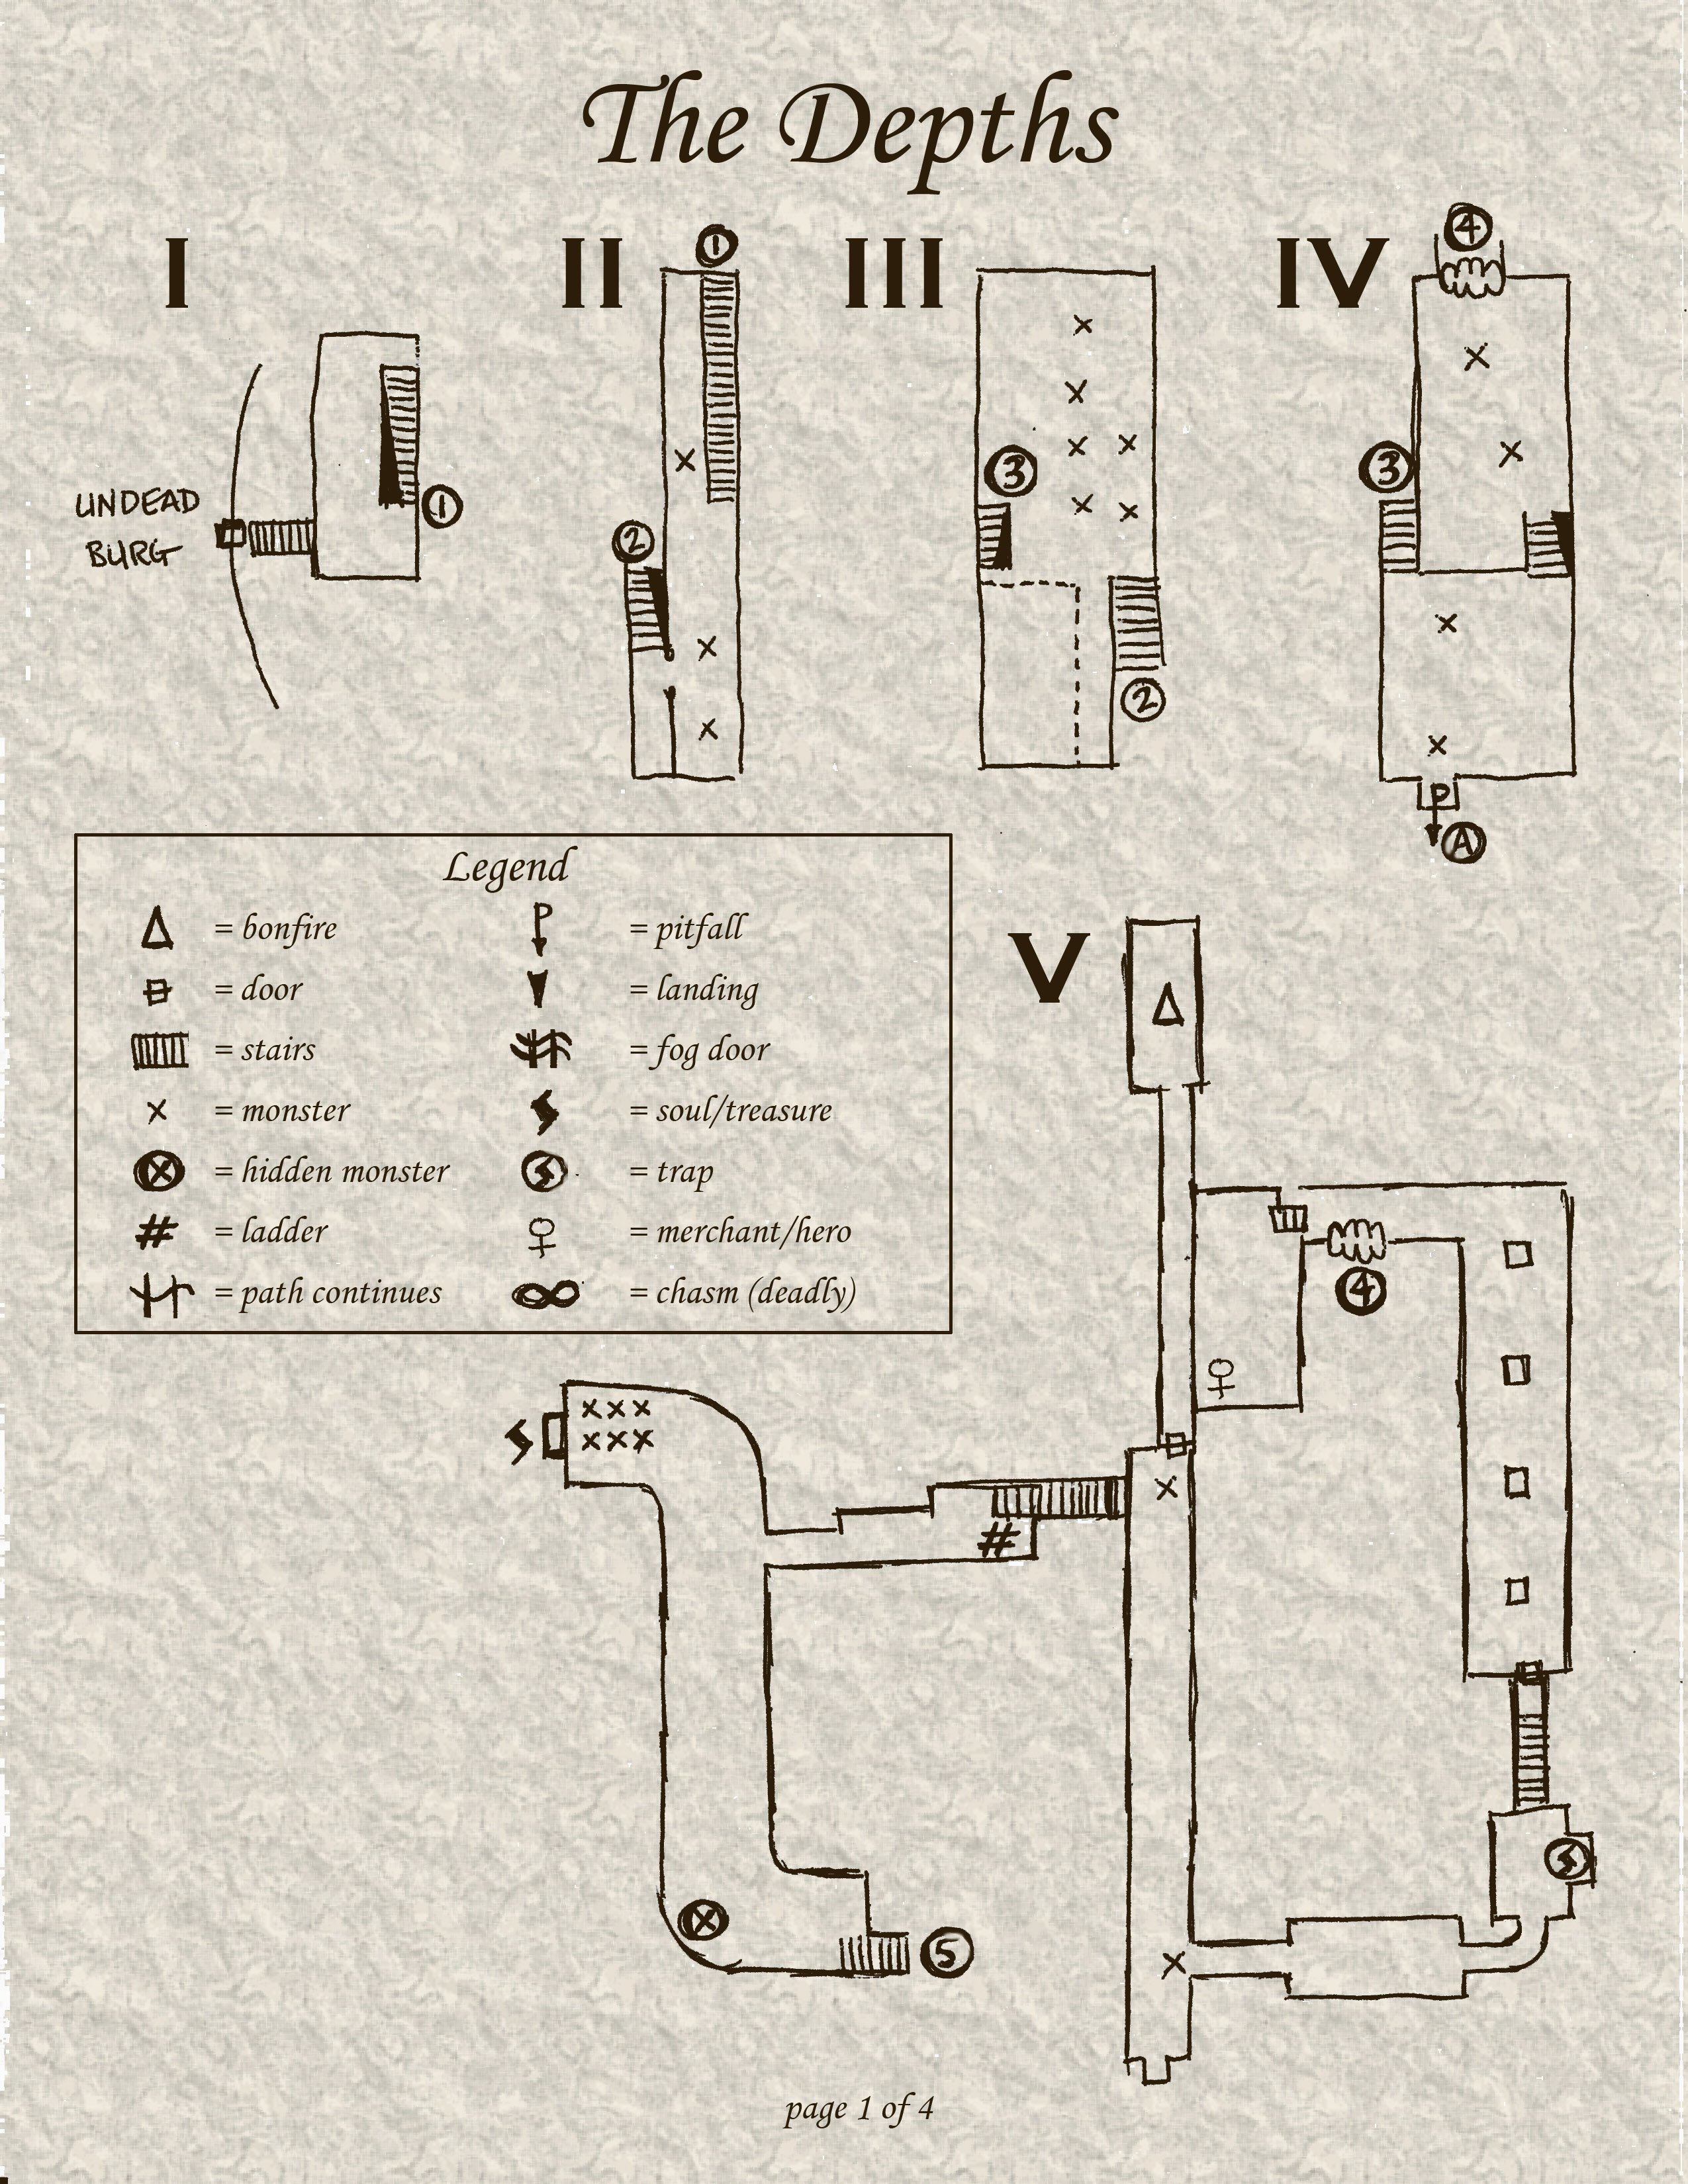
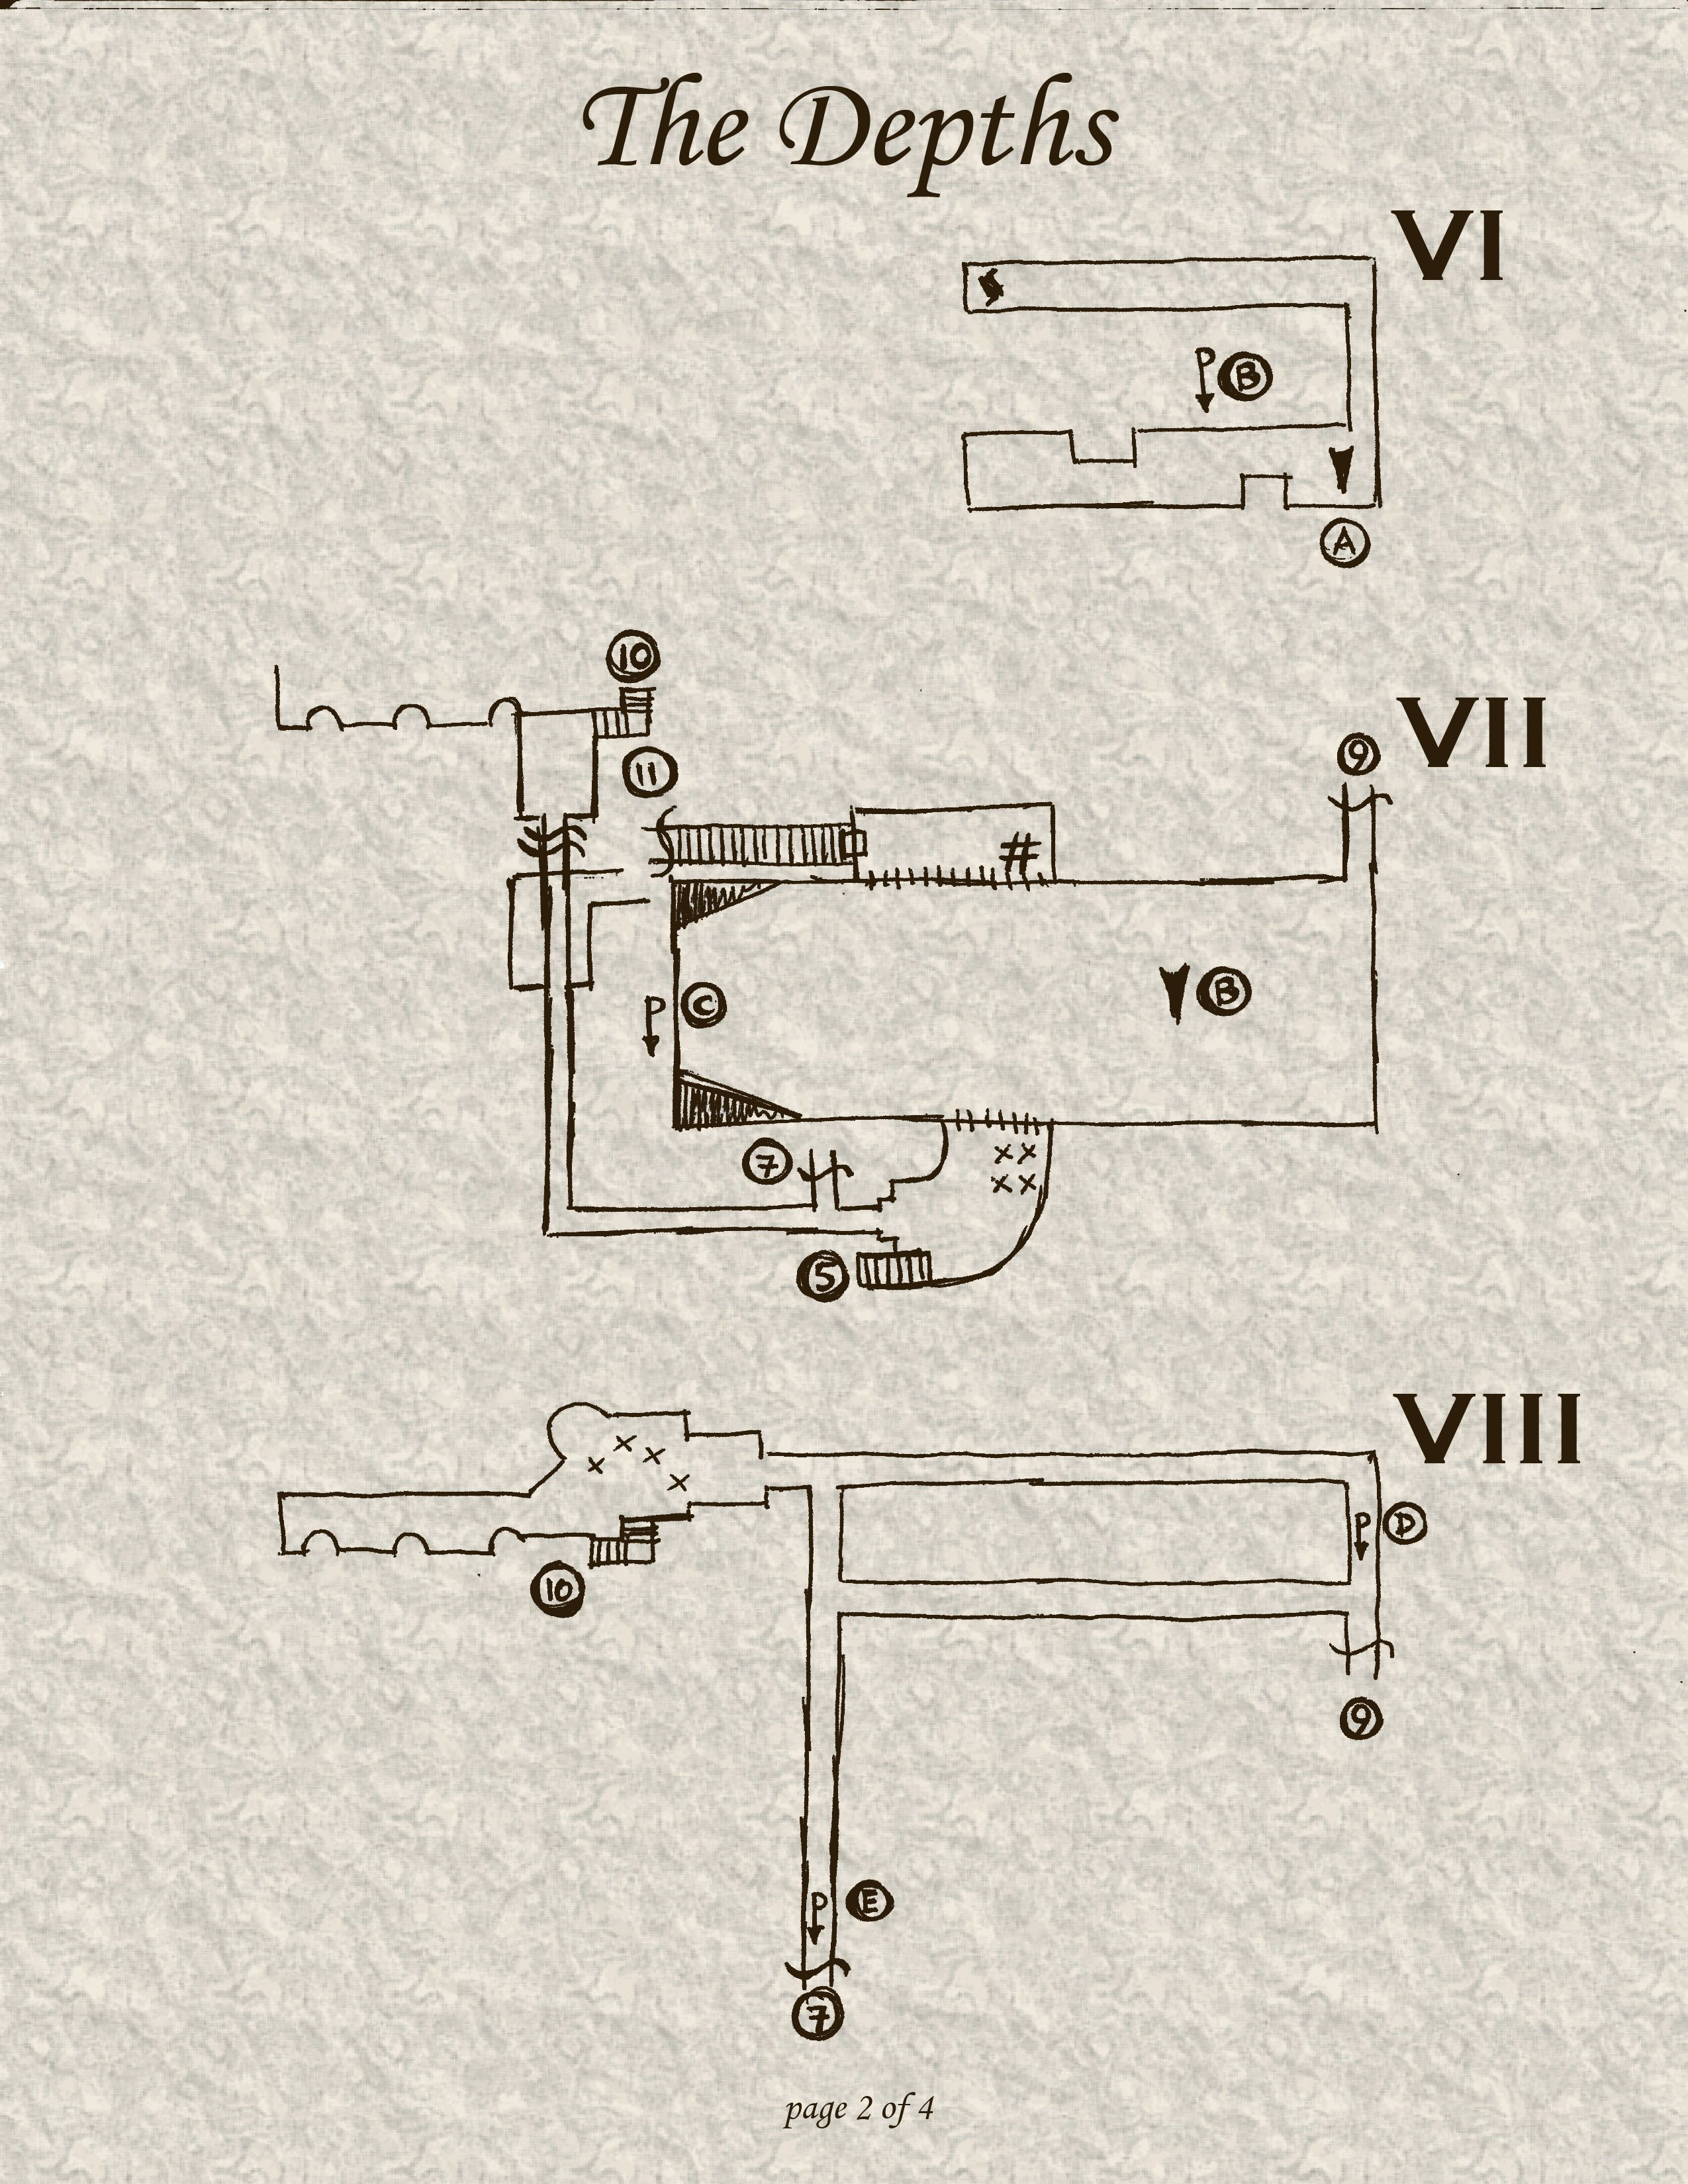
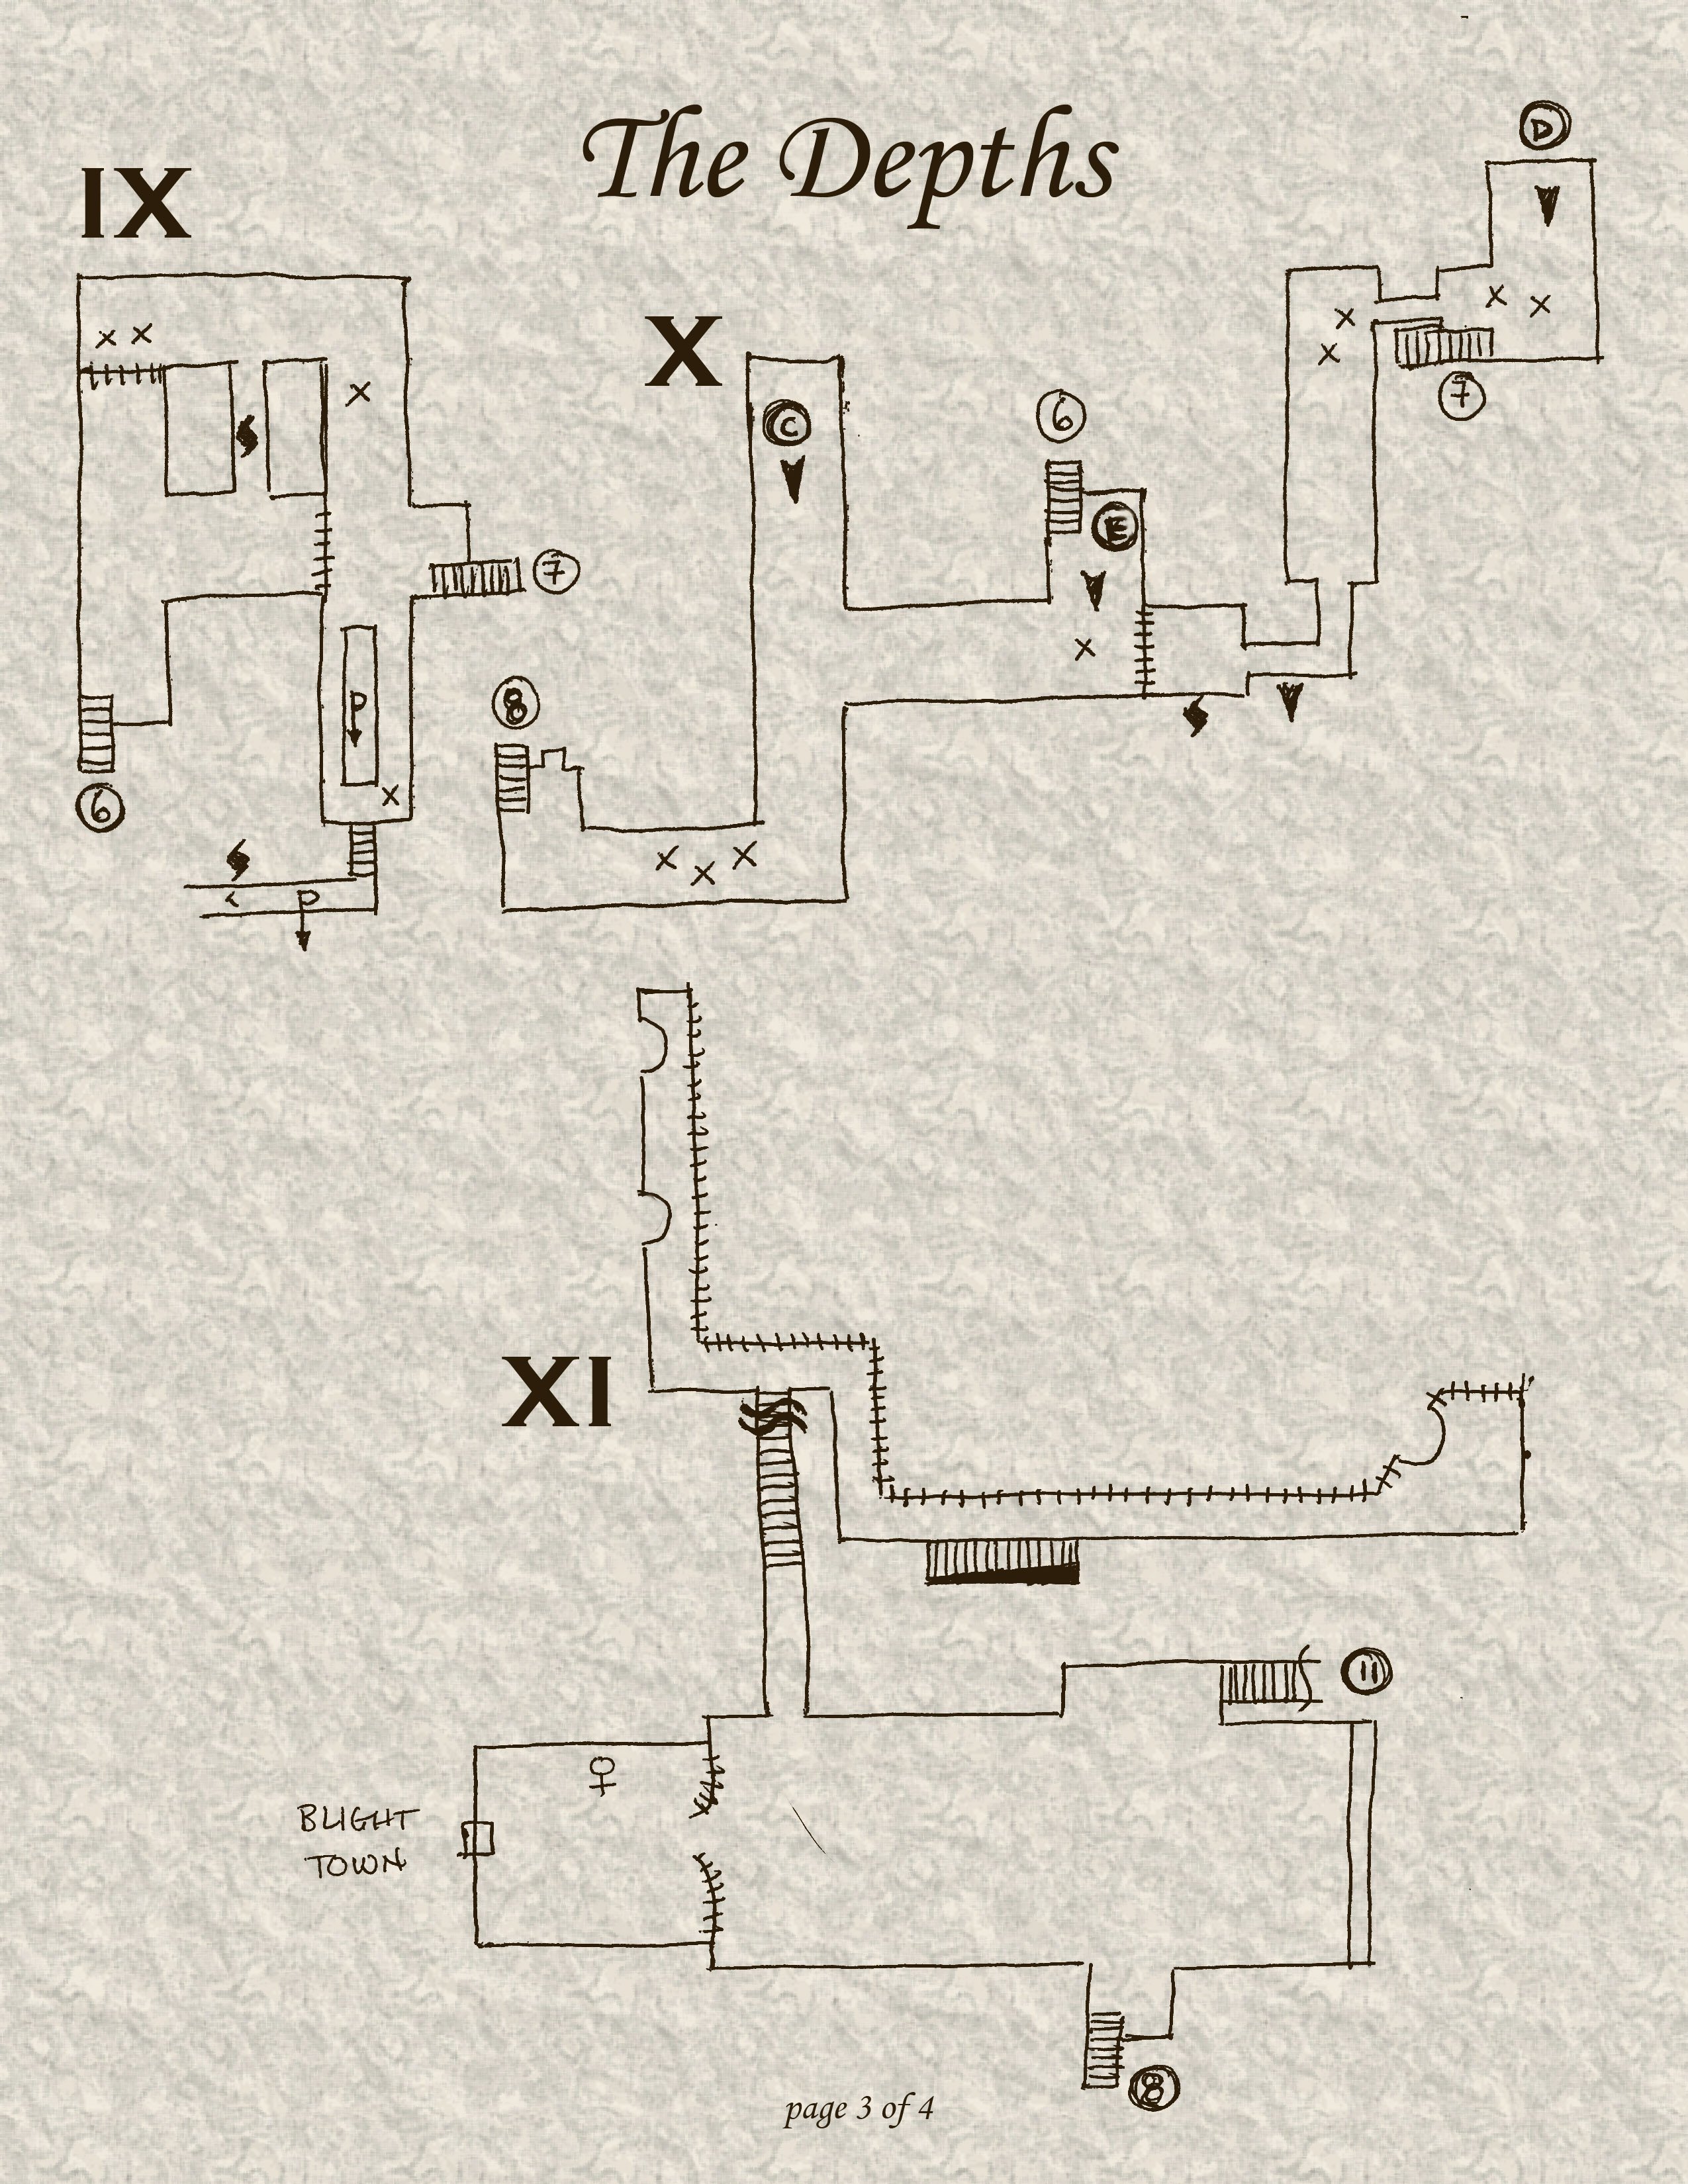
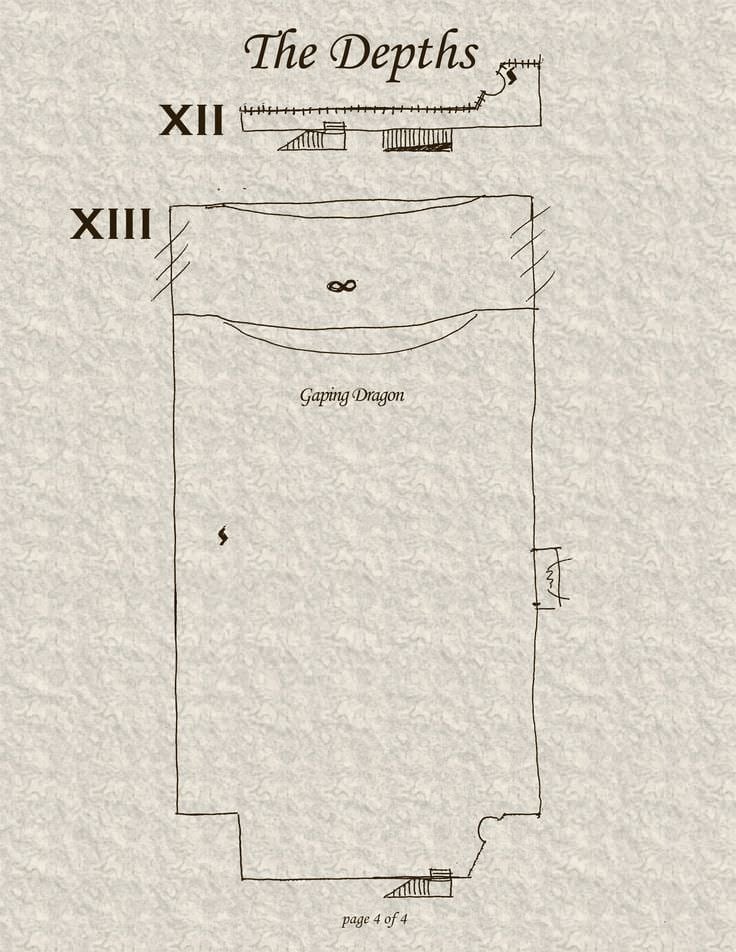
Depths Map
NPCs in the area
Bosses
- Butcher (mini boss)
- Giant Rat (mini boss)
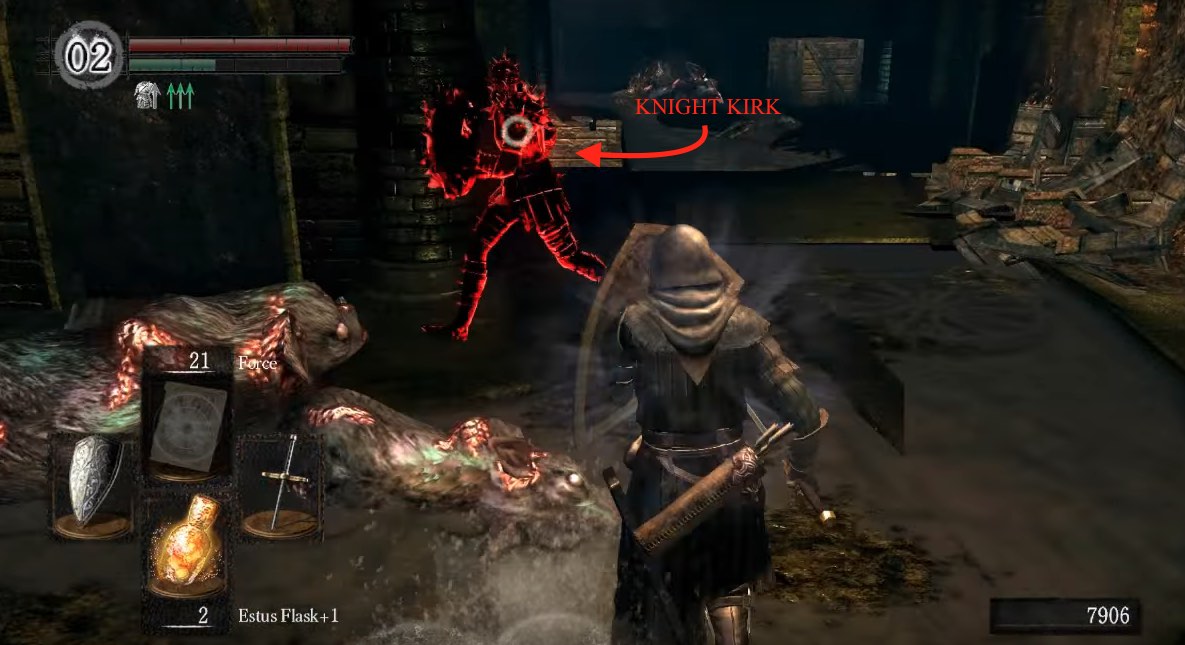
- Knight Kirk (NPC Invasion)
- The Channeler (mini boss)
- Gaping Dragon
Items
Consumables
- Soul of a Nameless Soldier
- Humanity
- Large Soul of a Nameless Soldier
- Large Soul of a Lost Undead
- Large Soul of a Proud Knight
- Heavy Bolts
- Eye of Death
- Twin Humanities
- Purple Moss Clump
- Blooming Purple Moss Clump
- Egg VermifugeCharcoal Pine Resin
- Gold Pine Resin
- Repair Powder
- Transient Curse
- Purging Stone
- Divine Blessing
Weapons, Spells & Armor
- Warrior Set
- Ring of the Evil Eye
- Spider Shield
- Greataxe
- Heavy Crossbow
- Light Crossbow
- Broken Straight Sword
- Short Bow
- Channeler's Trident
- Dung Pie
- Prism Stone
- Copper Coin
- Gold Coin
- Silver Coin
Upgrade Materials
- Red Titanite Chunk
- Titanite Chunk
- Twinkling Titanite
- White Titanite Chunk
- Green Titanite Shard
- Large Titanite Shard
- Demon Titanite
- Blue Titanite Chunk
- Dragon Scale
Keys & Other
- Large Ember
- Sewer Chamber Key
- Sunlight Medal
- Blighttown Key (Boss Spoil)
Enemies
- Hollows (Sword)
- Torch Hollows
- Undead Attack Dog
- Slime
- Sewer Rat
- Basilisk
- Large Rats
- Small Rats
- The Channeler
- Vagrants
Full Depths Walkthrough
BEFORE YOU BEGIN THIS AREA, PLEASE NOTE THE FOLLOWING:
- You will find many Sewer Rats here and you will likely need a cure for poison, which you can pick-up from dead Ents in Darkroot, or alternatively, you can purchase from the Undead Merchant (female).
- You will find a new enemy; the Basilisk. They spew a gas which will kill and curse you if you stay in it for too long. Being cursed is a dire situation to be in and it's advised that you know more about the cursed status, how to improve your resistance to it and how to remove it before you begin. You can find further information on the cursed status here. High curse resistance gear such as the Antiquated Set can be extremely helpful.
- There is the very high chance you will become toxified so be sure to stock up on blooming purple moss clumps.
- If you're planning to do the full loop (Depths -> Blighttown -> Quelaag's Domain -> The Valley of the Drakes -> Firelink Shrine), it will take you a while to get back to a blacksmith that can upgrade and repair your weapons and armors. Purchasing the Weapon and Armor smithboxes and the repair box is recommanded before starting on this journey.
The Kitchen
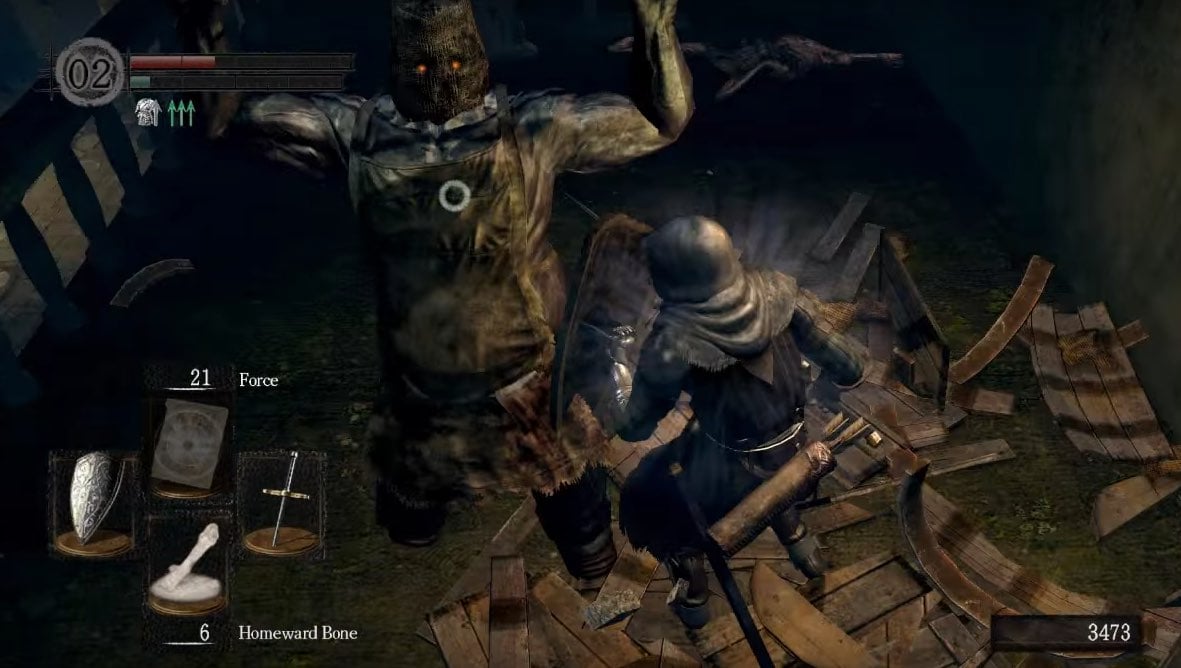
Into the Depths - The Depths can be accessed once you obtain the key from the Capra Demon, backtrack to the door we found earlier before entering the fog gate to battle the demon. Head down the stairs, through the door, to find three Hollows - one will try to surprise you from behind on your right, once you've descended. After killing them, follow the direction of which the surprise Hollow came from, all the way back to acquire a Soul of a Nameless Soldier on a corpse behind a few boxes. Turn around and head to the end of the hallway, where there is a doorway on the left. Coming down the stairs, you should notice three Torch Hollows ahead as well as two more Hollows hiding behind the pillars. There will also be one more Hollow on the left of the stairs you came from. If you notice on the left of the railing, you should see a Butcher going about her business.
What's Cooking, Good Looking? - You should be able to dent in her health (substantially) with strong ranged attacks, but you can also aggravate her from up here before you even get a shot off, so don't be surprised if she brings the fight to you. Once make your way down to the kitchen, an Undead Attack Dog will stand at the foot of the steps, while another waits at the butchers table (the one beside the table does not respawn). Lure the Butcher before proceeding (if you haven't already triggered her). You will find a chest, next to the Butcher's table, containing the Large Ember. There are some boxes which you can break behind the table to reveal a small passage that leads to a hole in the ground, but don't go down there yet; make a note of the hole and head down into the water instead. The hole drops you down onto a ledge with a Spider Shield, above the Giant Rat.
Note: There is a shorter route to the end of the Depths that you can access at this point. But doing so will skip a huge portion of the area and it's items and possibly leave you at a disadvantage during the boss battle. Please see the 'Shortcut' section below this walkthrough for further information.
Helping Hand - Down in the water you'll find two Undead Attack Dogs and a Hollow waiting. Make use of your ranged attacks to dispose of them and then make your way up the pile of rubble down there, then head through the hole in the wall. A second Butcher will be standing on beams above you to the left, as you ascend the rubble into the hallway. Use ranged attacks for an easy kill or bait her cleaver attacks for a backstab. Heading through the door she was standing over will lead you to a large room filled with barrels - Laurentius is trapped in one of them, in the corner of the room. After speaking, with him roll into the barrels to destroy them, to prevent any accidental harm to him while freeing him. Once done he'll now appear in Firelink Shrine as a pyromancy trainer. Head back and continue down the corridor, but be wary of the second Butcher coming from behind if you have not already fought her - you will hear her drop down if you haven't killed her yet (NOTE: The door leading to the sewers can be used to kill the second butcher easily if you are having trouble; lure the butcher to stand outside the door and close it, where she will remain and your attacks will still deal damage through the door. Beware that the butcher can likewise hit you through the door as well so just hit her once then step back, let her attack then hit her again). Move through the door at the end of the hall to make your way down the stairs to the sewers.
Entering The Sewers
Slimy Sewers - Once you enter the water, at the bottom of the stairs you'll see a corpse on your left with an item. DO NOT inspect it just yet as a Slime is hovering above and has a good chance to kill if it falls on you; you can force it to drop with a single arrow or by very slowly moving towards the corpse until it drops ahead of you. Once its on ground level, it is easy to dispose of. Also, be wary of the Torch Hollow that's in the passage ahead as he can sneak up on you if you're not paying attention. Once it's clear, the baited corpse has a Soul of a Nameless Soldier. Continue until you reach a corridor that extends to the right with a Torch Hollow on the opposite end. At this point it is highly recommended that you dispose of that Torch Hollow with a ranged weapon (if available) as a load of Slimes are on the ceiling between you and the undead. You can target some, but not all, of the slimes with arrows or spells as they cling to the ceiling. Or you can sprint past them and deal with them once they've grounded. If you're sprinting - be sure to hug the left side of the wall (facing the Torch Hollow) to avoid any dropping slimes- then it's extra important that you don't have to deal with the Torch Hollow, incase things don't go exactly according to plan. At the end of the slime-infested corridor you'll find a door, unlockable with the Master Key to access a bonfire. (HINT: it is actually better to not use it until you have killed the Giant Rat) But if you don't have the Master Key then the key you'll have to wait just a little bit longer to find the alternative key.

Bonfire Access - Head down the passage next to the bonfire door to find some boxes to your left and a Giant Rat behind the fence - it can't attack you from there, so don't worry. (Tip: If you have a bow, it is possible to kill the Giant Rat from here by shooting arrows through the small gap above the bars. You cannot shoot through the bars, but if you have a spear [the Silver Knight Spear, the Dragonslayer Spear or the Moonlight Butterfly Horn are especially good, but a regular , Winged Spear or Partizan etc. will also suffice.] you can also poke him through the bars). The boxes here can be broken to reveal a ladder leading down; there's no need to go down the for the time being - there is only a locked door down there and it only opens from the other side. Keep heading forward until you reach another t-junction. On the right, is a mob of sewer rats guarding a corpse with a Greataxe. (Tip: this is a good location to farm Humanity items once you have access to the nearby bonfire.) Head to the left but be wary of the box at the end of the corridor as a another sewer rat will leap out of it, so hug the right wall as you move towards the box in order to spring the trap but not get injured. Keep going forward and you will spot a rat running away from you. There are a few more more rats down the stairs on the right next to a reachable corpse holding the Sewer Chamber Key - which grants access to the bonfire if you do not have the Master Key.
Clearing Out the Sewers
Pest Control - Turn around and take the path under the stairs you just came down. You will notice a passage on your right with a drain hole towards the end, ignore this for now and head for the corpse in the distance to obtain a Soul of a Nameless Soldier. If you continue around to the right from there, you will find a fog gate, and through it you will see four Sewer Rats and a Channeler patrolling some ramparts that overlook the boss arena. If you want, you can battle them here or you can take a riskier route for an easier fight. The risky route involves heading back to the passage with the drain hole from earlier. A rat in the distance and will require you to jump over the hole to continue, fail to successfully complete the jump, and you will plunge into the Basilisk Tunnels, which will require you to make your way out again. Skip to the 'Basilisk Tunnels' section below for a survival guide.
Note: It's highly advised that you kill the Channeler before engaging the boss, or be prepared to be shot at with fire soul arrows at you during the boss fight or even have spell buffs on the boss, which makes that battle unnecessarily hard.
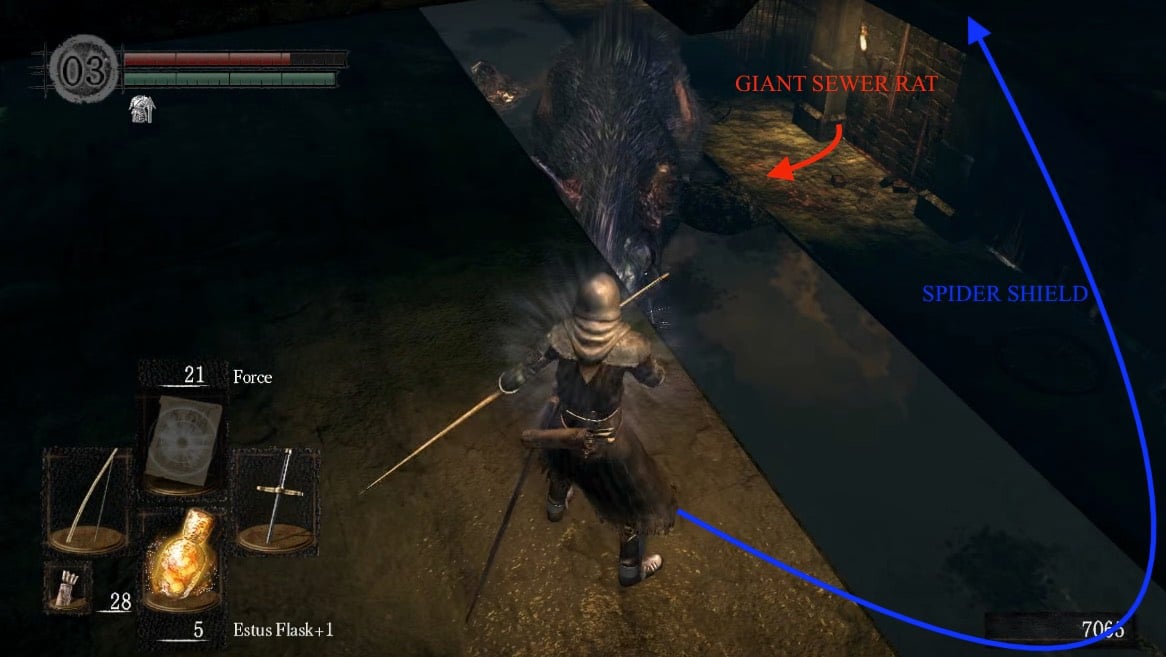
Big Rodent Problem - Past the hole is a passage to your right with another rat at the end. Head in that direction to find a corpse with Soul of a Nameless Soldier at a t-junction - to the left there's an easily overlooked gap in the ground which you should avoid, as this one leaves you in the deepest part of the Basilisk Tunnels. Take a right and follow the tunnel to find the Giant Rat. For an easier battle, make your way back to the kitchen and drop down the hole (we ignored earlier) behind the table. You will land on the ledge mentioned earlier for a very easy fight. While on this ledge, go to the far right and make your way around to the other side of the room to find a Spider Shield on a corpse; dropping down to where the Giant Rat roamed, you'll find a Soul of a Nameless Soldier on a corpse.
Note: The shortcut mentioned in an earlier note can also be accessed from the Giant Rat's room. Again, please see the 'Shortcut' section below for more info.
The Final Piece - Head back to the drain hole and continue down the passage until you reach another t-junction. On your left will be the ramparts with the Channeler and his sewer rat friends and to your far right, a slime and the other drain hole on the ground. Once you've cleared all enemies on the ramparts, move further onto them, past the wooden stairs on the left and continue in that direction. The first two boxes on the left after the stairs are concealing two rats, ready to ambush you. Past them, right at the back you will find a corpse behind the last pillar with a Large Titanite Shard. Now it's time to explore the deepest and most dangerous area of the Depths...
The Basilisk Tunnels
Ugly Creatures - You can reach the Basilisk Tunnels by dropping down one of the holes in the narrow passages, or by accidentally falling down the middle of the waterfall in the Giant Rat's room. Try dropping down the drain hole you saw first, as this is the safest entry point. You will land next to some stairs and a few Basilisk will come around the corner momentarily (NOTE: Try to stay away from Basilisk they spew as their gas can curse you - please visit the Basilisk's page for detailed insight). Before moving along, climb the stairs behind you to find two basilisk ahead of you, one on your right – be ready for it. Continue through the passage to find a couple more Basilisk and a Soul of a Nameless Soldier on a corpse. Try luring the two Basilisks on your left before proceeding. Go right and take the path to the left. There should be five basilisks hiding under the stairs, however some may have gone aggro and attacked you sooner. You will also find a corpse with a Large Soul of a Nameless Soldier.
Do You Bleed? - Head back and take the path leading under the stairs where you are to be confronted by two more basilisks, to your left. Follow the path until you reach a corpse with Ring of the Evil Eye. Go back up the stairs and take a left into the doorway above the ground level you can reach by moving along the left side of the wall. Be careful once you enter the doorway because there is a hole in the ground just around the corner but there is a very tempting corpse on the other side of it holding treasure. You will need to start your run-up from the doorway and time the jump well once you turn the corner to obtain the Humanity on the corpse. Make your way back to the hole you fell through originally, its a mini waterfall next to some stairs. Continue down the stairs and follow the passage to until you reach a t-junction. Go left and be ready for the three rats coming around the corner. This is also where Knight Kirk will spawn, if you are in human form, so be ready for a moderately simple fight - just ensure it's a 1-on-1 and watch out for his bleed (NOTE: Make sure you are in human form so he is able to spawn, and you can begin your journey in acquiring his spiked armor). Head up the stairs, and make your way out of these tunnels.
Route to the Gaping Dragon
How About A Trade? - At the top of the stairs you will find yourself in a room with three Slimes, one of which is on the ceiling, and two Sewer Rats. To your right lies a passage with a long staircase leading you up to a door. Through the door you will find a room with a ladder, which should be familiar to you. It's the ladder revealed much earlier by breaking the boxes and it lets you gain easy and welcome access to the bonfire. To your left there is passage with stairs leading to the boss fight. There is also an opening through some metal bars on the left, where you will find Domhnall of Zena and the big doors that lead to Blighttown.
Teeth - Head into the passage that leads to the boss, move to your right and take the stairs down to the lower level. Continue on right and you will then encounter more stairs going down - this takes you to the fog gate, but don't go down them just yet. Go past them and next to the pillar ahead you may see summon signs for both Knight Solaire and Knight Lautrec, on either side of the pillar, if you are in Human form and their quest lines are still open - they will assist greatly with the impending boss fight. Keep going forward past this pillar to find a corpse with Heavy Crossbow and Heavy Bolts behind the corner on the left. Now that you're ready, continue down the stairs until you reach the fog gate...
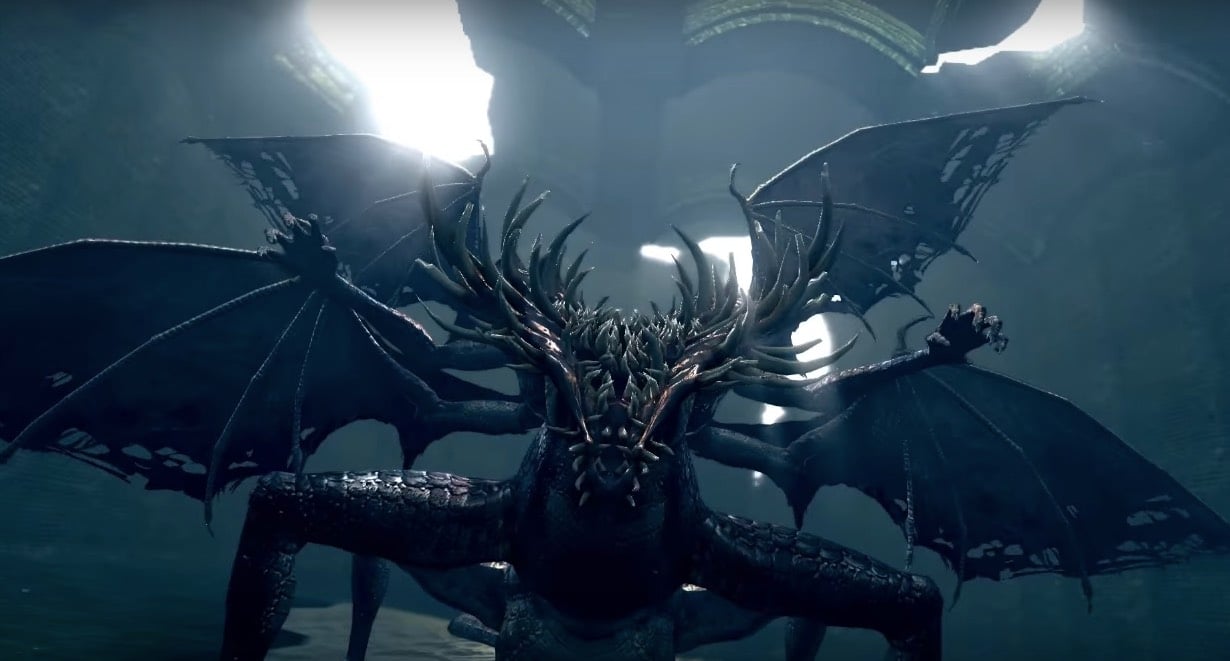
Boss fight: Gaping Dragon
Once the boss is defeated you will receive the Blighttown Key and you can safely collect the Warrior Set that's in the boss arena. Go back to the room with Domhnall of Zena to use the key and enter the next area: Blighttown.
Shortcut
There is a shorter route through the Depths that skips a great deal of the area and leads on to the boss. Beware, doing so without killing the Channeler up on the top level can make the boss fight harder than it needs to be. Please follow the steps below to follow the shorter route:
- Behind the table where the first Butcher stands in the Kitchen section, there are boxes hiding a passage that leads to a hole. Go down this hole.
- You'll then be on the ledge above the Giant Rat's room. Kill the Giant Rat if this is your first trip here and then jump down into the pit where it was.
- You'll notice a waterfall at the end of the room. Approach the waterfall hugging the left wall and slide down. (It might take an attempt or two to get a hang of it as pillars can nudge you and make you fall if you do not correct your path)
- You'll land in the room that leads to the Blighttown doors. Work your way to the other end and take a right to go up the stairs to some ramparts. Going down two more flights of stairs will lead you to the boss' fog gate.
- Step through to fight the Gaping Dragon.
Hints and Farming
As you leave the Undead Burg, you will begin your descent into a kitchen area. Fight your way past the Zombies, being careful not to get surrounded, and prepare for a mini boss during your first visit. You will have to fight a Butcher with two giant cleavers.
There are two types of sewer rats, The smaller ones will leave you alone if you keep your distance. The larger ones will attack.
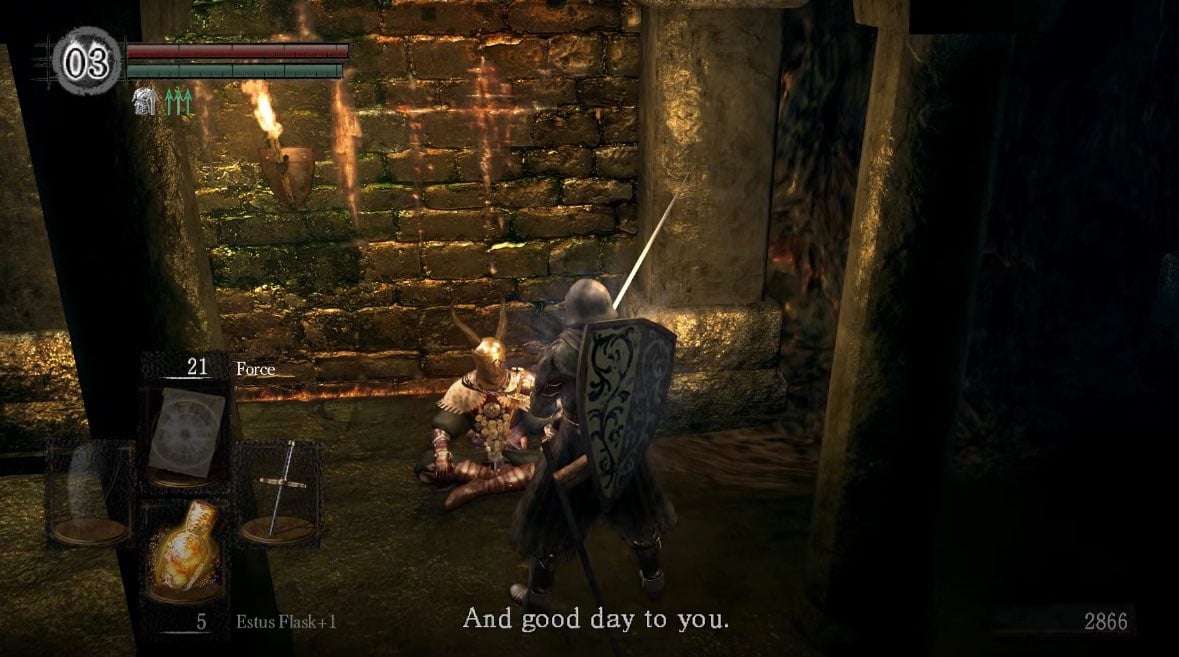
Both Solaire of Astora and Knight Lautrec can be summoned right before the boss if you are human. They will also follow you around, so you can summon them to help you clear the sewer and kill Kirk, before you fight the boss.
If you are not taking the shortcut, there are a lot of good items and farming opportunities throughout the rest of the sewers. Be on the lookout for holes in the drainage tunnels. You can leap over them, but falling through them often leads to trouble.
Watch out for Basilisks, ballooning up to spit a curse. The mist is an area of effect which will very quickly fill your curse meter, and kill you within a few moments of exposure. Those brittle statues that crumble when you walk through them are victims of the curse. It will cause your health to be halved, and can stack, resulting in 1/4 and then 1/8 of your normal health until your reach a healer later in the game, or use a purging stone from Oswald or the Undead Female Merchant. They cost 3000 or 6000 souls (respectively), so it might be easier to avoid the areas with the Basilisks if you don't have any.
Basilisk Farming Strategy: The Basilisks give 200 souls per kill. If you approach them using the ramps near the boss area/merchant then you don't have to worry about dropping into a bad situation. Be careful, and avoid aggroing groups. You can run back out the empty ramps, and make your way back to the bonfire easily afterwards. You can net 2000-2500 per run. The Basilisks also (since the 1.05 patch) drop Eyes of Death fairly often, which are important for the Gravelord Covenant.
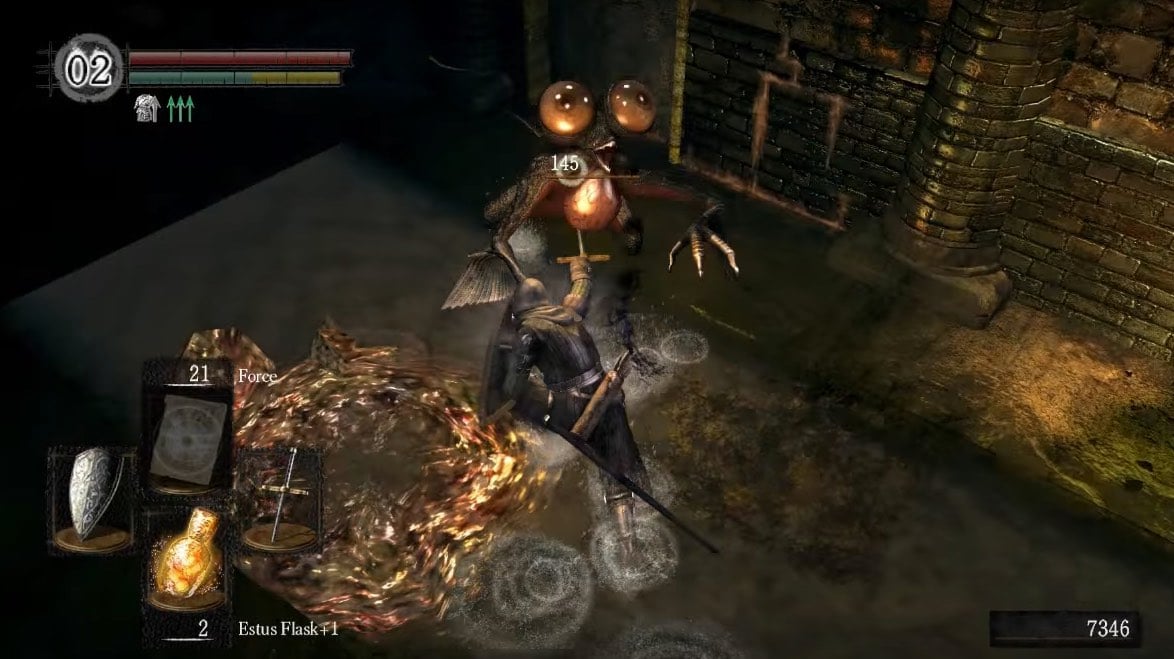
There are also some Slimes, who don't pose too much of a threat if they are on the ground. The real trouble with them is that they can climb on the ceiling, waiting to drop down on you. It is possible to break free should they engulf you by mashing R1 (attack). They are very weak against fire, and drop upgrade stones. One farming technique involves learning a basic pyromancy spell, and finding the bonfire in the depths. When you head straight out from the fire, there are several Slimes on the ceiling ahead of you. Run past them, turn around and flame them all the hell. Pick up any spoils, then return to the bonfire. They will not drop any souls, but as your humanity increases, the upgrade drop rate increases.
It is also possible to farm Sewer Rats here, they have a 1 in 10-20 drop rate of Humanity.
Depths Map

Speed Run Walkthrough
A fast walkthrough of how to get to the end of the level the fastest, picking up only essential items goes here.Notes & Trivia:
- Laurentius of the Great Swamp - Found in the 'Kitchen' section, trapped in a barrel. Free him and he'll then serve as your first Pyromancy trainer once he gets back to Firelink Shrine.
- Domhnall of Zena - Found very close to the big doors that lead to Blighttown. He sells a variety of unique armour sets that are unlocked depending on your actions in the game.
- Solaire of Astora - If in human form, this NPC's summon sign will appear nearby the fog gate that leads to the boss, assuming that you have not killed him already and have followed his quest-line correctly thus far.
- Knight Lautrec - If in human form, this NPC's summon sign will appear nearby the fog gate that leads to the boss, assuming that you have not killed him already and have followed his quest-line correctly thus far.
 Anonymous
- Anonymous
so this is why i always feel underleveled when i smack taurus demon and dart it to blighttown, occasionally ill kill gargs before blighttown but not always, si quelaag is actually wayyyyy harder than she needs to be
- Anonymous
It's kind of a pain to navigate, but the level design is ingenious- there's a hidden Chaneller, a pit of Basilisks, and a shortcut if you surf the concrete next to the waterfall. This is where the game starts to take the gloves off in terms of level geometry.
- Anonymous
Wow I've played 200 hours and I only just found out that I can skip 80% of this area by sliding down the ramp behind the giant rat
- Anonymous
How do I get back to the Hollow merchant after getting the depths bonfire? I got cursed and I know she sells a purging stone
- Anonymous
Lol I skipped this and lower burg because I had the master key
- Anonymous
Let's all just be glad that there are no carnivorous bacteria in this game besides poison and toxin ...
- Anonymous
looks like a 12 years old draw those maps, I'm not criticizing, I love it
- Anonymous
Why is it better to unlock the bonfire after killing the big rat? Just so you don't have to kill the mobs again?
- Anonymous
I love how despite its name, it’s only the depths of the Undead Burg and in reality it’s far higher up in the walls compared to several other parts of the land
This is my first play through ever of the game. But I’m getting invaded by dark spirit twin blade? At the entrance of depths with the hollows. I see nothing about him on the internet. I’ve already encountered and beat the dark Knight spirit next to the rats, deeper in the depths
- Anonymous
- Anonymous
- Anonymous
I’m definetly gonna use this place to farm Humanity. Rats have a chance of dropping it, and there are a LOT of rats.
- Anonymous
What they said below. Sever the tail for Dragon King Greataxe(this should be added aboce under boss notes). Any Knight/Warrior will want to try this out. Swings a bit slow but hits like a truck.
- Anonymous
All this info is great but one of the biggest pieces of information doesn't get mentioned. On the boss fight, CUT THE TAIL. This is stupid easy to do with the summoned NPC's for distraction while you wail on the tail. Upon severing the tail you are rewarded with the Dragon King Greataxe. Base DMG:380, 50STR wield requirement.
- Anonymous
Solaire and lotrec aren't really doing anything though. The best they do is distract the dragon so you can cut off the tail in peace.
- Anonymous
In the Remaster, the Slimes consistently drop 100 Souls a piece, making farming them a grindy, but low risk way to level up.
- Anonymous
I very much disagree that the drain holes are safe entry points to the basilisk nests. The waterfall behind the giant rat is be far the best entry into that tunnel as you get to easily isolate them instead of being forced to fight them in groups.
- Anonymous
Why can't we have these kinds of maps for the Dark Souls 3 wiki?
- Anonymous
How the HELL do you get here??? It says to backtrack to a door before the Capra Demon in Lower Undead Burg, but no map shows the entrance and I'm just wandering around stuck cause I can't find the path. I tried finger, but hole. Plz halp!
- Anonymous
After I destroyed quelag witch in blightown, the Pyromancer trainer(?) turned hostile, I killed him...then I return to the depths, domnhal the Zena is nowhere to be found. Did some rat killed domnhal the Zena which made the Pyromancer trainer hostile?
- Anonymous
Where can I find Andre? I read on the Boss Wep page that he can be found here? Haven't played the game in YEARS and I can't remember. thx
- Anonymous
The bonfire that is unlocked with the sewer key doesn't work
- Anonymous
- Anonymous
2024. Still f*cling hate it.
7
+10
-1