

Sen's Fortress is an area in Dark Souls and Dark Souls Remastered. This dark castle is guarded by monstrous reptilian guards, boulder-throwing giants and numerous traps such as massive swinging axes, boulders and pitfalls. It serves as the gateway to Anor Londo.

General Information
- Previous: Blighttown, Undead Parish
- Next: Anor Londo
- Recommended Levels: 50+
- Bosses: Iron Golem
Video Walkthrough
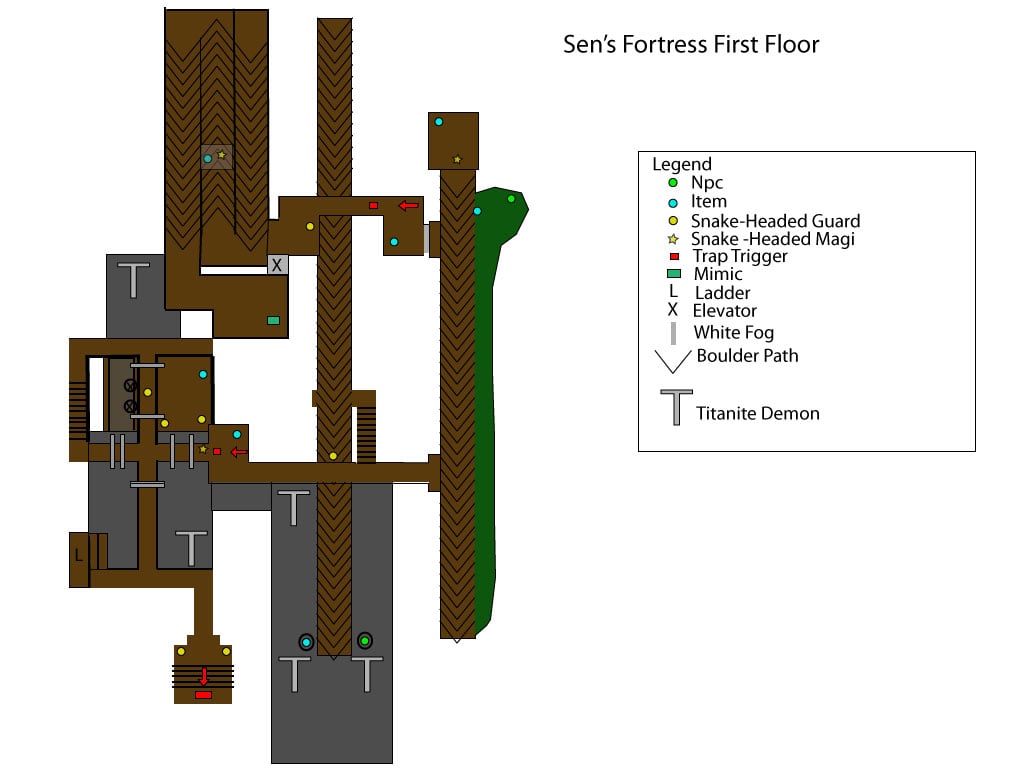
Sen's Fortress Map
NPCs in the area
Bosses
- Iron Golem
- Titanite Demon (miniboss) x4
- Firebomb Giant (miniboss) (3000 souls, Titanite Chunk)
- Gate Giant (miniboss) (3000 souls, Titanite Chunk)
- Rock Giant (miniboss) (this one respawns)
- Ricard the Archer (miniboss npc)
Items
Consumables
- Soul of a Brave Warrior
- Large Soul of a Brave Warrior
- Soul of a Hero
- Divine Blessing
- Humanity
- Twin Humanities
- Large Soul of a Lost Undead
- Large Soul of a Nameless Soldier
- Large Soul of a Proud Knight
- Large Soul of a Lost Undead
- Purple Moss Clump
- Blooming Purple Moss Clump
- Soul of a Nameless Soldier
- Egg Vermifuge
- Divine Blessing
- Repair Powder
- Transient Curse
Weapons, Spells & Armor
- Black Sorcerer set
- Shotel
- Balder Side Sword
- Scythe
- Sniper Crossbow
- Spear (lightning infused)
- Ricard's Rapier (dropped by NPC)
- Covetous Gold Serpent Ring
- Flame Stoneplate Ring
- Slumbering Dragoncrest Ring
- Ring Of Steel Protection
- Rare Ring of Sacrifice
- Hush (Sorcery)
- Rapier
- Balder Shield
- Buckler
- Light Crossbow
- Balder Helm
- Balder Armor
- Balder Gauntlets
- Balder Leggings
- Man-Serpent Greatsword
- Flamberge
- Symbol of Avarice
- Lightning Spear
- Crystal Halberd
- Occult Club
- Gold Coin
- Silver Coin
- Crystal Knight Shield
- Dung Pie
- Prism Stone
- Copper Coin
- Gold Coin
- Silver Coin
Upgrade Materials
- Red Titanite Chunk
- Titanite Chunk
- Twinkling Titanite
- White Titanite Chunk
- Green Titanite Shard
- Large Titanite Shard
- Demon Titanite
- Dragon Scale
- Blue Titanite Chunk
Keys & Other
Enemies
- Man-Serpent (Soldier and Mage)
- Undead Knight Archer
- Balder Knight (Rapier and Buckler, Sword and Shield, Ranged)
- Mimic
- Vagrants
Full Sen's Fortress Walkthrough
The Entrance & Ground Floor
The Fortress - Through the door at bonfire above Blacksmith Andre in the Undead Parish, you will find the gates to Sen's Fortress. Though initially locked upon your first encounter, Siegmeyer of Catarina waits on the steps of the gates, in hope of entering the fortress as well. Both, the Upper and Lower Bells of Awakening, must be rung to prompt the Giant to unlock them; so you should probably get ringing before you head this way - click on respective bells to find out how to ring them.

The Gates - The first room contains a new enemy, or two, Man-Serpent soldiers; they are as easily lured as most enemies you encounter in this game. Beware of the arrow trap triggered by a pressure plate on the floor - it will fire three arrows out of a slit in the middle of the central staircase. When life gives you lemons, you can lure one of the Man-Serpents out to the middle and trigger the plate at the right time to kill them. Before continuing up the stairway, break the pots adjacent to the doorway to find a Soul of a Brave Warrior.

Swinging Guillotines - Atop the stairs, you'll find a massive room. You'll immediately notice Sen's fascination with pendulum guillotines - these may be referred to as swinging blades or any of the four bolded words combined [for some variety]-, which make the walkway more challenging to cross. With a little bit of patience, the blades are fairly simple to avoid. You may also notice an out-of-reach item, in a hole on the wall, a level above you to your left - we'll get to this in a second but for now, we go forward. (If you wonder what lies beneath the walkways and wish to venture into the depths of this room, please check The Pit)
The Pit
NOTE: You can go down into the pit here to kill some strong enemies, get souls and some items if you wish, but it can be difficult. If you want to skip this for now and come back here later, then skip to Traversing the Fortress and its Traps - otherwise, read on.
Face Your Titanite Demons - Look down and you'll see a Titanite Demon directly below you on the right side of pit - luckily you can also target him from up on the ledge. Once targeted, you should be able to easily take him out with ranged attacks if you stand close to the edge.
Once the first demon is defeated, be sure your you have a full health bar as this next step requires you to drop down - which in case you haven't guessed will include some major fall damage. Once at the bottom, you'll find the ground covered in a tar-like goop that limits movement - equip the Rusted Iron Ring for easier navigation in this pit. Down here you'll find another three Titanite Demons - four if you haven't killed the one we advised you to - that do not respawn. Head forward toward the row of three pillars but beware of the three Serpent Mages up on the ledge at the end - you should be able to take them out with arrows while remaining out of reach of their spells. Continue forward toward the pillars and you'll see another Titanite Demon in the tunnel behind them - with the pillars in the way, this guy should prove to be an easy kill using ranged attacks - in his tunnel you'll find a Large Soul of a Brave Warrior and the Scythe. There's a passage on the right side, near the pillars, that leads to a long, wide corridor with two more Titanite Demons - there's nothing else down there though. These two demons can also be easily taken out with ranged attacks from within cages in the same room as Big Hat Logan, who you can choose to encounter later.
To leave the the pit, head for the room in the corner next to where you initially dropped down, with a ladder that brings you up to the out-of-reach item from earlier, and by hitting the blocked-up archway up here you'll reveal a secret ladder to the top of the fortress where you can kill the Giant that opened the gate. Now head back down to the ledge where you arrived at this room, first.
Traversing the Fortress and its Traps
Passing the first two blades is this easiest bit, passing the third and fourth, you will be targeted with lightning spells by the Man-Serpent mage from the walkway above. There will also be a Man-Serpent soldier on your walkway, at the underpass of the walkway above (Tip: You can engage the soldier with an arrow and get him to make his way towards you - through the blades. A few well placed arrows, aimed at the mage may also knock him from his perch and cause his fall to death).

More Guillotines - No bow or arrows? Then pass through the swinging guillotines as quick as you can and fight the Man-Serpent soldier under the walkway holding the Man-Serpent mage; this blocks the mage's attacks from reaching you. Proceed quickly to the end of the walkway, through the door, passing another blade. Head left and up the stairs to arrive at the walkway above to find a set of 4 more swinging blades, between yourself and the mage throwing lightning your way, earlier.
Another Trap - There is another pressure plate arrow trap before the chest holding 2 Large Titanite Shards, you see in front of you; trigger it to active the three arrows from the dispenser in the wall straight ahead, but keep your shield up (or roll to the side) and you should be fine.

Continue left through the door and you'll see a sleeping Man-Serpent soldier leaning against a wall on the walkway below - if you wish to rescue Big Hat Logan, leaving this guy alone can help with doing so later. Continue forward and refrain from rushing out the doorway; large boulders are roll down from the left past your doorway, in intervals. The Man-Serpent soldier right outside will prove to be an example of what happens if you don't watch out for the boulders.
As soon as a boulder passes, take a left up the ramp and sprint to the door on the left with the fog gate, but don't go through yet. You can head up further to find a Man-Serpent mage at the top of the ramp. A bow and arrows allow you to peek out of the first door before you attempt the sprint up the Boulder ramp. You can see the Man-Serpent mage in the doorway, just under and out of harms way of the boulders. Whilst exercising caution, a cheeky arrow to the mage will aggro him into coming after you, and subsequently, get flattened.

We Meet Again - In the building behind him you'll find a chest holding the Ring of Steel Protection. After looting the chest, head out the door which you came from and drop to the left of the ramp to find a weapon - the Shotel. Hop down a platform further to find two Man-Serpent soldiers and Siegmeyer of Catarina again; if you want to avoid a tough fight and continue his quest-line, ensure you don't strike him. Follow the wall of the ramp until you can head back up and enter the fog gate; remember to time your run with the falling boulders.
Another Trap - Past the fog, you will find an empty room, with a booby-trapped corridor on the right - a pressure plate that shoots three arrows from the dispenser behind you. There is a Man-Serpent soldier on the left in the next room. On the left of the room, is a doorway with rolling boulders on the outside.

Beware The Boulders - Let a boulder pass by and then chase it down the winding ramp (NOTE: Any form of contact with the boulder registers as it hitting you), avoiding the spells of the Man-Serpent mage on the rafters above. Keep following the ramp down until you reach the hole in the floor and take the door on the left to avoid the next boulder. You can head into a secret room behind the hole, but you'll have to wait for more boulders to fall in and fill it before doing so. Once it's full, wait for another boulder to knock a hole in the wall and follow immediately after it, taking a sharp turn on the first left. You'll notice a corpse hanging on a window close-by; loot it for the Covetous Gold Serpent Ring, but be careful not to get smashed by the next boulder. There's nothing else in here, so go back the way you came in and take the door on your right.
When's A Chest Not A Chest? - The noticeably askew chest on the ground in the next room is a Mimic - don't open it! This is likely the first time you'll meet one of these, so take note. You can tell a regular chest from a mimic by the chain attached to them. A regular chest has a chain that curves somewhat to its front and then back in, while the chain on a mimic just goes almost straight outwards. There are a couple of other subtle differences, but the chain allows you to tell at a glance. If you open them they will try to eat you whole and can inflict massive damage with this attack. If you ignore them they won't become hostile, but they're worth killing as they drop valuable treasure, this mimic has a Lightning Spear. You can also make them go to sleep and open by throwing a Lloyd's Talisman at them.

There's a lift in the corner of this room, but beware of the rather devious trap it holds. As it goes up, it'll stop for a moment at a point where you can get off - ensure you do so, as the lift will continue to elevate into the spiked ceiling (NOTE: If you need to take this lift down later, wait for it to go up into the ceiling and come back down again before you get on). From there, go up the stairs, cross the bridge then down the stairs, and finally run up the ramp to find the room with the boulder aiming mechanism.
The Boulder Aiming Room
You Have The Power - You can send the boulders where you like at this point. There is a platform in the center of the room with a lever to rotate it, allowing you to aim and fire boulders through one of four openings on each side of the room (NOTE: Wherever you push the lever to, the boulder will roll down the opposite way). Turn it counter-clockwise once to fire the boulders down to where you saw the sleeping Serpent Soldier from earlier. Let a few boulders go down this way and then turn the lever counter-clockwise again - if you ignored the sleeping guard from earlier, then you'll know when to turn the lever again once you collect the souls from his death. If you don't have the Master Key, then you may as well skip to a little later - otherwise, read on.

Go down the path where you were just firing boulders and you'll see that they have made a hole in the wall that you can pass through. In the resulting room, you'll see various hanging cages on either side of the walkway. Near the end, you'll see Big Hat Logan locked in a cage on the right, and you'll also find a Soul of a Hero in a cage to the left. Other cages, when opened, can be used to range attack the two Titanite Demons in the tar-pit below. Talk to Logan, and then use the Master Key to free him. If you don't have this key, then neither cage will open for you right now, and you'll have to come back here later once you have obtained the Cage Key. Make your way back up to the boulder aiming room to continue.
Sorcerer Set - Change the direction of the boulders to allow you to go down the path with the winding ramp that you chased a boulder down earlier. Taking this path, hop right off the side of the stairs from the highest point you can, and you should land on a ledge with the Man-Serpent mage who was shooting at you while you were chasing that boulder earlier. After dispatching him, collect the Large Soul of the Proud Knight and head towards the archway in the wall you just dropped from. Enter to find the Black Sorcerer Set and the Sorcery: Hush then head back to the mage's platform.

Back Again - Through the hole in the wall, find a small cell with the bars on the windows pried open. Be warned; it's a long way back up, but if you go through the window here and drop down, you may have to battle a Man-Serpent soldier to find the Slumbering Dragoncrest Ring on that floor. You can make your way down from here through a hole that has a series of ledges along the sides of it that you can drop to, and at the bottom you'll be in the tar-pit. If you didn't clear out the Titanite Demons from down here earlier on, then either get your Rusted Iron Ring out and run or prepare for a fight. Alternatively, you can drop into the starting room where you first saw the pendulum guillotines (with a bit of fall damage) on the same ledge you found the ring. Make your way back up to the boulder aiming room again.
The Journey to the Roof
Another Trap - Back in the boulder aiming room, in addition to the four large openings you can shoot boulders through, there's also a doorway. Proceed through this passage, and look out for another booby-trapped pressure plate; this time 4 dispensers shoot 3 arrows each from the left. Doesn't matter how fast you think you are, your best bet would be to trigger the plate and retreat until the trap has finished its cycle. You'll then be greeted by another set of swinging blades along another thin walkway. For this group, sprint through them all in one go and try not to fall off (You may find that rolling through them is more effective, if you are particularly slow due to heavy armor).

In the room at the other side of the walkway, there's a Man-Serpent soldier down a corridor on the right with a floor-less doorway, that drops down to the pit, behind him - be careful. Turn around and you'll see a staircase with a Man-Serpent mage at the top. Take care of the mage, but don't go up there yet - take the passage to the left of the stairs first instead to find a Man-Serpent soldier and 3x Large Titanite Shard.
Traps Everywhere - Go back up the stairs, to come across the final set of swinging blades on the thinnest of the walkways. Before taking them on, you should take out the Serpent Mage to the left of the walkway, with ranged attacks. To get past the blades here, take them on in pairs. Past them, you should see a fog gate to your right up some stairs, and a path to the left to the area the mage was at. Beware of the two pressure plates that trigger the arrow trap, one on either side - the arrows come from the left if you trigger either switch. Go through the fog gate and you'll find yourself on the roof of the fortress.

The Rooftops
Saving Grace - Once on the roof, you'll see the Rock Giant straight ahead of you - he's the one that's been dropping boulders into the boulder aiming room. He's harmless, but kill him with arrows if you please, just note that he respawns. Now, it is in your best interest that you turn left and continue up the stairs. Be wary, as you are about to be greeted by some huge firebombs. The Firebomb Giant on the roof will be hurling these down, every chance he gets until you get to him. After one explodes, wait for the flames to subside and then run quickly up the stairs, continuing up the second flight of stairs ahead of you. Up here you will notice a corpse on the floor holding a Large Soul of a Brave Warrior, and if you look to your right you may notice an opening in the wall - drop down here to find the only bonfire in the area.

Make your way back up, following the only available path, to end up at the fog gate once again. Head right, down two flights of stairs to find two Balder Knights, and a chest with the Flame Stoneplate Ring.
Tower Knight - Ascend the third flight of stairs where you'll see another corpse holding a Large Titanite Shard. Going straight leads you to a Tower Shield Knight with a painful mace, however can be taken out using arrows without getting his attention by standing before the stairs leading down to him. Past him, to the left, descend the ladder and continue along the path toward the tower ahead where you will be attacked by Ricard the Archer as you climb the stairs - he's an easy fight and drops Ricard's Rapier. Past him you will find two chests holding a Divine Blessing and a Rare Ring of Sacrifice.
Becoming A Sniper - Head back the way you came - where you found the second corpse with the Large Titanite Shard. This time go up the stairs to the left and you'll find yourself on an elevated walkway - beware that the Firebomb Giant can still land his firebombs on you. The path splits into two here with a jumpable gap on the left side; if you take a running jump off the walkway and straight forward towards the Rock Giant you will land safely on the ledge of his rooftop. Turn around, look down and at the bottom you will see a corpse - drop down here to find a Sniper Crossbow and some Sniper Bolts. From here jump down to find the Flame Stoneplate Ring and Balder Knights we saw earlier.
Finding Shortcuts - Make your way all the way back up to the walkway again, ignore the jumpable gap on the left again and take a right for now where the path forks yet again once inside the building. Left is an Undead Knight you can safely ignore, and a vagrant spawn point. Going right leads you into a room with two hanging cages in it, but without the Cage Key you won't be able to open them. Once you get the key, these can take you down to the first room with the swinging guillotines, opening up a valuable shortcut that by-passes a lot of Sen's Fortress.
On the other side of the room with the cages, you'll find a door leading outside again and up to a thin walkway that turns two corners. There's an Undead Knight Archer firing at you here and the Firebomb Giant can also throw bombs in the way. You'll have to be quick about traversing the walkway, but follow it around without falling off and you'll have your melee fight with the Archer, if you didn't kill him already.
Put Out The Fire - In the next room, you should see the fog gate which leads to the boss - you can look out the windows beside the gate to get a early glimpse of him if you want. A quick detour up the spiral staircase, opposite the fog gate, will allow you to deal with the pesky Firebomb Giant. To defeat him just stay close behind him, hack and slash at his legs and back away when he begins to stomp. Eventually, he'll throw a tantrum and just drop; this allows you to attack him freely. He does not re-spawn once he's killed. His death will not only reward you with 3000 souls, but with the peace of mind of your safety from fireballs for the remainder of your rooftop travels.

Crestfallen Logan - Head back to the jumpable gap in the walkway. Make your way back to it and take a running jump over the gap (being under 25% equip load here will help make the jump easier), continue onwards to find the Crestfallen Merchant inside the tower. Head down the stairs to find a Man-Serpent mage on a bridge. Behind him you will find a corpse with the Cage Key, which will allow you to access a soul and free Big Hat Logan (if you didn't have the Master Key already) and unlock the two hanging cages for the shortcut mentioned above.

The Iron Giant - With all that done, now it's time for the boss. Make your way back up to the room at the top of the fortress with the fog gate; but If you're in human form, you may want to take one last detour. Instead go through the doorway to the bridge and run across to find a room where you can summon Iron Tarkus to help with the boss fight. When you're ready traverse fog gate.
Boss Fight: Iron Golem

To Londo - After the boss fight, you will be rewarded with the Core of the Iron Golem and a Humanity, and will also see a glowing orange ring in the centre of the arena. Touch the ring and you'll be treated to a cut-scene where you're carried away by three Bat Wing Demons who safely deliver you to Anor Londo.
Note: If you want to get back, turn around and talk to the bat wing demon perched on the wall, and you'll be taken back to the Sen's Fortress boss arena.
Sen's Fortress Map

Speed Run Walkthrough
A fast walkthrough of how to get to the end of the level the fastest, picking up only essential items goes here.Notes & Trivia:
- Big Hat Logan - After breaking a hole in a wall with a boulder (note the wall can be broken by hitting it with your weapon), you'll find him in a cage that can be opened with either the Master Key or the Cage Key that you find in the area.
- Crestfallen Merchant - The merchant can be found across a broken bridge after reaching the rooftop. You must run and jump across to make the gap.
- Siegmeyer of Catarina - He can be found outside the gates before they open and once they are you can find him near the first rolling boulder section.
- Iron Tarkus (Summonable NPC) - His summon sign is found in the tower across the bridge nearest the boss' fog gate, but only if you are in human form. He helps greatly during the boss fight.
 Anonymous
Just an FYI, if the Mimic ends up jumping down the shaft and dying, you can miss the Lightning Spear it drops. I just had it happen and tried quitting and reloading, shutting down the entire game and reloading, and going from offline to online and it's not at the Mimic spawn point. Not a tremendous loss since you'll be able to make one shortly, but be aware.
- Anonymous
killing the titanite demons has significantly impacted my mental health. To heal, I will praise the sun
- Anonymous
This place ain't that bad if you take your time and don't run like a maniac. Basically like the entire game. Just go slowly, look around and don't rush like an idiot. You will die more than once anyways but it's worth to stay cool and slow.
Also this place has Iron Tarkus and Crestfallen Merchant which automatically makes it a good place to visit :)
- Anonymous
- Anonymous
- Anonymous
A little tip.
If you die after killing the Titanite Demon but before you could pick up the loot it will be gone forever.
- Anonymous
- Anonymous
Top tip: use fog ring, demon spear and shield. Your life will be waaay easier here
- Anonymous
Yo lvl 50+ recommended?! Sorry if I’m just trash but that just doesn’t compute, my first character was like lvl 30 and my most recent character is only level 45 and I’ve only lost about 3 levels worth of souls. Any side areas/bosses y’all did before this to get that high?
- Anonymous
i thought blighttown is terrible, and then i found this place
thanks miyazaki
- Anonymous
- Anonymous
I love it when you meet your friend black marcus inside of snake fortress
- Anonymous
- Anonymous
Sen is an unsufferable D-bag that likes to hang up swinging blades powered by a perpetual motion machine. You can make perpetual motion and THAT is what you use it on???
- Anonymous
- Anonymous
- Anonymous
Bit pissed off they added all items that could potentially drop to the list of stuff
- Anonymous
As a newbie, I find this area delightfully frustrating. I can’t wait to find all the cool stuff in the fortress and get through it with less difficulty
- Anonymous
it seems like all the mid/late game areas have "hidden" bonfires. so obviously a new player is gonna struggle amd keep dying and keep getting sent way back to the blacksmith bonfire back in the parish , thinking wtf, how did they expect you to do this all in one go? never noticing that hidden bonfire to drop down to from the rooftop.
or like, in another area, with seemingly no bonfire , because the bonfire is hidden behind an illusion wall that has to be stuck first.
of course, a veteran with metaknowledge will know where all the bonfires are.
so basically, they checkpoint starve the players that need the checkpoints the most. ..
- Anonymous
- Anonymous
This level was veeeery annoying at first ngl, but once I got to the end of it I realized i want more of this brutal classic dungeon crawling gem of a level.
- Anonymous
The firebomb giant falls down to his knees if you cast Poison Mist on him. Easy clap.
- Anonymous
Once you memorize the enemy/trap placements, this place isn't that bad. But yeah, the first time through is brutal. At least the boss is easy.
- Anonymous
- Anonymous
I found this place to be 1000000x more annoying than Blighttown tbh, although I do suppose it's kind of funny
- Anonymous
I have first hand experience of how big the fortress is and I am still surprised to see how massive that map is!
- Anonymous
This thing seems to be very easy to take out with high poise, it got and his hands and knees quickly to accept my battle axe
- Anonymous
- Anonymous
- Anonymous
Near the bonfire is an excellent soul/shard farm. Camp, run out, kill mage to right, run up stairs, take right kill two balders, go back up kill iron knight, go further up, shoot balder that keeps shooting at you, then shoot titan that keeps dropping boulders, then on way to cage shortcuts kill other balder. Run back and carefully fall back to bonfire, rinse and repeat. Easily get 99 of titanite and large titanite shards with having 10 humanity and gold covetous serpent ring, plus one run I just described yields 4300 souls, assuming no overkill bonuses. Takes like 2-3 minutes tops.
- Anonymous
"Who is the evil architect who built this fun house full of traps?"
"Sssssen!"
"Ah, that'right, baby!"
- Anonymous
This is probably the funniest area/level of any game I've played - from the lizardmen getting smashed by boulders and swinging axes to the chest that can eat you to the boss that you can smack off a cliff, everything in Sen's Fortress is so bloody hilarious, and that's a big part of why I love it so much
- Anonymous
If you want some extra humanity, just invade inside the fortress. There's a big chance that the host's gonna die before you even get to see them
- Anonymous
Crest Key AND Archive Tower Cell Key are BOTH NOT FOUND IN THIS AREA
I do not know how to but some edit that **** out please, it's cringy someone even put the effort in placing it here.
- Anonymous
- Anonymous
- Anonymous
- Anonymous
- Anonymous
Blighttown and this place are brutal hellholes that make Dark Souls the game it is. Hard but possible areas. After you are done breaking down multiple times and crying for a desperate bonfire, once you finally get there, the feeling is amazing.
- Anonymous
why does this page list items in anor londo and the duke's archives? why is the lightning spear on here twice?
- Anonymous
so you are stuck once you fall in the tar pit or something?
because i didn't see any way out (except the doorgiant's balcony that is a dead end)
- Anonymous
- Anonymous
This area is downright unfair but I love it. First blind playthrough of DS1 after completing its two sequels and getting halfway through bloodborne. Gonna feel so good when I get to the end of SNES Fortress... IF I get to the end of it.
Ah! A treacherous man-serpent stands in my way on this narrow pathway! But i do not fear him, for my powerful WINGED SPEAR can inflict a large amount of damage from a distance, all while keeping my balance so that I do not fall in the frightful pit below. The powerful WINGED SPEAR shows us yet again that it is indeed the best weapon ever.
In case you were wondering, the man-serpent by the cage shortcut can ride the elevator up with you. I love me some cage fights haha.
- Anonymous
- Anonymous
okay who designed this flipping house out of satans backyard? this place is almost harder than getting past the londo archers or the slamjam bros, i hate this place so dang much, but for some reason everyone calls it a funny name so i call it "Sen's Funhouse of Doom"
- Anonymous
- Anonymous
- Anonymous
- Anonymous
- Anonymous
idk if this is intentional or something but the crest key is in the upgrade materials list for some reason
- Anonymous
- Anonymous
Fk’ing love the cutscene of Sen’s Fortress opening. Hard to describe just what it is but there’s no hype up or music like the Anor Londo reveal it’s just the giant gate raising with the sun shining through. It’s really raw and gives off just the right amount of intimidating vibes.
- Anonymous
PHUCKING TRAPS PHUCKING BOULDERS I JUST WANT A PHUCKING BPNFIRE PLEEEEEASE
- Anonymous
It only just occurred to me that the absolute nightmare fuel which is none other than the two optional Titanite Demons may be intended for a later return as they have literally 3X the health of the other two who are visible at the start, chain aggro very easily and the titanite they drop is the only loot obtained in that part unlike the other two whom one guards loot and the other is close to the ladder that leads up to the illusiory wall
I actually really liked this area, Dpeths and Blightown gave me way more trouble
- Anonymous
The whole castle will be your enemy. Chosen Undead with a thousand enemies. Be cunning and full of tricks. And you shall never be defeated.
- Anonymous
Passing through this is about as fun as passing a kidney stone, except the kidney stone is the size of one of the boulders here
- Anonymous
Who doesn't love to be invading and see a whole gank crew with the host? Who also doesn't love fire tempest used on the narrow walkways? "Let the bodies hit the floor..."
- Anonymous
Would have been nice to know where to exit the most dangerous part of the location when I'm neck deep in tar and multiple titanite demons or that I didn't even have to be there...
- Anonymous
- Anonymous
- Anonymous
is it me, or are you supposed to do 28 damage per swing with a falchion? I have 20 dex and a +6 falchion, and a regular two handed swing deals 28 damage per hit, I deal better damage against the big knights with maces and greatshields. Am I taking the wrong route here?
- Anonymous
Sometimes the pressure plate trap at the entrance does not reset after death or resting, and remains disabled until you die/rest at the bonfire a second time.
- Anonymous
i've rung both bells, but the gates to the fortress still closed, what am i missing?
- Anonymous
- Anonymous
- Anonymous
- Anonymous
Might want to add a note to the lightning spear because on remastered its a wl10 weapon and will bump you up to that if you are not already at or past wl10. This goes for the crystal halberd and crystal knight's shield in anor londo and duke's archives respectively, though you're at less of a risk of prematurely bumping up your wl at that point.
- Anonymous
Just a mildly general knowledge I would like to point out here since it is interesting to be think of, at least for me, after reading several comments earlier than mine. One could say the English version of this particular location's name, Sen's Fortress, is a mistranslation from the Japanese version which some believed should have been "Fortress of Thousand". But then in the Japanese version, it was written as センの古城 which is pronounced "sen no kojou" which directly translates to "Sen's Old Castle/Fortress".
Now in Japanese language, foreign words are usually written in katakana. "sen" in katakana would be セン of course, in hiragana it would be せん which is a roughly accurate alternative to write 千, a kanji character meaning "thousand". [continue]→
- Anonymous
The fight with Iron Golem is the easiest one for me so far. Not a big deal though since I summoned Iron Tarkus prior to entering the battle. Equipped the Shadow set that I got from Blighttown, Ring of Steel Protection and Cloranthy Ring, Pyromancy Flame+10 with Firestorm attuned, was lucky enough to get the Black Knight Greatsword, and an Eagle shield I forgot to unequip from my successful attempts of killing all 4 Titanite Demons in The Pit.
Just need to stay under him near his back heels, I was fast enough to roll and sprint if anything bad happens. Just double-hand your weapon and no need to worry about blocking his attacks. He fell down later and then used Firestorm as much as possible and boom, one-go'd this boss. And of I go to Anor Londo weeeeeeeeee
- Anonymous
- Anonymous
You can break the big hat logan wall without boulder if you R2 the snake soldier to the wall with black knight sword. I did this totally on purpose..
- Anonymous
So I fought the mimic, but it pushed us both in the trap elevator. The elevator going up, I can't get out with mimic blocking me, eventually the elevator killing us both. Here is the thing: The supposed to drop Lightning Spear is nowhere to be found. The mimic disappeared, as it doesn't respawn. There is no item in the mimics room or at the elevator. Quit and reload, still nothing. Well **** me.
Also first Titanite Demon didn't drop anything. Well **** me again. Playing on PC.
- Anonymous
Can we agree that this mysterious Sen not only had a strange sense of architecture but also an extremely bizarre sense of humor?
- Anonymous
You think having to run across a very thin platform with swinging blades and magic snake people is bs. Well better stock up on poison arrows to make entering the palace in anor londo slightly easier
- Anonymous
- Anonymous
- Anonymous
I played a lot of mario maker so spotting traps and avoiding them is my specialty. So I am totally fine with most of the stuff here. However, the two titanite demons in the water at the beginning are bs. If you want a 1v1, you trap yourself in a corner. Otherwise, you better kill the first one quick or you're *****ed. They're attacks also seem to always combo into eachother when they shouldn't. You get hit once and then either get sucked into the tail hit or the front of the second swing. Of course you can dodge, but you can't dodge closer because that will usually bring you into the tail or into the vision of the next one. There's also nothing in the area, which makes it only worthwhile for completionists and people who need the demon titanites. Besides that, the fortress is fun to navigate. You don't just run down a single path like other areas, you need to backtrack and loop around. Honestly love that, especially since the last areas were incredibly boring one way paths.
- Anonymous
There is an item at the right side of the first bridge... Near the elevator... Anyone knows how to go there...?
- Anonymous
- Anonymous
Crest Key does not belong under upgrade materials, or on this page as it is a dlc item.
- Anonymous
Anyone know how to disable the swingy-axes? I remember being able to turn them on and of with a lever or something, but I can't remember where. Does anyone here know?
- Anonymous
I'm a level 46 Pyromancer, and I still have trouble dealing with the Snake-Headed Guards and the Snake-Headed Magi. What should I do?
- Anonymous
- Anonymous
- Anonymous
Best way to avoid being crushed by boulders is quit and reload midway. That will reset the boulders
- Anonymous
- Anonymous
Sen was a master architect who was forced to cut labor costs after working on Sen's Fortress for a few years. He had spent too many souls on swinging axes that he had run out of strong building material. This explains why when the boulders hit some walls, the walls do not break, but when it hits others, those walls break. Also, his original guards were going to be Silver Knights. But Sen did not have enough money to pay them. So they took off there armor and left it inside. Sen was forced to hire Man-Serpents instead, and he payed them in large rats (Depths)
How the heck did Sen roam around here without getting gored on his own deathtraps? Never mind the enemies placed to make the already stupid bridges even worse, when said enemies would otherwise not even be a real issue. Love most of the rest of this game, but this place? "Point Down" gestures for days.
- Anonymous
Hate this place. the enemies are pretty easy, but this platform***** is *****ing with me
- Anonymous
Indiana Jones would scream if he say this temple, with all of the snake people in it.
- Anonymous
Just finished the location and it's just amazing, hated it at first but after half an hour you understand the layout and I loved it in there.
- Anonymous
How is there nothing online about The Dark Spirit "Sen" invading players on the rooftops? Tries to kite players into the hitzone of the boulder throwing giant !!!
The most cancerous level in dark souls... Or so you'll think for a while. Then you'll meet the bonewheels and silver archers who will help you reassess.
- Anonymous

Ok the cage Shortcut is a relief but the bonfire on top just made me run again backtrack to smith after cage xD
0
+10
-1