

Undead Burg is one of the first areas of Dark Souls and Dark Souls Remastered. This area is divided in two sections. Section 1 is known as the "Upper Undead Burg" is a linear section leading to the Undead Parish. Section 2 is accessible through a locked door on the Wyvern bridge that can be opened with the Basement Key found in Undead Parish and serves as the gateway to the Depths.

General Information
- Previous: Firelink Shrine
- Next: Undead Parish
- Recommended Levels: Any
- Bosses: Taurus Demon
Video Walkthrough
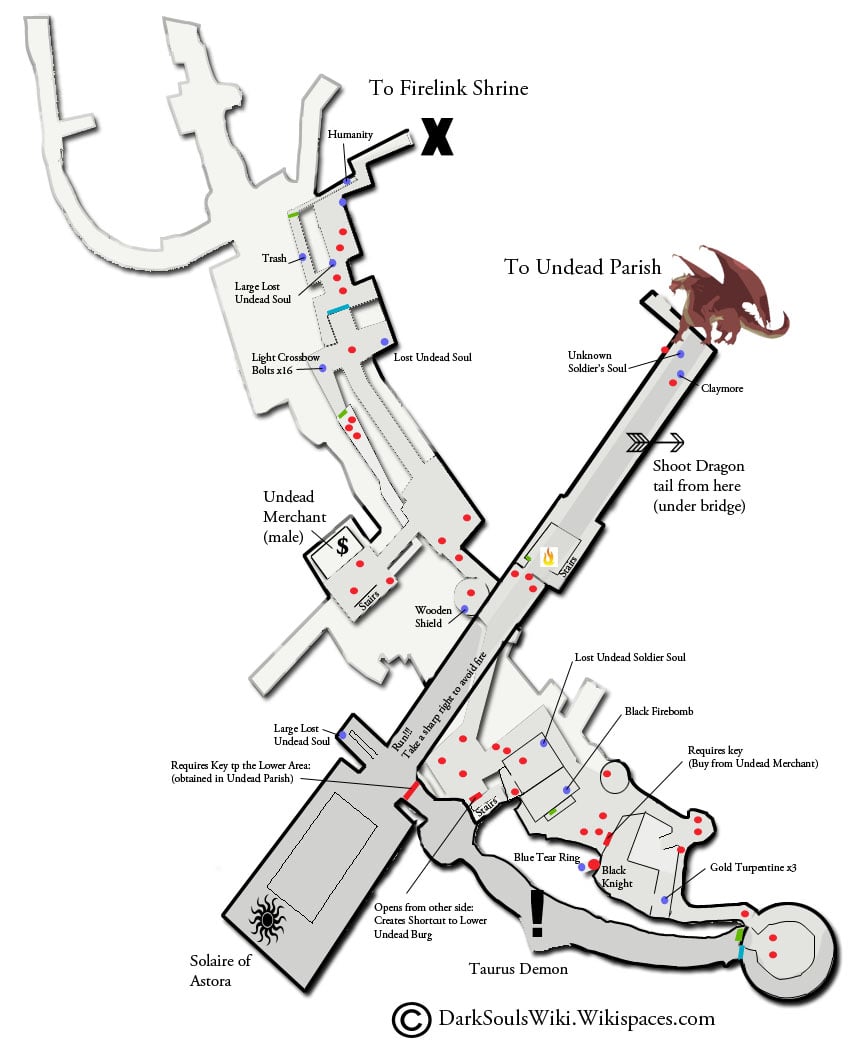
Undead Burg Map
NPCs in the area
Bosses
Items
Consumables
- White Sign Soapstone
- Gold Pine Resin
- Soul of a Lost Undead
- Large Soul of a Lost Undead
- Humanity
- Black Firebomb
- Throwing Knife
- Charcoal Pine Resin
- Purging Stone
- Repair Powder
- Transient Curse
- Divine Blessing
- Large Soul of a Lost Undead
- Twin Humanities
- Large Soul of a Nameless Soldier
- Large Soul of a Proud Knight
- Purple Moss Clump
- Blooming Purple Moss Clump
- Soul of a Nameless Soldier
- Egg Vermifuge
- Divine Blessing
- Repair Powder
- Transient Curse
Weapons, Spells & Armor
- Light Crossbow
- Broken Straight Sword
- Short Bow
- Standard Bolt
- Drake Sword
- Blue Tearstone Ring
- Wooden Shield
- Black Knight Shield
- Black Knight Greatsword
- Black Knight Halberd
- Black Knight Sword
- Dung Pie
- Prism Stone
- Copper Coin
- Gold Coin
- Silver Coin
- Longsword
- Spear
- Light Crossbow
- Hollow Soldier Shield
- Hollow Soldier Helm
- Hollow Soldier Armor
- Hollow Soldier Waistcloth
- Bandit's Knife
- Target Shield
- Hollow Thief's Hood
- Hollow Thief's Leather Armor
- Hollow Thief's Tights
Upgrade Materials
- Titanite Chunk
- Twinkling Titanite
- Large Titanite Shard
- White Titanite Chunk
- Blue Titanite Chunk
- Red Titanite Chunk
- Green Titanite Shard
- Large Titanite Shard
- Demon Titanite
- Titanite Shard
Keys & Other
Enemies
Upper Undead Burg Walkthrough
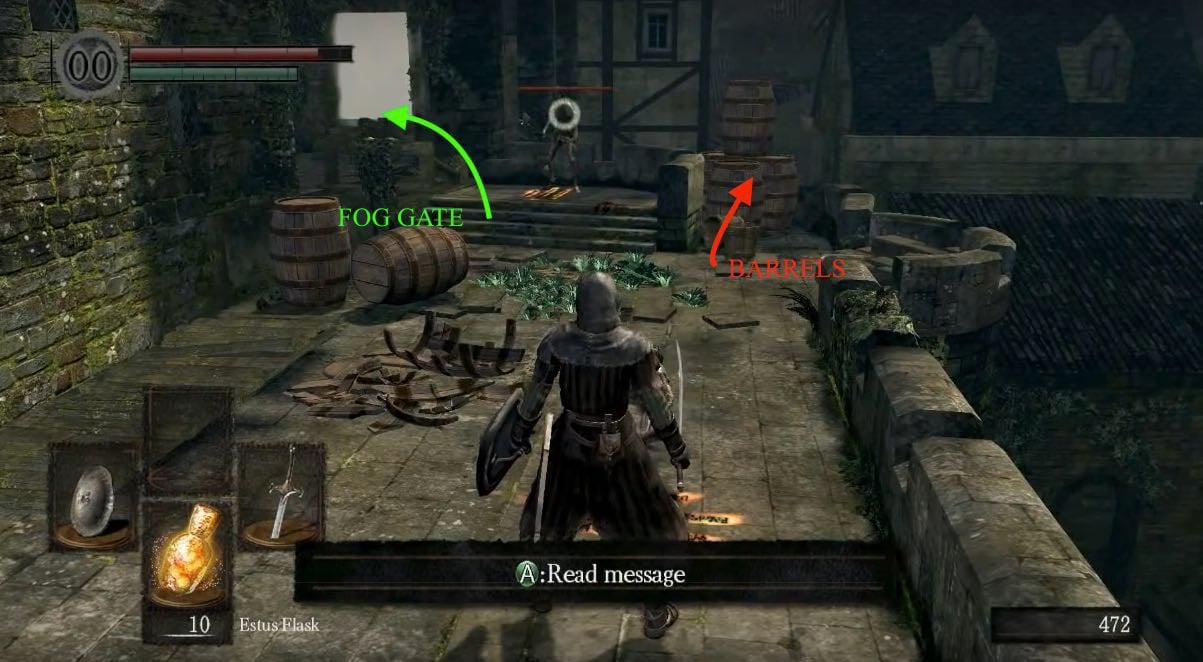
Welcome to Undead Burg
Having arrived at the rooftop from the Firelink Shrine, through the aqueduct, expect to encounter two Armored Hollows. The first wielding a sword and shield, the next an axe. NOTE: As you advance to seemingly the only path to available (up the few steps and across the small bridge on the left), you may notice some barrels at the end on the right, make a note of this section as we'll come back here later. When you cross over the bridge on your left, firebombing Hollow will engage you. There is a fog gate on the right and opposite it, a building holding another Armored Hollow (sword and shield). Dispatching the Firebomber quickly is key in avoiding a very uncomfortable fight, once you garner the attention of the Hollow in the building. When the battle is well and done, you have two options: enter the fog gate, or destroy the barrels. This is completely down to you as you will eventually do both, it's just a matter of which you'd prefer to do first.
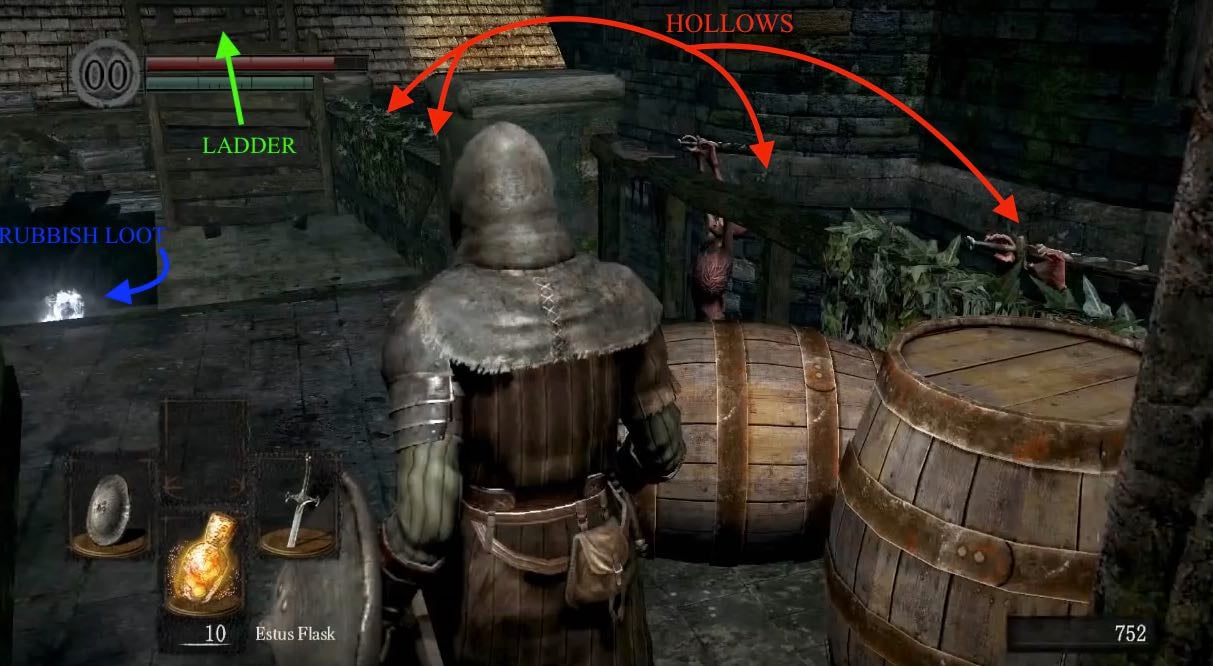
Barrel Destroyer - This route -is a lot shorter, so I recommend doing it first but it's not a requirement- will see the destruction of the barrels mentioned above, which reveals a ledge you can drop down to and find a Large Soul of a Lost Undead. You can drop down once again into an ally where a Hollow patrols the area, if he spots you he will either run away or attack you. Should he run away, don't chase after him as he may lead you to a sticky situation if you're not careful, but be ready to fight up to three of them. Once on the ground, take the door on your immediate left. Up the stairs you will find another corpse with a Soul of a Lost Undead. Head back out to the ally and take a right and proceed. In the even you haven't triggered them during your confrontation with the patrolling Hollow, two more will be hanging on the other side of a wall and will climb over to attack you once you are close to them. Dispose of them and make your way into the building on your right, past the bridge. From the other door, you will see an item on a corpse outside. Be warned that this is a trap - there are more of those hanging hollows on the right waiting for you to come close, four in total. HINT: There are two hollows hanging on your immediate right. You can strike their hands to make them drop before they have a chance to climb over. Once they're dead, you may proceed to the corpse and loot some Rubbish (Note: despite the name, this item can eventually be traded to a character named Snuggly for a nice item, so ensure you pick it up). Head straight ahead, up the ladder, and follow walkway to the end to find Humanity on a corpse. Turn around and drop down at the broken section of the walkway to find yourself back at the rooftop. This time proceed through the fog gate.
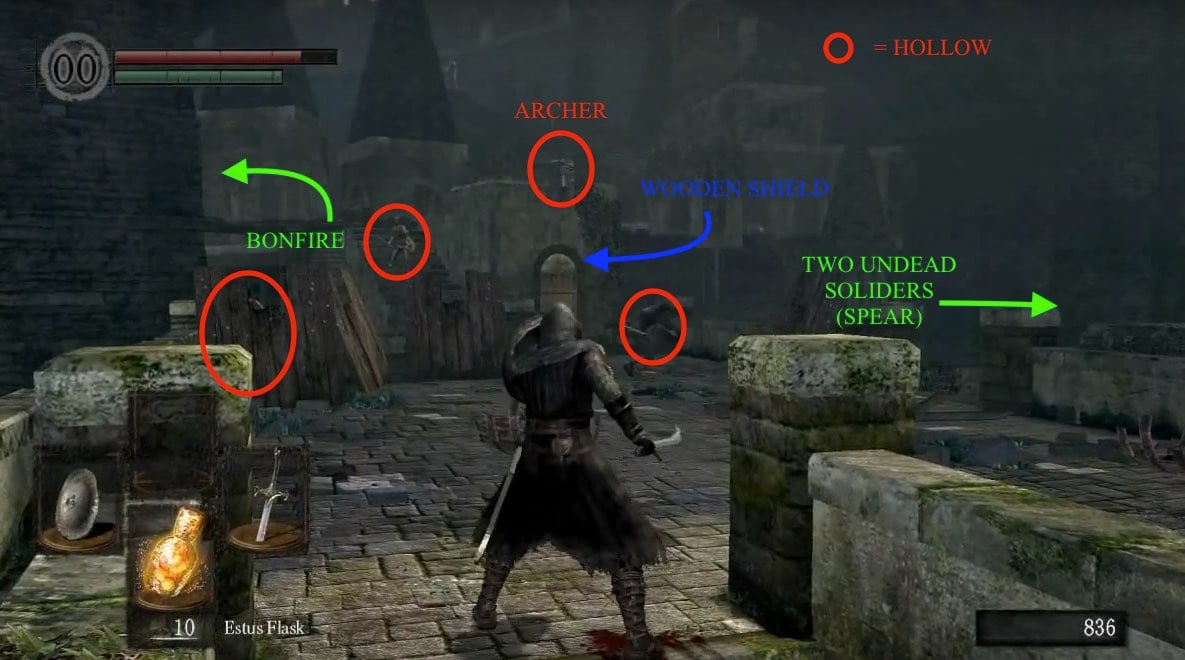
Into the Fog - Enter the fog gate. Under the stairs on the left, rests a corpse with a Soul of a Lost Undead. Head up the stairs to find two doors; one with a broken wooden bridge that leads into another door that is impossible to access from here - don't worry, we'll find another way around. Should you try, you would fall back onto the roof of the aqueduct. The other door leads up a flight of stairs, into an outdoor wall walk. Reaching the top of the stairs, a large dragon known as the Hellkite Drake, will crash down overhead. Move back quickly and put your shield up once you hear him, as it can hurt/kill you should it connect. It'll only be there for a moment before it flies off. Once it does, continue up the steps in the same direction,. In the distance you may spot some enemies, the two closest to you are of your primary concern, although there should be a total of 4 Hollows in that will engage you (1 Archer, 3 sword & shield). The Hollow Archer will draw its bow and target you from a distance while the melee Armored Horrows engage you. There are two Hollows hiding behind the wooden barriers ahead, and one standing near to the archer. To avoid unnecessary arrow damage, you can try to lure the sword-wielding Hollows down the steps you just came from, removing you from the line of sight of the archer and enabling you to defeat them easily. Once done, head across the courtyard, up the stairs and deal with the archer (Note: You may notice, a door on the structure directly under where the archer was shooting. If you have the masterkey, you can enter the space to find a Wooden Shield on the corpse, on the balcony. At the top of the stairs on your left there's a room with a bonfire - but since we have cleared out a lot of enemies it may be best not to use it just yet, but the choice is ultimately yours.
Exploring Around the First Bonfire
Into the fog Pt 2 - Head back down to the courtyard to find two spear wielding Undead Soldier, on your left. These guys are tough to take out once their shields are raised, so it is advised that you use a ranged attack to take them out one at a time. Kicking while their guard is up will stagger them and leave them open to attack. If you have any Pyromancies such as the starting fireball pyromancy, or some firebombs, you can kill them with a single shot by standing at a middle distance and lobbing the spell or firebomb so it arcs beneath their shield and hits their legs. This is a useful tactic with many shielded enemies, so it is worth practising a bit by resetting these two soldiers a few times via the bonfire. If you are lucky they may also drop a Hollowed Shield. Just be careful not to be surprised by a sudden spear thrust, as the two soldiers will occasionally turn aggressive or even leap at you.
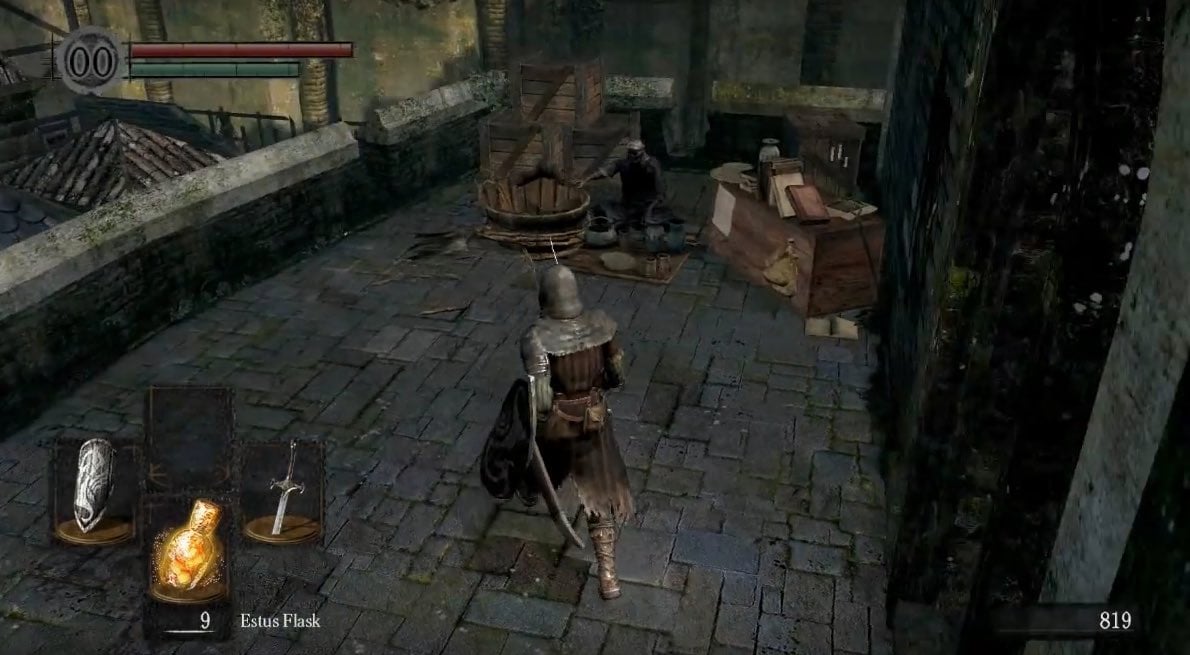
Into the fog Pt 3 - Once the two spear wielding Hollows are dead, head over and destroy the boxes initially behind them to reveal stairs leading downwards. Down the stairs, the door ahead will lead outside where you will find the Undead Merchant. Before you go talk to him, turn right and just on the other side of the fireplace is an axe wielding Hollow hiding behind some cabinets. Kill him now to ensure your safety when dealing with the merchant. The merchant has some useful items for sale. The Residence Key (if you haven't got the Master Key) and the Bottomless Box are incredibly useful. Other good items he sells include: Firebombs, a Short Bow, and Repair Powder (Note: If you can't afford them, doing few runs from the merchant to the bonfire, collecting the souls of the Harrows you dispatch, to enable your purchases). Also, you can kill the Undead Merchant, which rewards you with the Uchigatana, however it is not recommended as he can sell you a lot more. Head back inside from the merchant's balcony and turn left into a corridor then down the stairs and at the back of the resulting alleyway there will be four shield-less Hollows. Take care of them and continue down the ally to climb the ladder. You'll end up at rooftop where you will find a corpse with Throwing Knives (x10). Straight ahead you will see the doorway with the broken wooden bridge. Where earlier it wasn't possible to run jump onto it, here it is. Once you do, head up the stairs onto the ledge to find Light Crossbow and some Standard Bolts (x16) on a corpse. Jump off this ledge through the gap in the railing and you'll be back on the rooftop where you entered Undead Burg. If you haven't already, you can now proceed to destroy the barrels and the route that follows.
Beyond the First Bonfire
Battlefield - If you head back to the bonfire room, on your left there is a bridge, but be warned that there will be three FireBomber Hollows at you from above (one is behind the church tower) as you approach and cross it. You can try and shoot them out if you have a crossbow or a bow, but that may take some practice so it's highly recommended to just sprint through and keep as far right as possible. Once you enter the doorway at the other end, you'll be out of range of the fire bombs but will encounter two axe Hollows and an Undead Soldier (sword). Also be aware that one or two of the firebomb hollows from earlier may have dropped down here. (Note: This door will already be open the next time you come here and you should travel a small section of the bridge to lure the undead soldier across the bridge toward you and once he is gone you can then proceed onwards and get rid of the axe hollows.) You will also notice a locked gate in this room that you will be able to unlock it a bit later from Lower Undead Burg.
Head out the door and take the next door on your right into a building. On your immediate right a Hollow will attack. Go straight through to reveal another armed Hollowon your immediate left. Back in the first room will be some stairs to another room on the left. In here, a chest holds Black Firebombs (x5). Head back outside and ascend the stairs on the right into an area with three more aggro Hollows, one of which throws Firebombs. After you have disposed of them, there will be a ladder to the left of the stairs you came from. Once ascended, you'll find the three Firebombers that tried to kill you earlier when crossing the bridge, and you can kindly return the favour. There will be a corpse up here with Soul of a Lost Undead. Head back down the ladder and enter the small tower on your left to silence the archer Hollow atop.
Back downstairs there is a building on your right that you can unlock with the Residence Key (or the Master Key). Head through to find a chest containing Gold Pine Resin (x3). If you have a ranged weapon, you can take care of the three Undead Soldiers that are visible from here. If not, drop down off the ledge here and engage them. Here you will see some stairs leading down, and some leading up:
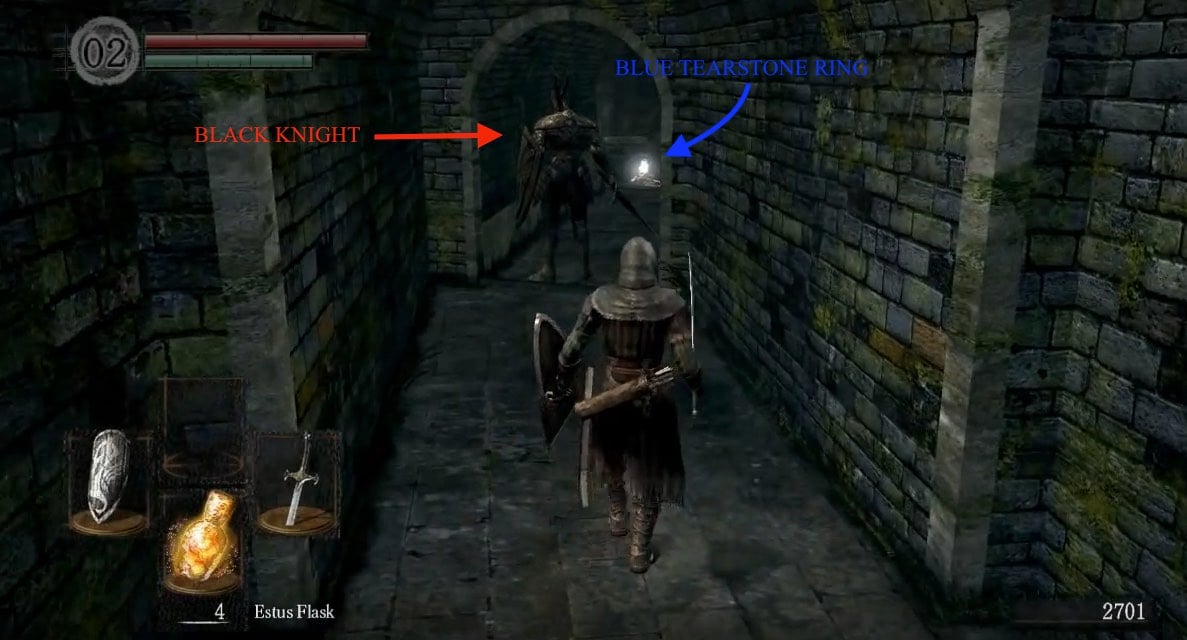
The Darkest Knight Brings The Lightest Loot - The downward stairs lead to the intimidating sight of a Black Knight, but luckily he has his back to you. At such an early stage in the game these guys are tough, but if you are feeling brave you can attempt to take him on - be warned however that at low levels a straight melee fight will be a challenge. If you lure him out and run back to the ladder that lead up to the firebomb Hollows, he won't be able to follow you up the ladder and will give you an opportunity to kill him through ranged attacks - firebombs work well for all character types. If you have experienced summons with you, they may also be able to handle him for you. He will drop a Titanite Chunk and possibly other valuable items such as a Black Knight Sword or Shield once killed. Past where you met the Black Knight you will find the Blue Tearstone Ring.
Undead Donkey Kong - The upward stairs leads toward a tower, but proceed carefully because at the top there is an Undead Soldier waiting to roll a flaming barrel down the stairs once you take the second flight of stairs. There is a broken section in the wall you can drop down (carefully) to avoid the trap - once the trap is set off, it does not reset. Alternatively, go just far enough up the stairs to set off the rolling barrel, and then run back down around the corner. Once the trap is sprung and the Undead Soldier is defeated, head up the stairs into the tower.
The Taurus Demon's Tower
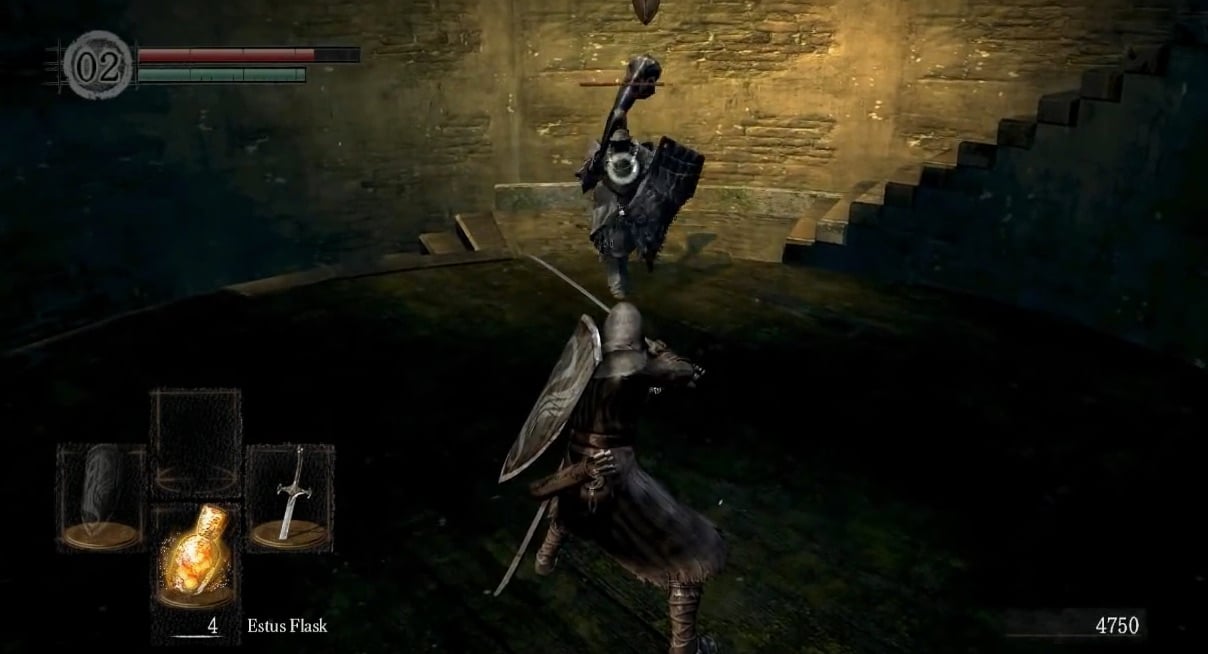
Rock Bottom - Inside the tower you'll find a door straight ahead of you that can be opened with the Master Key but it's best to avoid this area for now because Havel The Rock is waiting downstairs, although if you have summoned spirits with you it is worth a try. Even if you manage to defeat him, there's only a locked door down here (it opens as a shortcut between Undead Burg and Darkroot Basin later in the game), so you will have to go up to proceed regardless of if you decide to take him on or not. Note: If you do decide to try your luck with our friend Havel, be wary. If he hits you with his weapon, which is a dragon's tooth - yeah, you're in trouble -, you are dead regardless of your shield, or anything; conserve your stamina and use it to mainly roll out of the way of his attacks.
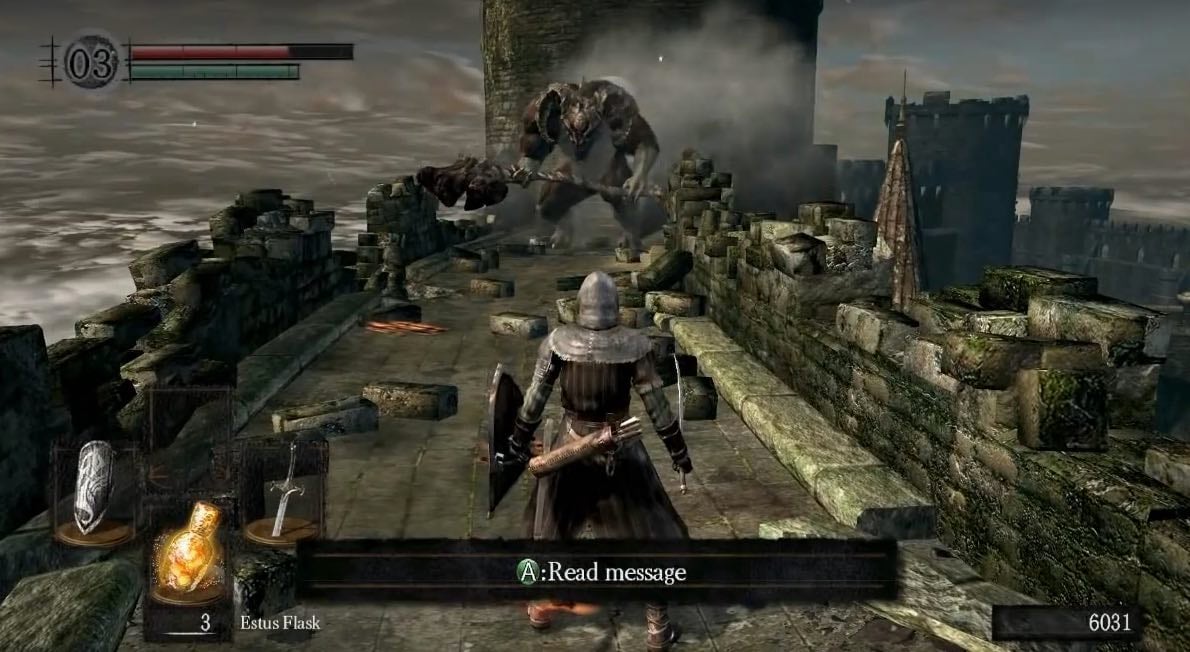
Mess With The Bull... - Head up the stairs until you are two floors up from the tower's entrance and then take out the barrels here to reveal a Crystal Lizard which you should quickly dispatch to receive some Twinkling Titanite and another random Titanite drop. Proceed to the fog gate and through it, find yourself on some battlements with another gate at the end, but don't cross the bridge yet. Ascend the ladder on your immediate right instead to find two Hollow archers (with swords) that will attack you once you reach the top. Kill them then go back down again and start crossing over. About three quarters of the way across the bridge, a monster will come crashing down in front of you...
Boss fight: Taurus Demon
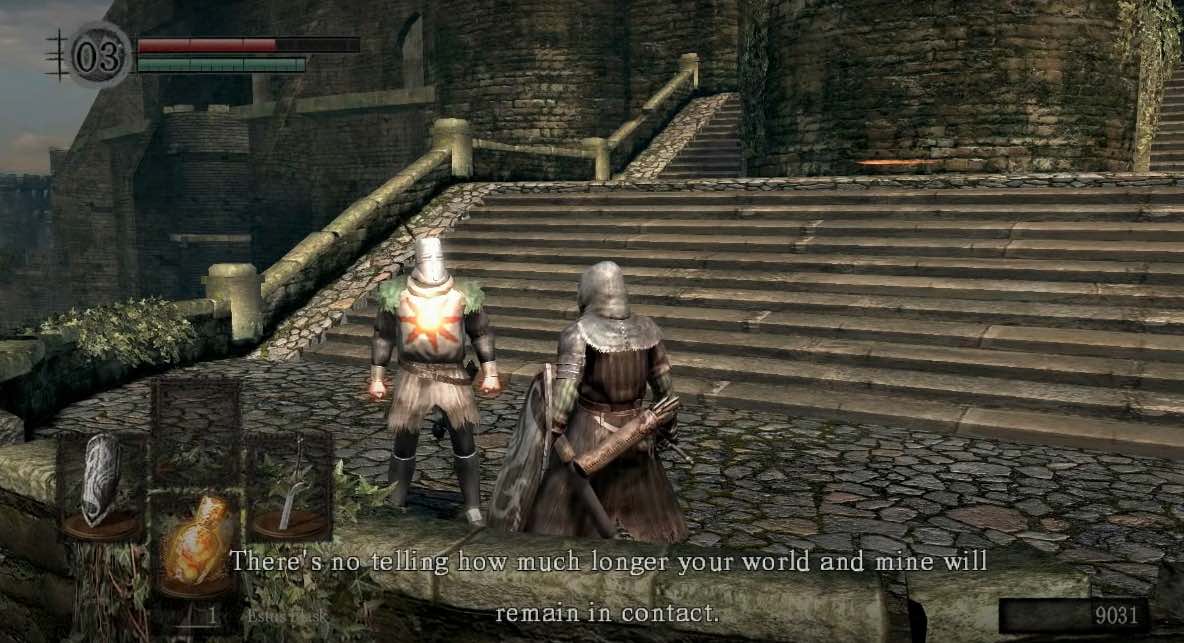
Meeting Solaire
Sun Of A Gun - After defeating the Taurus Demon, head through the fog gate at the end of the boss arena. There are stairs leading down but before heading down, destroy the boxes at the end to find a Large Soul of a Lost Undead. At the bottom, you will see the locked door that will lead you to Lower Undead Burg - you'll find the key later. To your left there's a wide and long bridge with some enemies on it, and if you continue to the right you'll find Solaire of Astora out on the platform looking at the sun. Praise the Sun! If you answer YES to all his questions he will give you White Sign Soapstone - giving you the ability to join co-op with other players to help take on bosses in their world.
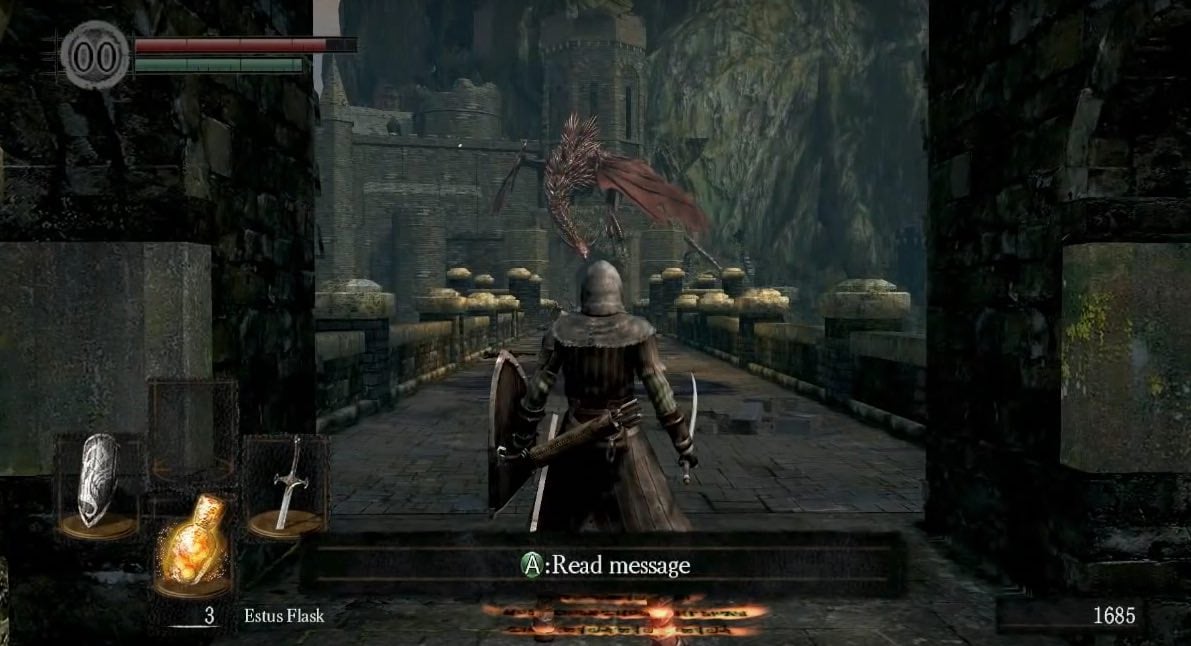
The Wyvern Bridge
Can You Handle The Heat? - Go back to the long bridge with the enemies and proceed across it. If the Drake is not at the end, it will come flying from behind - either way, there will be loads of fire when you are about halfway across the bridge. There are two openings ahead, one on the left and another on the right. The one on the right has some stairs going down - that is the one you want to aim for. Raise your shield and start running towards the stairs on the right of the bridge, hugging the right side of the bridge as you go. Ignore the enemies but avoid the arrows since they will slow you down. As mentioned, about halfway across the Drake will spew fire, killing all the enemies (and hopefully not you). Hint: The Heater Shield (purchasable from the Undead Merchant in Undead Burg) and its increased fire resistance may prove useful here if you are having difficulty making it across. Head down the stairs and you will see two doors. One leads under the bridge and the other is a shortcut to your last visited bonfire. Take the one back to the bonfire first and note that you will need to kick down a ladder to open a way back up. IMPORTANT: Make sure you kick down the ladder first to open the shortcut for good. Once this is done, go back up and take the other door that leads under the bridge.
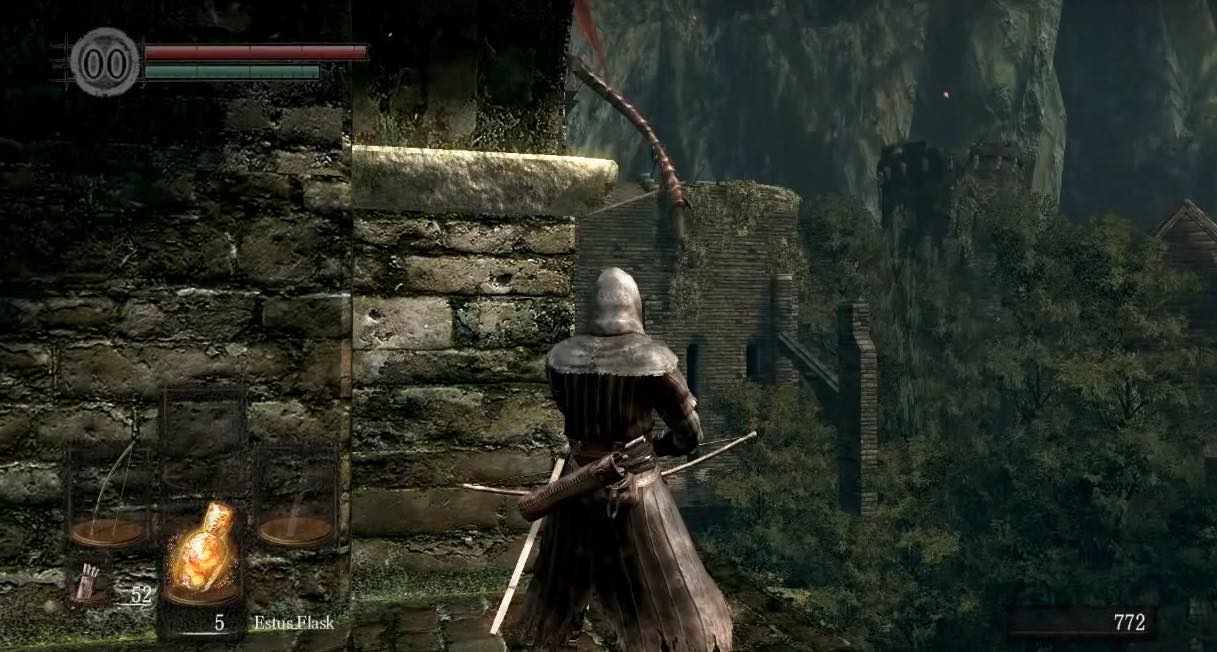
Down here you can obtain a weapon that's very useful for low level characters: the Drake Sword. You obtain it by shooting the Drake's tail multiple times with arrows from below the bridge on the right side until it breaks off. Note: Once done, you should be aware that there are three ways you can proceed. One way will allow you to go under the bridge, ignoring the Drake and the other two ways will require you to either run past or kill the Drake, but these methods will open up a shortcut to the Undead Parish, a bonfire and a covenant (the Warrior of Sunlight covenant - read up on this covenant to find out how to join):
Method 1 - Under the Bridge: While under the bridge, go around the pillars. Past the second one an Undead Soldier (sword) lurks. Take the path to the left of the last pillar and you will see a Undead Soldier (spear) patrolling. Past him you will see a door leading into a room. This part can be tricky since three poisonous sewer rats will rush you (and possibly knock you off the edge if you're not careful). Either try lure them out or rush inside and get rid of them. They are poisonous, so proceed with caution and keep that shield up. (Should you get poisoned, don't freak out. Being poisoned will only drain HP slowly, so if you just keep an eye on your health and use flasks when you need to you should be okay. Return to the bonfire to remove the poison and try again) Once inside the rat room, you can climb a ladder on your left to reach the Undead Parish.
Method 2 - Running Past the Drake on top of the Bridge: You can brave a sprint straight through to the passage below where the Wyvern sits, but this might be a tall order and having high fire resistance is recommended. So if you sprint from the top of the stairs on the bridge towards the other safe zone on the left side, it will usually cause the Drake to breathe fire, helping you with any remaining Hollows in the area. Then simply wait in the other safe zone until the Drake gets bored (usually takes no more than 20 seconds) and it will leap down onto the bridge. Alternatively, shooting an arrow at it from the stairs will make it leap down right away. The second it does this, quickly bolt through its legs towards the doorway behind it. It's worth trying to pick up the Claymore on the corpse on the right as you run. If you make it through it is possible that the Drake may turn around and breathe fire into that area, so if you want to be safe you can hang a sharp right in the passage and run out the door here. Pulling the lever in there will make the Drake fly away and open a shortcut to Undead Parish. There is also a bonfire in here and a doorway leading to the covenant mentioned above. Enter the Undead Parish through the newly-opened gate.
Method 3 - Defeating the Drake: There are a number of ways to kill the Hellkite Drake (as further detailed on its discussion page), including moving to the left side under the bridge and shooting it in the neck with arrows as it patrols back and forth. (With the Patch this method has been fixed, the Drake heals, when health drops by 25%.) However, if you prefer melee, then what follows is also a viable option - but will likely take a few tries to perfect, so don't be discouraged if you die a few times. Stand at the top of the stairs to the side of the bridge so you can see the Drake's head, shoot it with an arrow to make it jump down and then ready your preferred weapon (ideally the Drake Sword), holding it two-handed. As soon as the arrow hits (and not before) start running out to the middle of the bridge and do a jump attack. The Drake will have come down to you by the time your strike lands and it will hopefully hit him right in the head, taking off a chunk of his health. As soon as you can, run back and down the stairs to avoid his attack and wait down there for him to go back up to his perch. Repeat this process a few times and he'll eventually expire, giving you a load of souls, allowing you to traverse bridge at your leisure, letting you pick up the items and get to the room at the back to access the bonfire and covenant. Pull the lever and go through the gate to enter the Undead Parish.
Whichever method you decide to use, you'll be at the Undead Parish once you're done.
Undead Burg Map
Speed Run Walkthrough
A fast walkthrough of how to get to the end of the level the fastest, picking up only essential items goes here.Trivia & Notes:
- Burg means Castle in the german language.
 Anonymous
Remastered player here, I didn't need the Masterkey to open the door to the Wooden Shield.
- Anonymous
Tower barrel trick.
The flaming barrel is 100% avoidable. Go in the house and down where u get the golden resin, take out your bow and shot the hollow soldier with an arrow. He'll knock it down and u will be untouched. :)
- Anonymous
The Crystal Lizard didn't appear for me. Bugged, or should I reload the area? Worth noting that bird or whatever didn't appear in the undead asylum nest either, earlier in the run. Playing the remastered PS4 version on the latest updated if that makes a difference.
- Anonymous
- Anonymous
- Anonymous
How the fckkk do I jump across that gap in the beginning? I've been trying to do it all game every time I come trhu here and I can never make it work
- Anonymous
Dark Bead twinks plague this place and the most upsetting part is that they went through all the trouble to make their characters only to be the ultimate example of boring.
- Anonymous
this is such terrible advice for the wyvern bridge part about crossing it, i tried the heater shield instead of the black knight shield i had been using thinking i must have misread the thing in game and it still one shots me, the heater shield isn't even good for fire resist, it's 15 lower than what i already had!
- Anonymous
I got lucky. The day before I shot his tail off, couldn't kill him when I was on the bridge, kept getting burned up. Today I ended back up there this time way in front of the bridge and soldiers. I shot some arrows at him but couldn't reach, so I shot at the two soldiers closest and they walked up to me and I killed them, then I tryed getting the Hellkites attention by running up a bit by the burn marks on the road I heard him roaring and ran back under by the stairs when I looked he turned around and disappeared, I thought maybe I could run the whole bridge before he comes back but I figured it was a trap, next thing you know my soul counter started filling up with the 10K you get if you kill him. I then moved toward the tower killed the other soldiers, got the goodies and left.
- Anonymous
- Anonymous
This guide is really over cautious about Havel. Sure, he does a lot of damage, but if you have a bit of extra stam and a 100% shield.. I just walked around him in circles backstabbing him to death.
- Anonymous
Firebombs didn't do any significant damage to the Black Knight. Firebombs did around 20 damage and Black Firebombs did around 40 damage.
- Anonymous
to kill the dragon you can just go to the tower of the gold night ,just up the rats and shoot a single arrow at his back , the dragon will be so surprise to forget how to fly and fall to it's Death, not sure if it's suppose to do that or not , but works for me
- Anonymous
- Anonymous
- Anonymous
- Anonymous
- Anonymous
Why do i have to become a member to view the maps? I need to register, because what? You don't like people *****ing?. That's stupid. If you don't like people to have an opinion then maybe you shouldn't have made the Wiki in the first place. A little egotistical if you ask me. "If your not in my group, don't post or comment". Grow up!!!
Wow, this map is terrible. Might as well draw your own maps.
6
+13
-1