The Catacombs is a Location in Dark Souls and Dark Souls Remastered. The dark and dank Catacombs lie in tunnel in the graveyard of Firelink Shrine. The area is populated by living Skeletons that are being kept alive by the Undead Mages that also reside here. It's here you'll acquire the ability to kindle bonfires further than previously possible from the area's boss: Pinwheel. It then leads on to Tomb of the Giants.

General Information
- Previous: Lost Izalith
- Next: Tomb of Giants
- Recommended Levels: Any
- Bosses: Pinwheel
Video Walkthrough
The Catacombs Map
(WIP)
NPCs in the area
Bosses
Items
Consumables
- Humanity
- Twin Humanities
- Large Soul of a Lost Undead
- Large Soul of a Nameless Soldier
- Large Soul of a Proud Knight
- Large Soul of a Lost Undead
- Gold Pine Resin
- Charcoal Pine Resin
- Purple Moss Clump
- Blooming Purple Moss Clump
- Soul of a Nameless Soldier
- Egg Vermifuge
- Divine Blessing
- Repair Powder
- Transient Curse
Weapons, Spells & Armor
- Darkmoon Seance Ring
- Tranquil Walk of Peace
- Eye of Death (x3)
- Mace
- Great Scythe
- Lucerne
- Holy set
- Skull Lantern
- Short Bow
- Scimitar
- Red & White Round Shield
- Bonewheel Shield
- Black Knight Shield
- Black Knight Greatsword
- Black Knight Halberd
- Black Knight Sword
- Dung Pie
- Prism Stone
- Copper Coin
- Gold Coin
- Silver Coin
Upgrade Materials
- Red Titanite Chunk
- Titanite Chunk
- Twinkling Titanite
- White Titanite Chunk
- Green Titanite Shard
- Large Titanite Shard
- Demon Titanite
- Dragon Scale
- Blue Titanite Chunk
Keys & Other
- --
Enemies
- Skeleton (holding various weapons and shields)
- Undead Mage
- Wisp
- Titanite Demon
- Black Knight (Great Axe)
- Wheel Skeleton
- Giant Skeleton
- Crystal Lizard x2
- The Black Knight
- Vagrants
Full The Catacombs Walkthrough
Introduction and Advice Before You Begin
The Catacombs can be accessed right at the start of the game, once you escape from the Undead Asylum and arrive in Lordran. You'll find the entrance tunnel in the graveyard that's accessed via the side exit of the flooded ruin (Frampt's location) in Firelink Shrine. While it's accessible very early, the journey through the Skeleton-infested graveyard, may be too grueling for low level characters, and if you manage to make it inside, the challenge takes it up a notch. Limited visibility, and the Skeletons that refuse to stay dead after you kill them - the Undead Mages that also reside here will bring the skeletons in their vicinity back to life until you kill them.
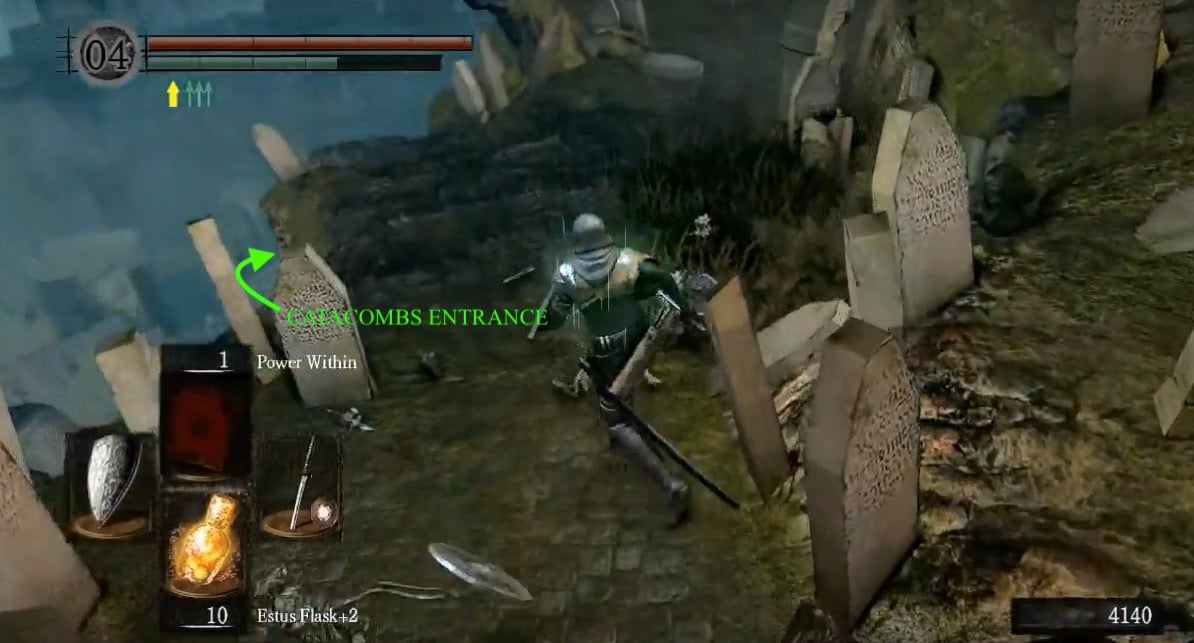
Before you attempt to journey in it's advised that you have the following, but they're not essential:
- A Light Source: Such as a Sunlight Maggot (found in Lost Izalith), the Cast Light sorcery and the ability to cast it (available from Dusk in Darkroot Basin) or a Skull Lantern (found in the Tomb of the Giants, a rare drop by Undead Mages). The area has limited visibility in many parts of it, so these can help greatly. Also, the area after the Catacombs, the Tomb of the Giants, is even darker and having one of the above light sources for here is highly advised.
- A Bow and Arrows: Some of the Undead Mages can be seen early but are out of reach, so a bow comes in quite handy for taking them out. If you don't have ability to take them out at range then you'll have to journey through the Catacombs until you're close enough to take them to engage in a melee, which often means fighting through hordes of respawning skeletons to get to where they are. Contrary to its name, the Undead Mage, does not respawn.
- A Divine Weapon: A ready-made example is Astora's Straight Sword, but any other +5 normal weapon, ascended to Divine status by Blacksmith Andre will also do. Finish off a skeleton with one of these and it'll stay down, without the need to kill the Undead Mage in the area first. Employing such weapons allows you you take your time in exploring the Catacombs, rather than racing to stay ahead of the relentless Skeleton horde while you look for the local Undead Mage.
There is a shortcut that skips a huge portion of The Catacombs which is accessible quite early on. If you wish to utilise this, please continue reading until further notice.
Watch out for the statues in this area; they shoot 3 blades out of their chest, you will notice that the booby-trapped ones have extra piece on the chest.
Although a light source is recommended in the advice above, the Catacombs are largely no harder to navigate than Blighttown (although a light source is needed for the Tomb of the Giants). As defeating the area boss grants the Rite of Kindling (allowing kindling for up to 20 Estus Flasks) and is relatively easy to beat. Players may wish to complete this area as soon as they have access to a divine weapon (Anor Londo in particular is less threatening with more than 10 flasks). Players concerned about being able to take on the skeletons - an early encounter after arriving at Firelink Shrine can make them appear scarier than they really are - can practice against the Firelink Graveyard mobs, to test the waters.
The Descent into the Catacombs
Descent - Continue into the Firelink Graveyard, and take the long stairway down to enter. You'll notice that the light in the area lowers significantly as you go in - equipping a light source (outlined above) is advised from this point on if you're finding it hard to see. Continue on to find a descending staircase that lines the wall on the right with a large hole to the left of it. There are two Skeletons on these stairs - these are the standard enemy of the Catacombs and, as outlined above, initially they will not stay dead for long unless they are slain by a Divine weapon. Keep an eye out for the three Wisps that are floating around the hole - they'll close-in on you the closer you get - as you proceed down the stairs and roll out as soon as you see them begin to shake and glow red in order to avoid the large explosion that will soon follow.
Continue on to enter a room on a ledge with a Skeleton on your immediate left, and a ladder next to it. Down the ladder, you'll find a doorway to your left that goes through a small passage, and into a room where two more Skeletons form as you approach. In this area, find a hole in the wall that leads down into another small area with a bonfire, a lever and your first Undead Mage. A few tips and notes to make on these enemies:
- They have low HP and only one form of attack, a fireball that they shoot from their Skull Lantern.
- Easy to deal with in a melee.
- Once they're killed they don't respawn which means all the local Skeletons in the area will now die for good using any weapon; the Skeletons you met up to this point can now be more easily dispatched.
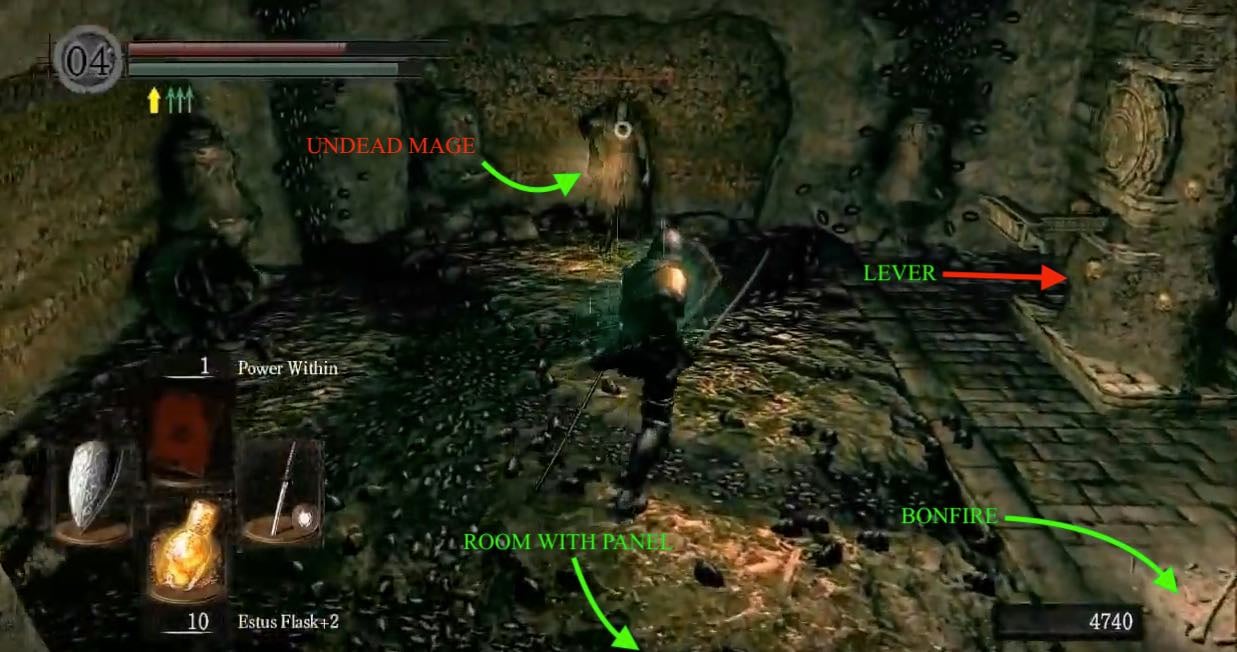
With the Undead Mage and Skeletons dealt with, rest up at the bonfire (if you wish) and activate the nearby lever - this will open a panel in the room above, and allow you to continue.
Inner Cavern
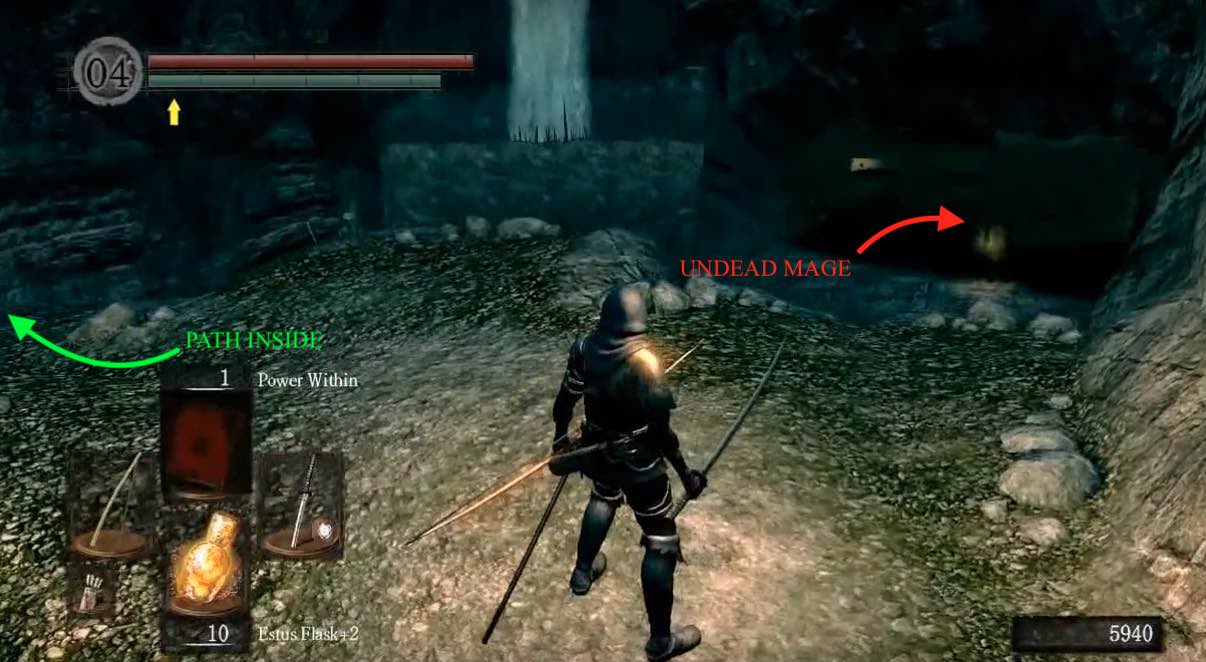
Dead Magic - Past the new opening, you'll find yourself in an outdoor area with a path to your left. Before proceeding, notice another Undead Mage on the ledge your right, across the gap. Kill him with arrows from here to alleviate the pain of the journey ahead. Continue on the path once you've killed him, taking on a Skeleton from the jump, and another two as you progress through the bridge and into the doorway.
SHORTCUT: IF YOU WISH TO USE THE SHORTCUT TO SKIP A WHOLE PART OF THE CATACOMBS, SKIP AHEAD TO 'SHORTCUT'.
Securing the Lucerne - Past the doorway there will be one Skeleton Archer on an upper level that we will reach upon further exploration. In the area through the doorway, two Skeletons directly in front and another waiting at the door on the left, you need to proceed through. This brings you to a catacomb proper, you will immediately find a Skeleton on a level above, that will jump on you. Take care of it then continue into the room to your right where you will have to fend off against two more Skeletons in order to secure the Lucerne.
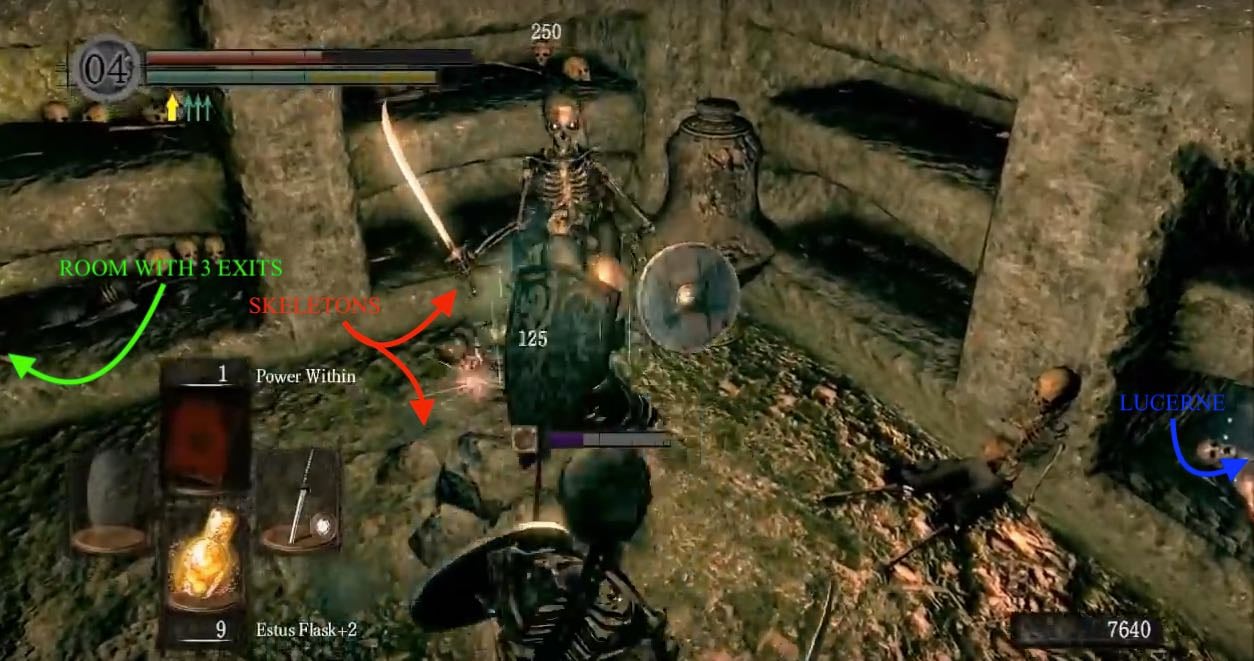
Exit the room and continue on the path to your right where you will have to pick off two more Skeletons to reach a room with a left opening ,and another Skeleton at the dead end ahead. Enter the left opening, and continue until you encounter a Skeleton Archer and a Skeleton. Once you deal with them, hold up. On the left of the passage you just entered from, there is a Large Soul of a Nameless Solider. There are three exits from this room - excluding the one you entered from -, the only one you need to take is the one on your immediate right, upon entering the room; the other two will drop on you in parts of the map you've already visited, making you loop around unnecessarily.
Begone Spikes -You will find yourself in the open, with a spiked bridge ahead, and a path full of Skeletons on your right. You may also notice the 3 Wisps floating just off the path. The best strategy here is to bolt it right, to the end of the path. Passing all the Skeletons, and hopefully triggering the Wisps on your way; with the Wisps gone, you fighting the skeletons on your way back will be a lot easier. Also, be wary of the statues with spike traps. Once you get to the end, recover a Soul of a Proud Knight behind some pots. When heading back you may notice a bonfire, beyond the big boulders - we can't access it from here, but we will be able to later in the level. You will also notice a lever to your right, not so far ahead. Activate it, then fight your way back over to find a safe-enough bridge to cross over, where the spiked bridge stood before.
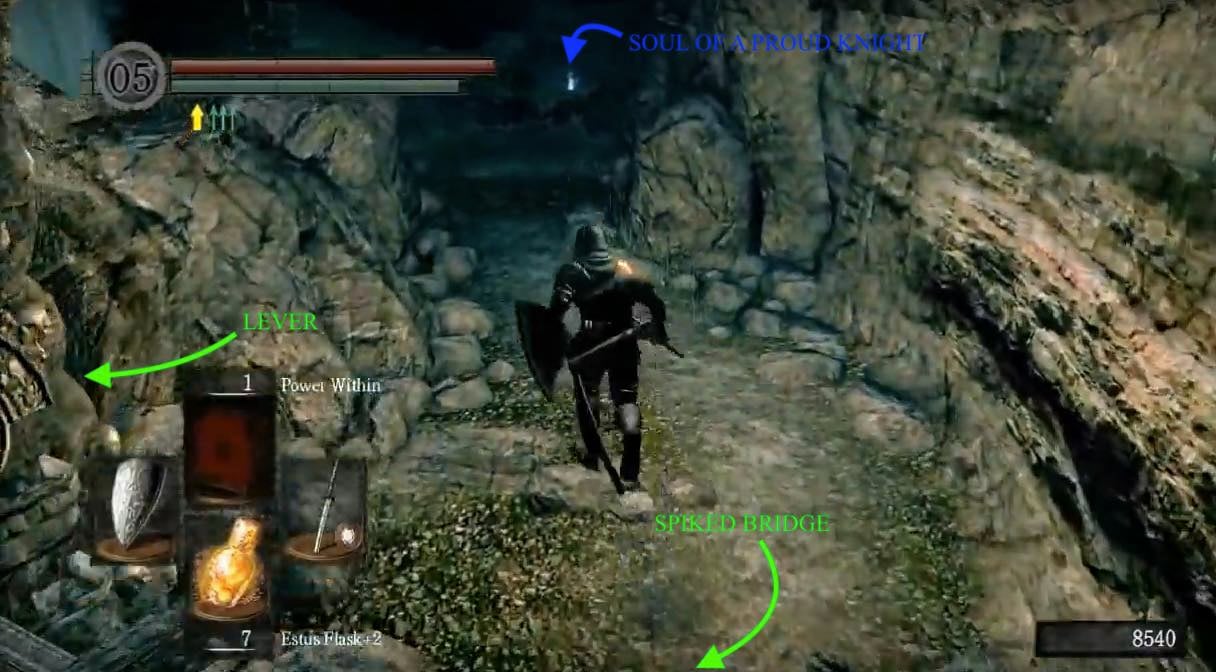
Through The Floor - Before you cross the bridge, you may want to deal with the Undead Mage across it, at range, then proceed to take care of the two Skeletons along side it. Cross the bridge to find a doorway and a broken wall on the right, head through the broken wall and there will be two secret platforms you can fall through:
- Left - You'll fall into an enclosed room with just one corridor that leads up to a ladder you can take to return to the same room. However as you soon as you land, you should run toward the glowing light in the corridor as there are two Crystal Lizards, with very saucy drops, that will escape if you don't kill them swiftly.
- Right - You'll fall back to where you picked up the Soul of a Proud Knight at the end of the pathway, next to the spiked bridge.
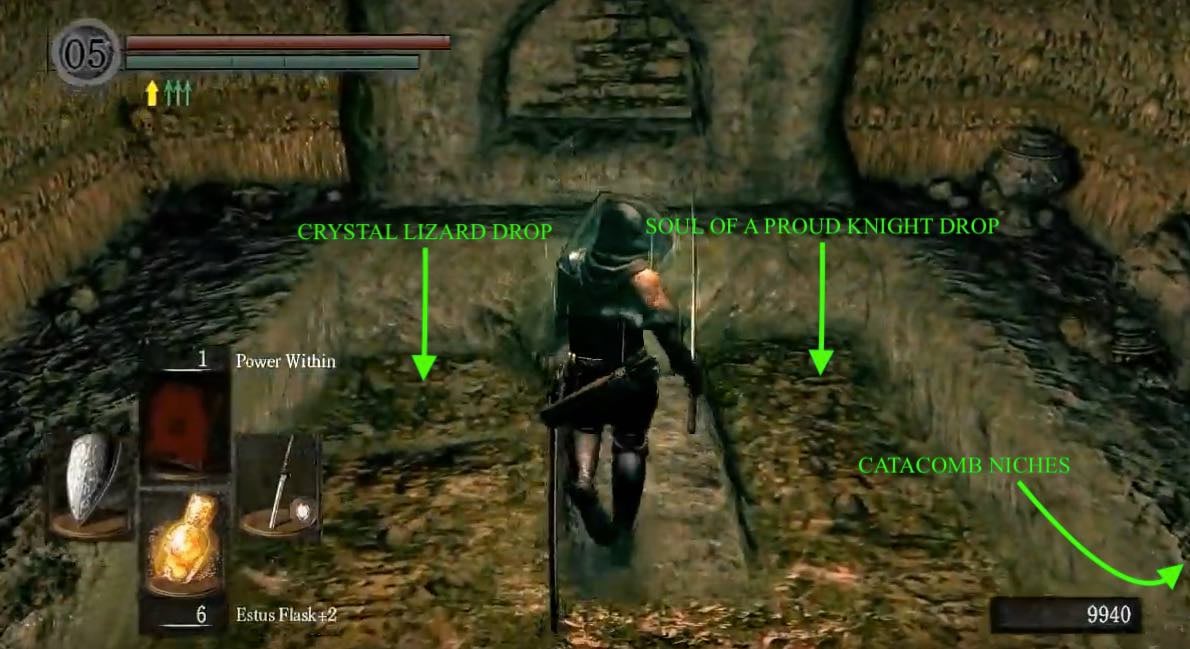
Exit the broken wall, and continue forward to find three catacomb niches that lead down to a small area. The first niche holds a Skeleton, nothing in the second, and third holds a Soul of a Proud Knight, guarded by a spiky statue and Skeletons so keep your distance or use your shield. At the bottom, are two more Skeletons. Here, you'll find a doorway, a blocked passage, and a spiral staircase leading down. Proceed through the doorway to enter the final niche holding: 3 Skeletons, 2 Spiked Statues, and a Soul of a Proud Knight. To open the passage you must continue down the stairs - be ready to fight any spooky bone boys.
Pull The Lever - Heading down about halfway, you will find a doorway on the right. In this small room, is a lever and an out-of-reach item. Activating the lever opens the blocked passage upstairs. Head back up and go through this passage. There's a left turn into darkness, and a few steps ahead, proceed ahead slowly. You'll notice you're on a suspended set of steps that don't connect to anything. Carefully drop off the right of the stairs, onto a small platform which you can then further roll onto another platform. This lands you on the platform with the out-of-reach item - the Great Scythe - in the lever room from earlier. If you continue on the platform, to the left, you'll find a secret shortcut drop to a later section of the game.
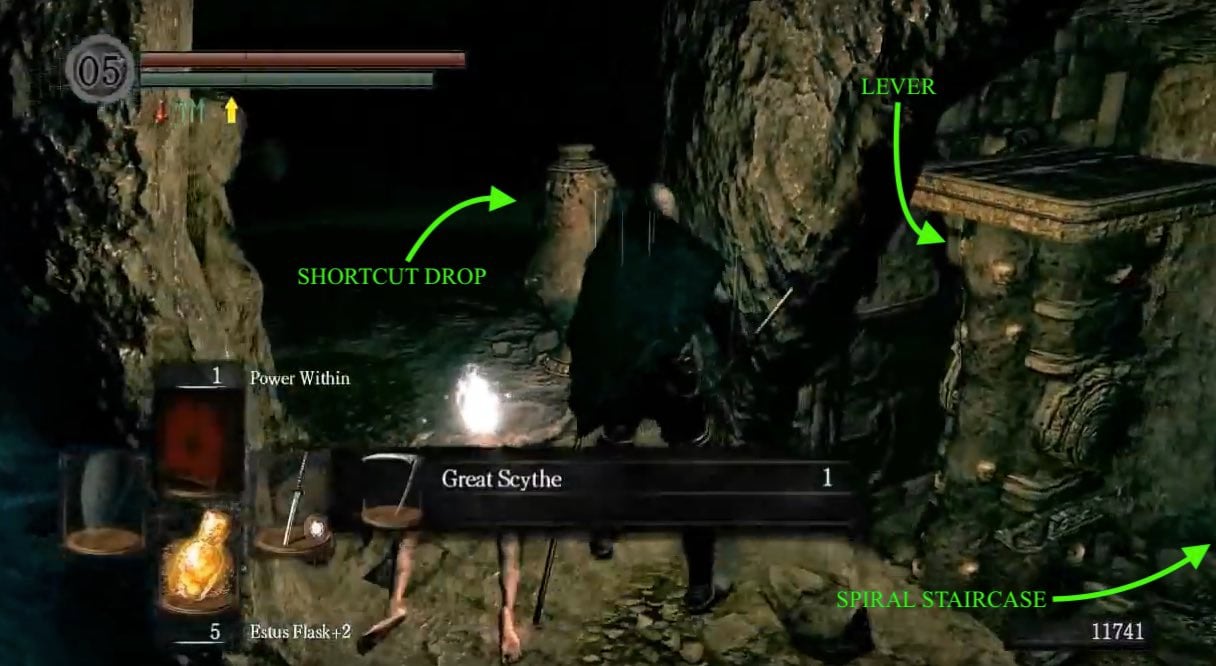
Second Bonfire - For now, we're heading back up the spiral staircase and through the unblocked passage again, only this time, we're heading left. This will lead us back outdoors. You may notice a spiked bridge on your right, which we will be ignoring for the time being, to head left to find a black wall, and a ladder leading up. Refraining for now from heading up and pulling the lever to make the spiked bridge traversable, give the wall a whack to reveal in fact, that it was an illusionary wall that leads up to the bonfire we couldn't reach earlier. Proceed to activate the lever after you're done, then head back to the spiral staircase.
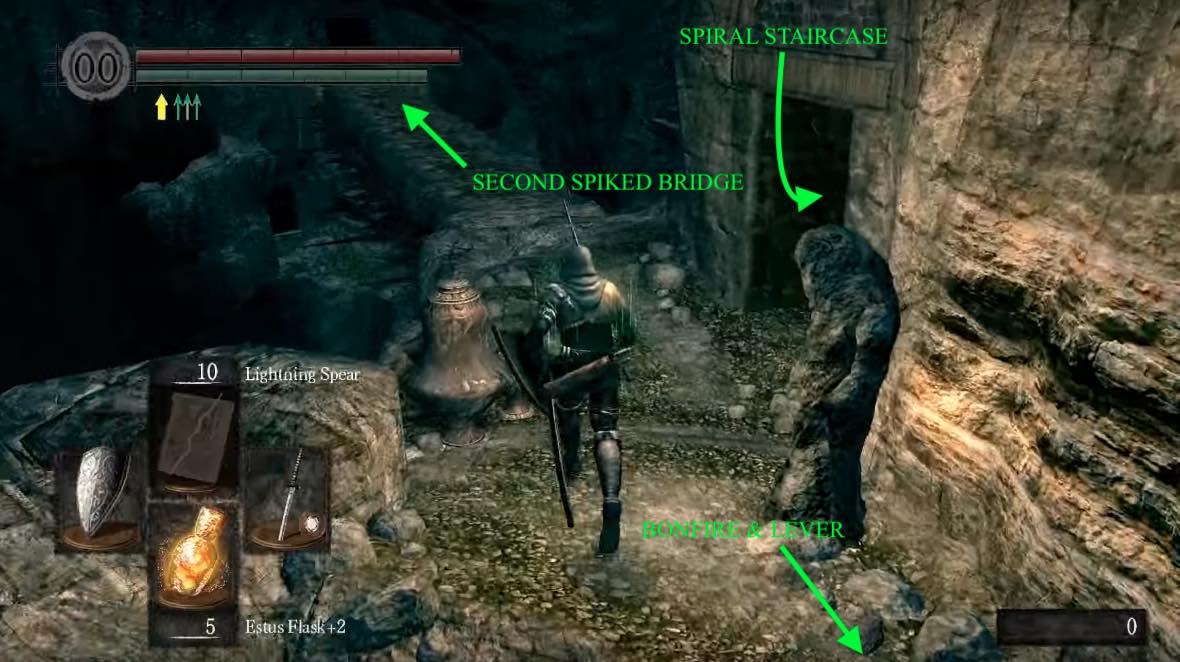
Vamos Al Blacksmith - If you continue down spiral staircase there will be a dead end. From here you can fall forward, off the edge to a platform below. Drop once again, and then again, picking up the Green Titanite Shard as you go along, onto another platform with a hole. Jumping through will trigger a cinematic that introduces us to Blacksmith Vamos, who tells you to go away by also smashing an impromptu hole in the wall that leads to the Wheel Skeleton den so be careful. While he does tell you to bugger off, you can still talk to him and acquire his blacksmithing services, at the end of the corridor. Before continuing into the den, we're going to head back to the second spiked bridge, across the second bonfire.
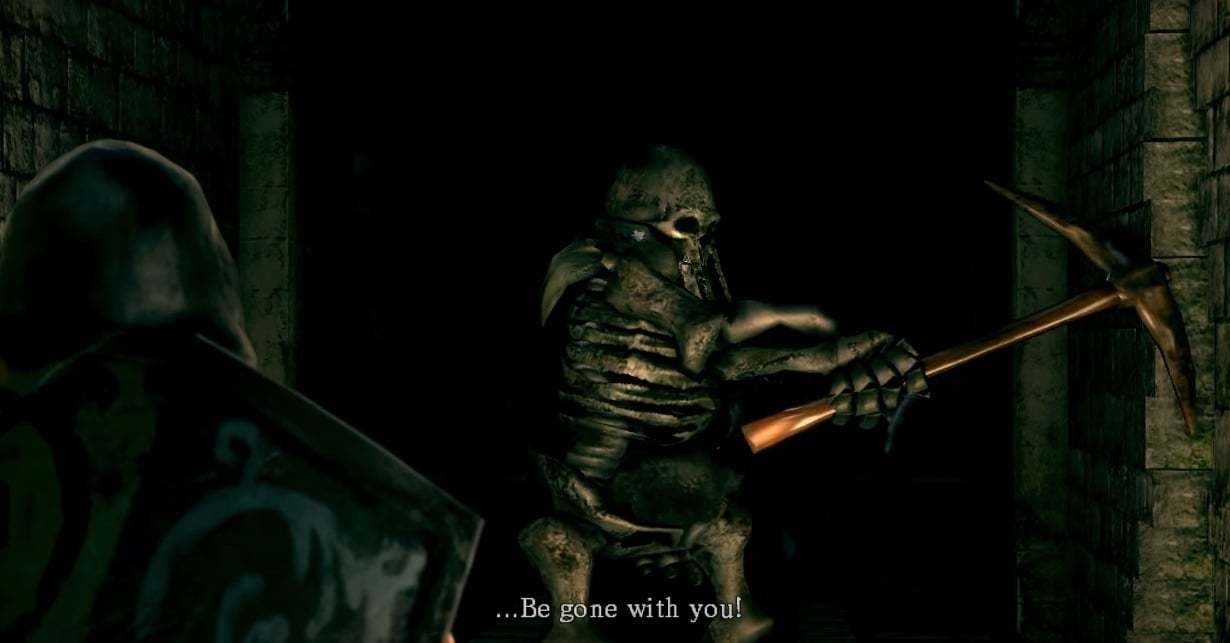
Across the Second Spiked Bridge
Big Bone Boy - Once you cross the bridge, you will enter a doorway with stairs leading down to an exit, but not before fending off two more Skeletons. You may notice a wall with loose bricks on the right of the exit, hit this to reveal a path that leads you to the Darkmoon Seance Ring. As soon as you enter, you will be on a suspended platform, and an Archer will be firing at you from a slightly-lowered platform, on your right. There's also another one across the room. But drop to the one on your right, first then deal with the other with a bow. Drop down to the very bottom to confront another Skeleton. Here, across the room you'll find a doorway but be warned - as you go through the doorway, and the subsequent room, a Giant Skeleton will crash through the ceiling above and attack you. Deal with him, and proceed to the end of the room to find the Ring we came here for.
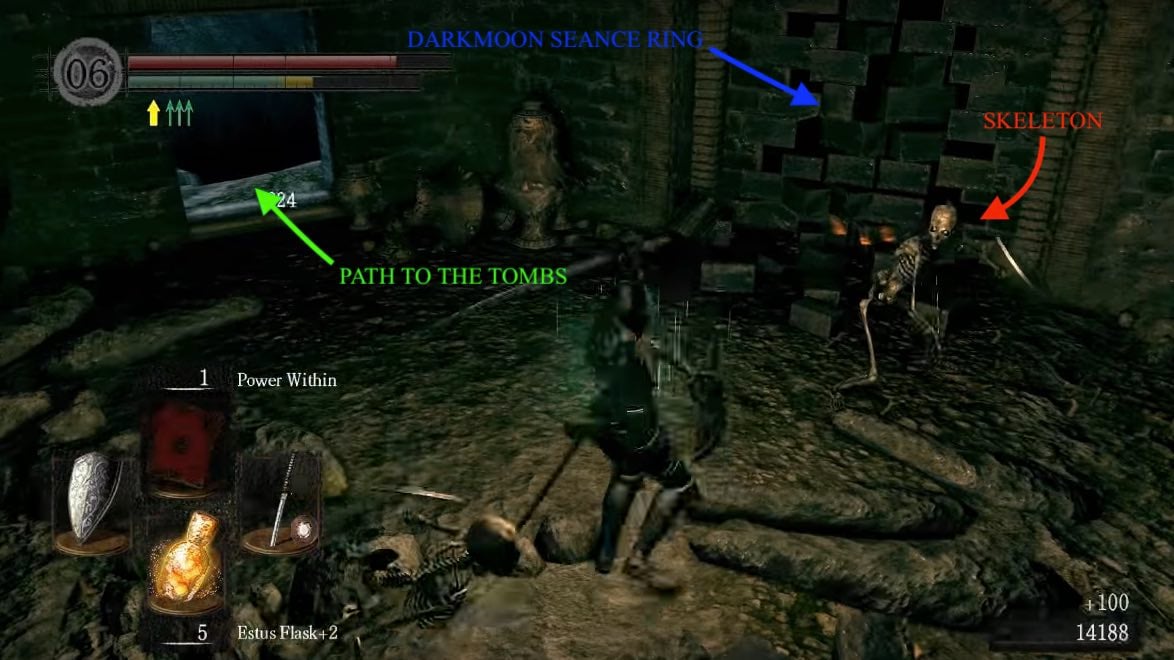
It's A Miracle - From here, head back and left, into the broken wall - right about where the Giant Skeleton landed- and follow the path up. You'll find yourself in a room overlooking the room with the loose brick wall, with a Skeleton and an Undead Mage. Defeat them, then proceed up the ladder on the right. Once you get to the top, continue on the only path, passing spiked statues as you go, and arrive at a corpse holding the Miracle: Tranquil Walk of Peace . You may notice it is sitting on a rather familiar surface - another secret door. This one, drops you into a room where you will be immediately attacked by two Skeletons, then by another one. From here, make your way back to the loose brick wall.
Made Of Titanite - Once you get here, go through the door leading outside. This will lead you to a large mountain ledge, follow it to the end, battling several Skeletons, and avoiding a couple Wisps along the way, to arrive at a dark door. This is also the resulting platform you land on if you take the shortcut from the room in which you picked up the Great Scythe. Enter to find a hall of tombs. Continue forward until you come across a Titanite Demon.
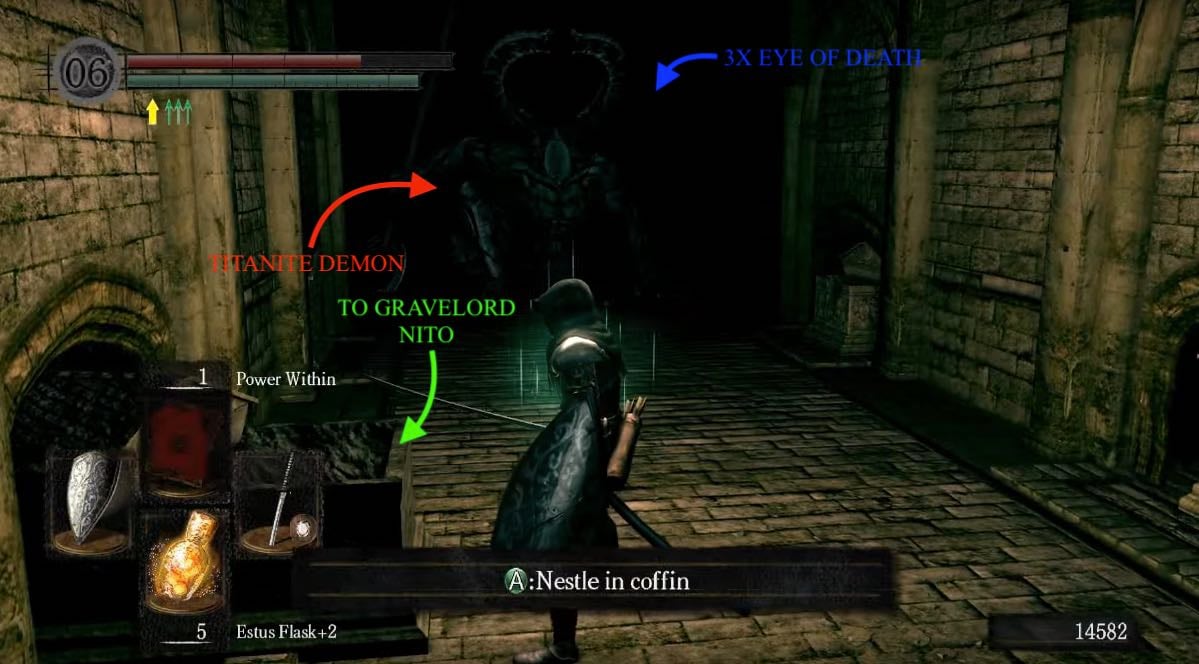
Afterlife - When you find him, you will also likely notice the half-opened tomb on the left; after you defeat the Titanite Demon, you can pick up his drop and loot behind him - 3x Eye of Death - which you can use to jump into the half-opened tomb. Wait 30 seconds in there to trigger a first-person cinematic of the tomb closing entirely, before shipping you off to a spacious room in the 'Tomb of the Giants', where you can join the Gravelord Servant Covenant by talking to Gravelord Nito (look around for the giant coffin). You will be rewarded with the Gravelord Sword, and Miracle: Gravelord Dance, if you choose to join this covenant. To traverse through the tomb, an Eye of Death is needed, which you just looted but can also be farmed from killing Basilisks.
Once back at the Titanite Demon, turn back in the direction you came from and continue until you come across a hole in the wall to your left. Through the hole you can find a room with a big square hole in the middle and a ladder going down, to your right, with a Large Soul of a Nameless Solider next to it. Down the ladder, you'll land in a room with a tomb in the middle, with black tiles on either side of it - these are trap floors that drop you into a small room with an axe-wielding Black Knight, ignore this for this now and enter the next room. In here you'll find another ladder to descend into a room where you will be immediately targeted by a Black Mage and two Archers, at the end of the corridor. At the end of a corridor, you can find a hole on the left wall that leads out into the Wheel Skeleton Den.
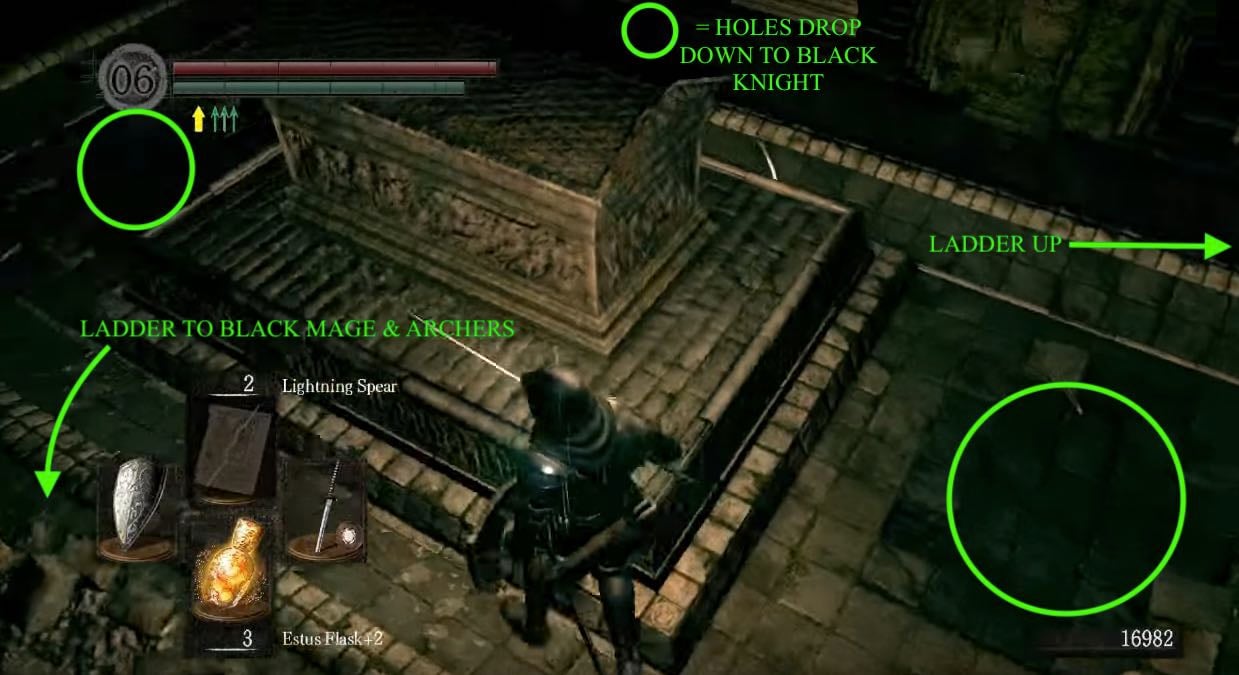
Who you calling Pinhead?
Roll With It - Head back up and drop down into the Black Knight's quarters, and engage him. Be careful not to fall off the platform, out the big broken wall as it overlooks the ravine filled with Wheel Skeletons, and if the drop doesn't kill you - which it most likely will - then the inhabitants at the bottom certainly will. Be sure to pick up the Soul of a Proud Knight, before your descent, then make your way down by dropping down the left side of this ledge onto a lower platform, which will be the last before the bottom. Wait a few seconds until 3-4 of the wheels have spotted you and are clustered around the base of the rock, and toss a few fireballs (1-2 should do it); a well-executed jump attack from a decent enough melee weapon should also be able to do the trick. The splash damage should easily take out all 4 skeletons, and greatly increase your chances of reaching the boss in one piece. Here are a few tips and notes about this area and its inhabitants:
- The ravine floor can be extremely dangerous thanks to the Wheel Skeletons.
- These enemies have a very long aggro range, and will charge the player repeatedly.
- Blocking the charge is usually ineffective; the attack continuously hits the shield and can drain stamina rapidly.
- The best strategy is to stay close to the outside walls, and use well-executed dodges, in an effort to make them hit the wall. This will bring them to a halt, and give you the window to land your two quick attacks that should finish them off; be wary of any additional mobs since your back will now be turned to oncoming assaults.
You can also access this ravine by these other shortcuts:
- The hole, the Blacksmith created in the cutscene.
- The hole on the wall, in room at the bottom of the stairs by the Titanite Demon.
- The ledge to the left of the exit of the tombs. Follow the arrow on the picture exactly, to avoid falling off and dying of fall damage.
- You can reach this shortcut by two separate shorcuts:
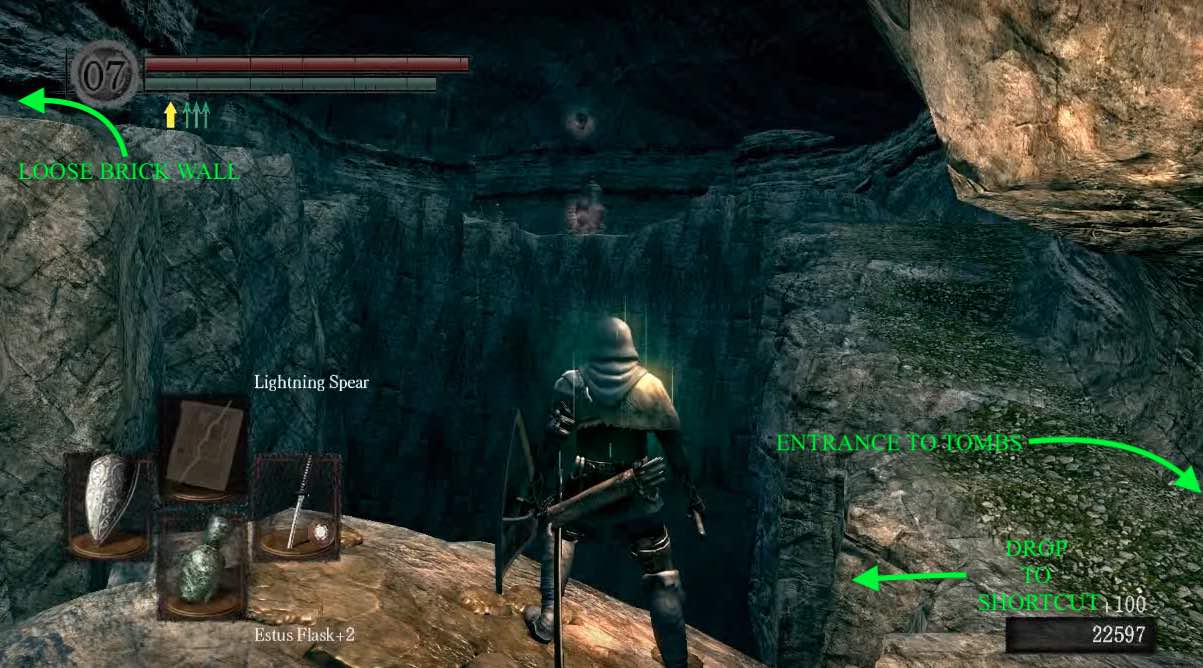
- The secret drop from the Great Scythe room.
- Jumping off the bridge next to the second bonfire.
- Drop down to the first ledge to obtain the Large Soul of a Nameless Solider, then carefully, to the second to loot the Holy Set and the Mace. The next level is the floor of the ravine.
- If you're in human form, and drop down here, you can summon Paladin Leeroy. He can easily do over 30% of this area's boss' health with his hammer if he two-hands it, and can tank almost anything for you, making this fight pretty easy if you summon him. Later on in the 'Tomb of the Giants', if you're in human form, Leeroy will be summoned as a black phantom to charge you.
- You can reach this shortcut by two separate shorcuts:
From the area you land from obtaining the Holy Set, head right, into the the gap between the two giant rocks. Follow this path until you reach the fog gate, and proceed. Continue through, and drop down the gap to trigger a cinematic of the boss of the area.
Boss Fight: Pinwheel
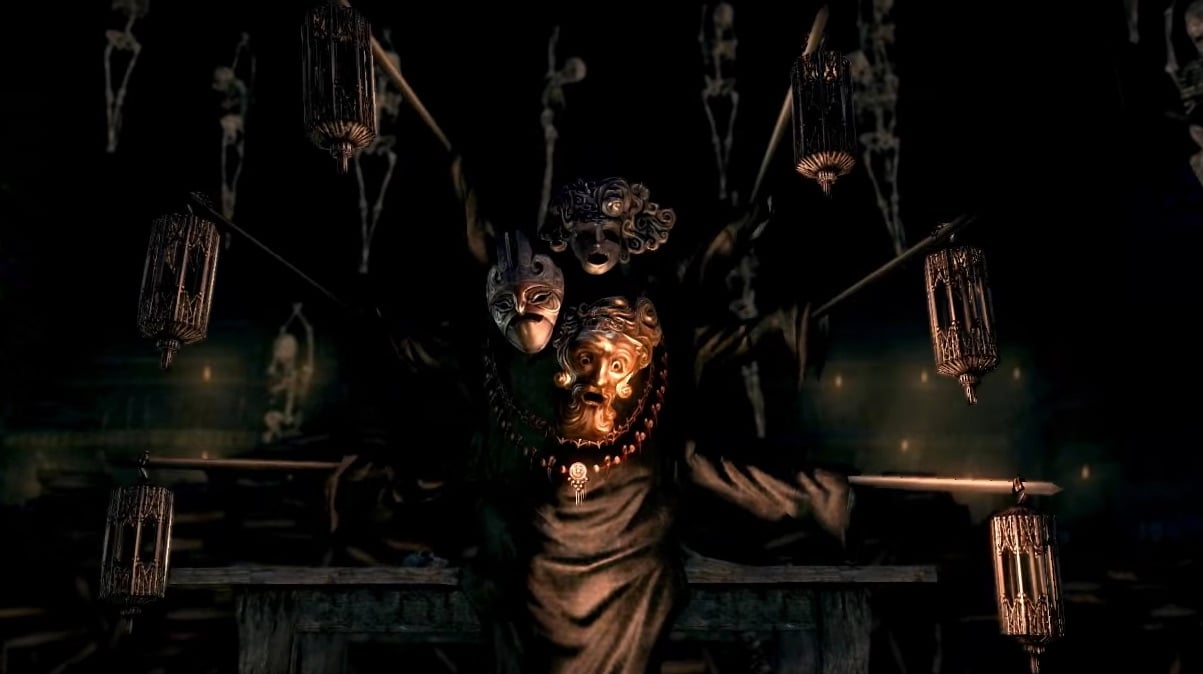
Note: Pinwheel is a caster that has the ability to summon several copies of himself; an ability he uses more and more, the longer the fight goes on. You should focus on him, since he'll continue to do so, until you put him down. Kill him to receive the Rite of Kindling, a Humanity, a Homeward Bone, 15,000 souls, and one of his three masks (Father, Mother, or Child).
Climb up the ladder on the right wall, at the end of the room to find another ladder to climb. Once at the top, try not to panic in the dark. Loop back towards the entrance and continue up the slope, and into the darkness until you find a corpse holding a Soul of a Proud Knight. Here you can drop down, back into the light and the tunnel which led you to Pinwheel.
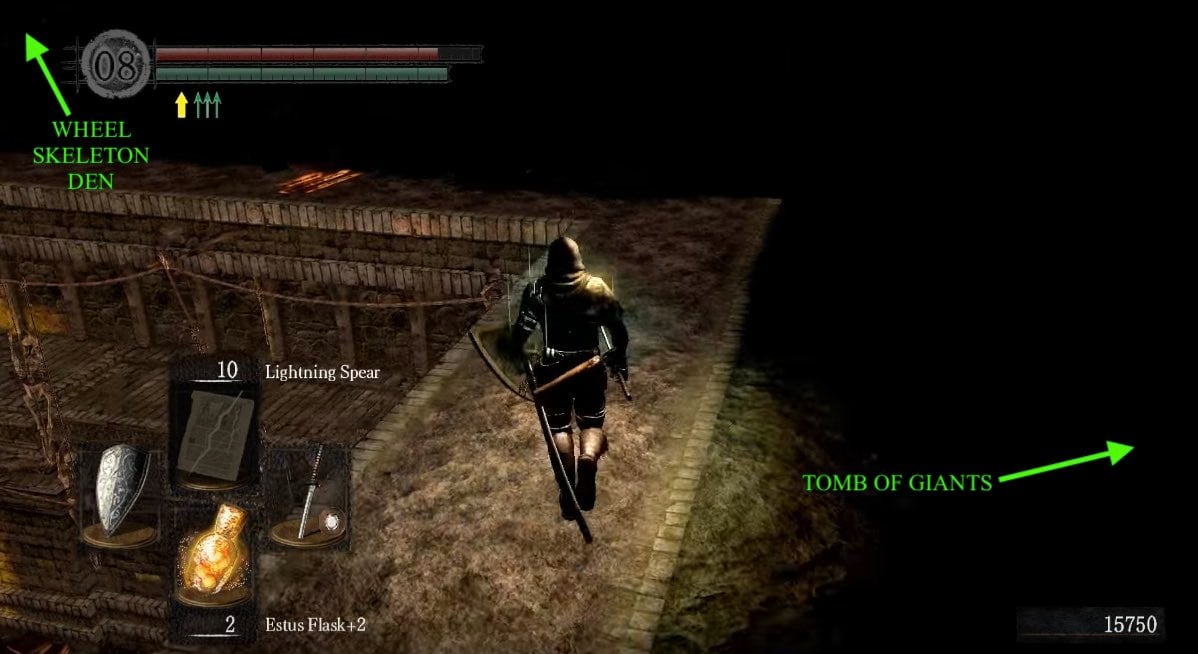
However, if you choose to follow the prism stones into the darkness, be prepared to get tossed around like a little girl by Giant Skeletons and their Giant Skeleton Dogs in the pitch black of the Tomb of the Giants.
Shortcut:
Starting at the first bonfire you will have to exit into the chasm and run along the first ledge until you reach the bridge going right. Walk to the end of the bridge, then walk onto the small ledge to the right of the opening of the next cave.
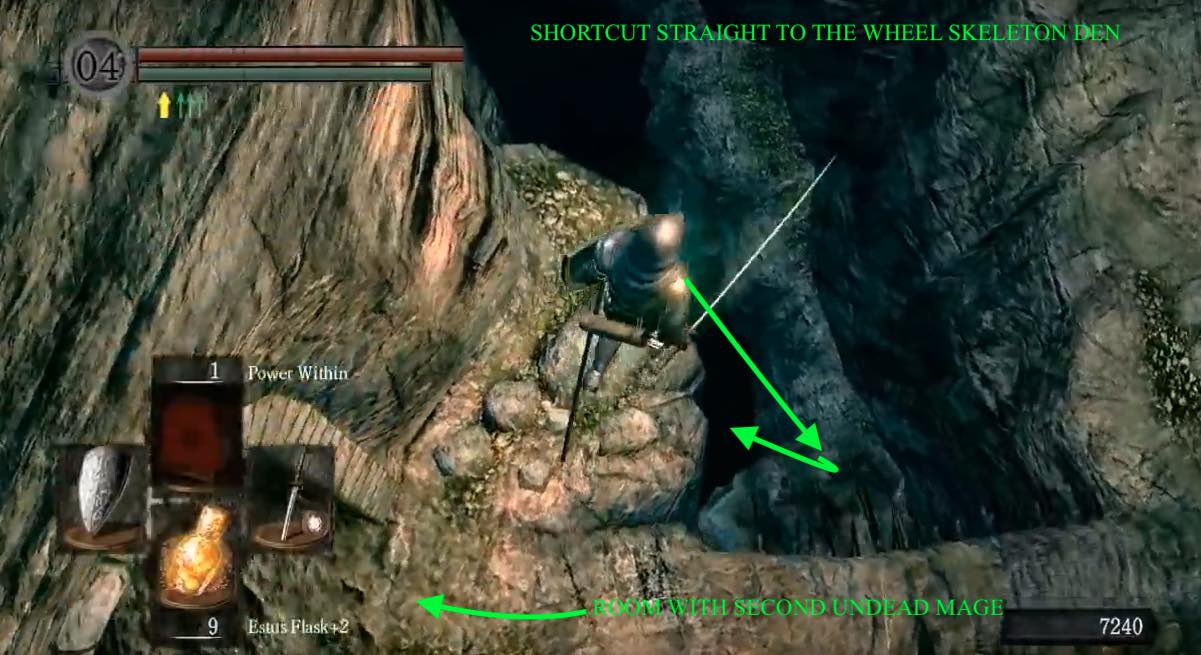
From here, you can see a platform down below across the gap. Be wary of your health before rolling across, as it takes a large amount of health to survive the fall. Immediately Estus up then drop down to the second ledge to obtain the Large Soul of a Nameless Solider, then carefully, to the third to loot the Holy Set and the Mace. The next level is the floor of the ravine. If you're in human form, and drop down here, you can summon Paladin Leeroy. He can easily do over 30% of this area's boss' health with his hammer if he two-hands it, and can tank almost anything for you, making this fight pretty easy if you summon him. Later on in the 'Tomb of the Giants', if you're in human form, Leeroy will be summoned as a black phantom to charge you.
From the area you land from obtaining the Holy Set, head right, into the the gap between the two giant rocks. Follow this path until you reach the fog gate, and proceed. Continue through, and drop down the gap to trigger a cinematic of the boss of the area: Pinwheel. He is a caster that has the ability to summon several copies of himself; an ability he uses more and more, the longer the fight goes on. You should focus on him, since he'll continue to do so, until you put him down. Kill him to receive the Rite of Kindling, a Humanity, a Homeward Bone, 15,000 souls, and one of his three masks (Father, Mother, or Child).
Climb up the ladder on the right wall, at the end of the room to find another ladder to climb. Once at the top, try not to panic in the dark. Loop back towards the entrance and continue up the slope, and into the darkness until you find a corpse holding a Soul of a Proud Knight. Here you can drop down, back into the light and the tunnel which led you to Pinwheel. However, if you choose to follow the prism stones into the darkness, be prepared to get tossed around like a little girl by Giant Skeletons and their Giant Skeleton Dogs in the pitch black of the Tomb of the Giants.
Shortcut Pros:
- Easy access to the Rite of Kindling for new characters.
- Does not require divine weapons, or hunting down necromancers.
- Estus can now be more easily conserved for the boss.
- Lower time in the map means lower odds of being invaded by other players.
Shortcut Cons:
- Players using this shortcut will not encounter the necromancers and in doing so not find their dedicated Skull Lantern drop.
- The player will not encounter Vamos, and so will not gain access to his services or tunnel entrance until properly encountering him.
- Loot is bypassed (Obviously)
Speed Run Walkthrough
A fast walkthrough of how to get to the end of the level the fastest, picking up only essential items goes here.Notes & Trivia:
- Blacksmith Vamos - This blacksmith can modify +5 normal weapons into fire weapons and also +5 fire weapons into chaos weapons once you obtain the relevant embers.
- Patches the Hyena - A rogue and merchant. (If you head to the catacombs before Reah and her companions he'll be here. If you don't you'll meet Patches in the Tomb of Giants later.)
- Gravelord Nito - Leader of the Gravelord Servant covenant. Technically he's in the Tomb of Giants, but the way to access and interact with this covenant is through The Catacombs.
- The Catacombs come from DeS' Shrine of Storms. They later inspired The Undead Crypt and The Carthus Catacombs.
 Anonymous
This has got to be my least favourite area since going through Irythill dungeon. It's dark, confusing and forces you to do suicide runs to kill a necromancer or you just cannot progress without accumulating the gank squad of a lifetime that will chase you to the ends of the earth. Of course there is no way to tell where the necromancers are unless you already know or look it up and no way to tell which skeletons they respawn, there is a section where you run past several groups of skeletons and the closest necromancer doesn't rez any of them except the ones that are in the room adjacent to it. The bonewheels need 0 explaination and pinwheel's a joke.
It sucks I hate it, and I would avoid it if it didn't hold the right of kindling hostage.
I especially hate how the 2nd bonfire is a complete trap that can make it extremely hard to get back to firelink if you use it and doesn't actually provide any benefit since you can easily roll down to the bridge it leads to.
 Anonymous
Had to walk all the way back from Vamos to the entrance, did I miss a shortcut or something

 Anonymous
This walkthrough is such a mess. Thanks btw for not mentioning the 6 spear statues in the crystal lizard corridor which you said that I should run along as fast af. 75% hp gone. Nice one, mate.

 Anonymous
And then what? You've led me by a shortcut to beat the boss and left me in a tunnel at the bottom of the catacombs. Is that it? Game completed? Yay!

 Anonymous
on my way to Reah early in the game for a miracle run, this place is absolute hell. Trying to go up from the tombs all the way back up to Firelink is madness. **** the WHEELS.

 Anonymous
tried to navigate on my own but got frustrated and gave up after 30 minutes. this area is worse than upper blighttown. so many shortcuts confuse the hell outta me

 Anonymous
Literally got stuck deep inside the catacombs for three days, i only managed to escape after grinding for hours on end and finally managed to escape after 45 attempts in pure darkness. Overall 10/10 would attempt again in a future playthrough.

 Anonymous
" Recommended level: any "?
Those ****ing skeleton don't die without divine weapon and can parry and hard to hit ...early game.
Recommended level : any.
 Anonymous
Trying to find your way through here is the worst. Tomb of the giants sucks but at least it's straightforward. You don't have to wade through all the half hour long videos of some idiot that won't stop talking

 Anonymous
In DSR on the switch you gotta take care of the black knight before the wheel skeleton room or he’ll jump in on you

 Anonymous
Just an FYI, the link for Gravelord Sword directs to the Miracle instead of the Weapon

 Anonymous
The catacombs Page is giving me 403 forbidden errors on multiple devices (with and without vpn's)

 Anonymous
"To traverse through the tomb, an Eye of Death is needed" Nope. You don't need them. (anymore?)

 Anonymous
The Vamos Al Blacksmith section is really weird.. am i supposed to fly back up or something?? Guess ill warp back to firelink and go through everything again...

 Anonymous
 Anonymous
 Anonymous
 Anonymous
I just come here right after asylum(and I get my zweihander on the way)
Go kill pinwheel from dropper shortcut
Then pick up mask of father
And go use souls at vamos' to buy 9 titanite and make fire zweihander
Early game op+path of the giantdad
 Anonymous
Your section after Vamos makes no mention of how to get back to the 2nd bonfire and newly traversable bridge. It seems to assume the player will use a homeward bone as from Vamos you either have to go right to BOSS/Pinwheel or left up some ladders into the Titanite demon room thru some other rooms to that very bridge, which is beyond am unmentioned small white FOG GATE.

 Anonymous
The extra Vamos bonfire was a dumb decision, they should've just made the 2nd bonfire warpable

 Anonymous
Probably the most underrated area in the game. Design-wise, it's up there with Undead Burg and Sen's Fortress, but I've never seen much discussion around it except for people laughing at Pinwheel and raging at the bonewheels.

 Anonymous
 Anonymous
the catacombs were made to tempt experienced players, with something for every build and the 15K+ souls from pinwheel you can get to a higher level so easily that going there after asylum is almost a no brainer

 Anonymous
idk bout you guys but i go here immediately after the asylum, im very good at the drops now and i summon leeroy jenkins and BOOM 15K souls easy mode. (plus the amazing weapon selection down there is very noice early game)

 Anonymous
I'm at the first bonfire, went and got the great scythe, died, and now have no idea how to leave. I may have stupid but I'm just trying to go back to fire link.

Created a (non-mage) twink build to up the difficulty of Giant Dad / Havel Mom / Boulder Child wannabees that make the run right after the Asylum.
I'm having a lot of fun and getting a surprising amount of invasions. They are more of a race than a duel; if they can make it to Pinwheel before I get them they win a mask!
 Anonymous
"Be prepared to be tossed around like a little girl" Something tells me the author isn't allowed around children

 Anonymous
Hello all, the way up from Vamos Bonfire without using the two bridges with spikes if the levers was not activated is possible. Please walk up and go through the secret room. Follow the chapters "Big Bone Boy" and "It's A Miracle". There a two red signs with the messages "Treasure" and "Up" on the way (offline mode). In the last room where the miracle is you can fall down through the left grave and then you are in the area described in the chapter "Securing the Lucerne".
I hope that this is helpful enough for them that think they are stuck in the catacombs.
 Anonymous
would have been nice to mention i can't use eye of death once iv'e beat the boss. Now i cant get to gravelord Nito.

 Anonymous
 Anonymous
Okay, sooo I wanted the Rite of Kindling early-on in NG++ aaaaaand I now realise that, after rezting next to Vamos, i can find no way back to the surface.
Help me
 Anonymous
The section with the drop to the crystal lizards is incorrect, the initial right side doesn't have a drop, once you go up the ladder afterwards it's a different room.

 Anonymous
Great place for level 60 invasions, just warp to the bonfire and your souls are safe if ya die. If you get lucky there will be all the spikeys down there and basically all ya gotta do is Lloyds Talisman and guard. Under those circumstances there is no shot of a fair fight for the person being invaded unfortunately so just put them out of their misery.
Got ganked by 4 invading once and the area was already cleared. I kamikazed with a fire tempest while being slashed by them with over 70 poise, they got me but not before I took all 5 of them with me with a decent amount of souls. I reclaimed mine by the bonfire but the host is going to have to get through the skellies to get his hahaha.
 Anonymous
In the pinwheel ravine, it's the Holy Set (priests hat, holy robe, etc) not the Cleric's set. Only patches sells the clerics set.

 Anonymous
All that's really needed for tackling this place just after arriving in Firelink shrine is high bleed resistance, a good shield, a melee weapon that can knock skeletons back, and a lot of patience.
Heck, that bit about the shield and bleed resistance is negotiable, since I managed to brave this damned place with just an upgraded Zweihander, and with no armor or shield.
If you are careful about how much aggro you draw, make sure to knock enemies off cliffs when you can, and make sure to find and slay necromancers quickly in certain parts of the cave, then it's possible.
As for... the more pesky enemies, you'll need to make a run to Vamos for upgrades[don't use the bonfire down there, just homeward bone out!], then go murder the black knight first by entering his perch, then warp out and head back to the entrance to the floor level with the archers and take care in luring the wheel skeletons there to slay one at a time [won't roll until they are close too you and you are in their sight], then the floor is cleared... tho, paladin Leeroy might be better for dealing with both, since he is easier to just whip out to clear out the trash in general.
If you wanna tangle with the Titanite Demon early, then I recommend luring him back towards the exit to the hallway where it won't follow you, and once it starts shooting lightning at you, run up to it around it's aim and smack it's arm and then back off before it melee attacks... might be able to hit him after any jump attacks since it leaves him open, but that takes reflexes. Failing defeating it, you can lure it to shoot/jump, then attempt to run around so you can get the eyes of death for early access to Nito, but remember this guy is a real room hog! Be sure you've got room to dash by!
That's about all I have in the way of tactics, but hope that helps would-be early grave-robbers, or friends/victims of patches that wanna get to him early.
 Anonymous
Peak level design in this place. If you’re willing to meet patches in here early game before petrus and the crew head down you can do so and venture around to the darkmoon seance ring, take the path up to the tranquil walk of peace miracle and drop right down to the beginning of the area to make your way back to the shrine.

 Anonymous
Help! Started playing again after what seemed like ages but remembered Vamos' shortcut and quickly got to, and killed, Pinwheel. Didn't flip one of the spiked bridges on the way down and now can't get back out. Haven't been to Anor Londo yet so no warping, and rested at bonfire too so bone doesn't help either. Sure the devs don't force you into restarting but I can't find any other way around the bridge or any way of flipping it from this side. What am I missing?

 Anonymous
First time I reached the pitch black entrance of this place I was seriously scared. DS isn’t a horror game but it has a lot of moments like this which add a lot.

 Anonymous
It is not dead what lies forever. And one day death will also be conquered. In other words: Git Gud, you innocent Casuls

 Anonymous
Does an occult weapon hold the same power divine upgraded weapons do in the catacombs?

 Anonymous
 Anonymous
 Anonymous
If any new player like me thought that skeletons in Catacombs would die to any weapon that has magic damage, they don't die. It has to be a divine weapon.

 Anonymous
 Anonymous
the skeletons are tougher than the area boss, wtf :/ its like the area itself is a boss and pinwheel is just .. kinda there.

 Anonymous
Someone else got that problem, he couldn't kindle bonfires in here? In my first playthroug I kindled the first bonfire (necromancer-bonfire) to 15, but it was gone when I reached it yesterday; second bonfire (illusory-wall-bonfire) I tried to kindle today to 15 which worked once but after I died it was like not kindled at all, and finally the third bonfire (vamos-bonfire) which I kindled to 20 just gave me 15 estus.

 Anonymous
Me and pinwheel killed each other on the same hit. I got the kindling rite but lost all souls (which were not retrieved thanks to the *****in wheel skeleys) and did NOT receive one of the masks. Con of sorcerey build in that boss fight.

 Anonymous
I never want to see another skeleton for as long as I play Dark Souls, holy*****.

 Anonymous
this is so helpful because i keep dying to pinwheel at a low lvl,at least leeroy helped me

 Anonymous
Okay so first playthrough I can kill them if I down them twice, ng+ nope they're all unkillable. Wtf I'm sorry okay for more and better enemies but you should in no way change the game's mechanics! Man Ds1 was the WORST !

 Anonymous
After the first bonfire you can easily bait most of the skeletons into their rolling attack. Just poke them with one arrow and watch them go suicidal. It's pretty funny to watch the other skeletons enjoy the suicide of their compatriot only to do exactly the same a few seconds later. Also in the Bonewheel area there is a bug. When entering the area through the little corridor from the area above - avoiding to drop down to the Black Night - you can lure the Bonewheels to you with a bow. Stay in the corridor and stay closer to the right wall (facing the room) than the left. As soon as they get to you they will start the rolling attack. Keep your shield up, block the impact and move a bit closer to the wall on the right so they will pass you. When the Bonewheel hits the wall just next to doorway it will pass right through and enter the void... Souls will be transferred to your account within a minute or so. Found this by accident during my very first playthrough and tried it a few times afterwards. Worked every time :)

You never say how to get back out of the bonewheel pit after going down the spiral stairs to drop to the blacksmith. You only mention it, as if we are following this through the guide, then say but before we go there go back to the bridge... So i dropped down thinking this was the way intended. Black knight scared me more than the random bonewheels. Got his axe though. Anyways, might want to update that section to know what all is down there and how to get bacm up since you only mention how to get down there.

 Anonymous
I fell down and forgot to activate one of the bridges, am I gonna have to start over?

 Anonymous
A divine weapon makes the skeletons much easier to handle, and is great for clearing a path to the necromancer who keeps reviving them. You can find Astora's Straight Sword in Valley of the Drakes. You can also get your hands on an occult club in the chests in Anor Londo where you get the rest of Havel's gear, and take it to andre to downgrade it, getting a Divine Club +5 in the process.

 Anonymous
The holes you drop through for the two titanite guys are listed incorrectly. There is only one hole to fal through, then the corridor, THEN the ladder to go up and drop through a separate room. The ladder doesn’t return you to the same room you first dropped down.

 Anonymous
There seems to be a 3rd bonfire i just found for remastered (not mentioned here) in the same corridor/hallway as Vamos the blacksmith

 Anonymous
Worst area in the entire souls Series together with Lordrans Castle.
Pure shit.
 Anonymous

summoning Leeroy before Pinwheel is just as unnecessary as summoning Witch Beatrice before the Butterfly
0
+10
-1