

Upper New Londo Ruins can be accessed immediately upon your arrival at the Firelink Shrine but it's advised to wait until you need to kill its boss before you venture in too far. From the Firelink bonfire, face the Crestfallen Warrior (or where he used to be) and look to the left for a staircase leading down. Bypass Anastacia's cell and find another staircase to descend to reach the elevator that brings you to New Londo. NOTE: This elevator will not reset if you die; you'll have to pull the elevator call lever to get it back up (so don't fall!)
General Information
- Previous: Darkroot Garden
- Next: The Duke's Archives
- Recommended Levels: Any
- Bosses: Four Kings
Video Walkthrough
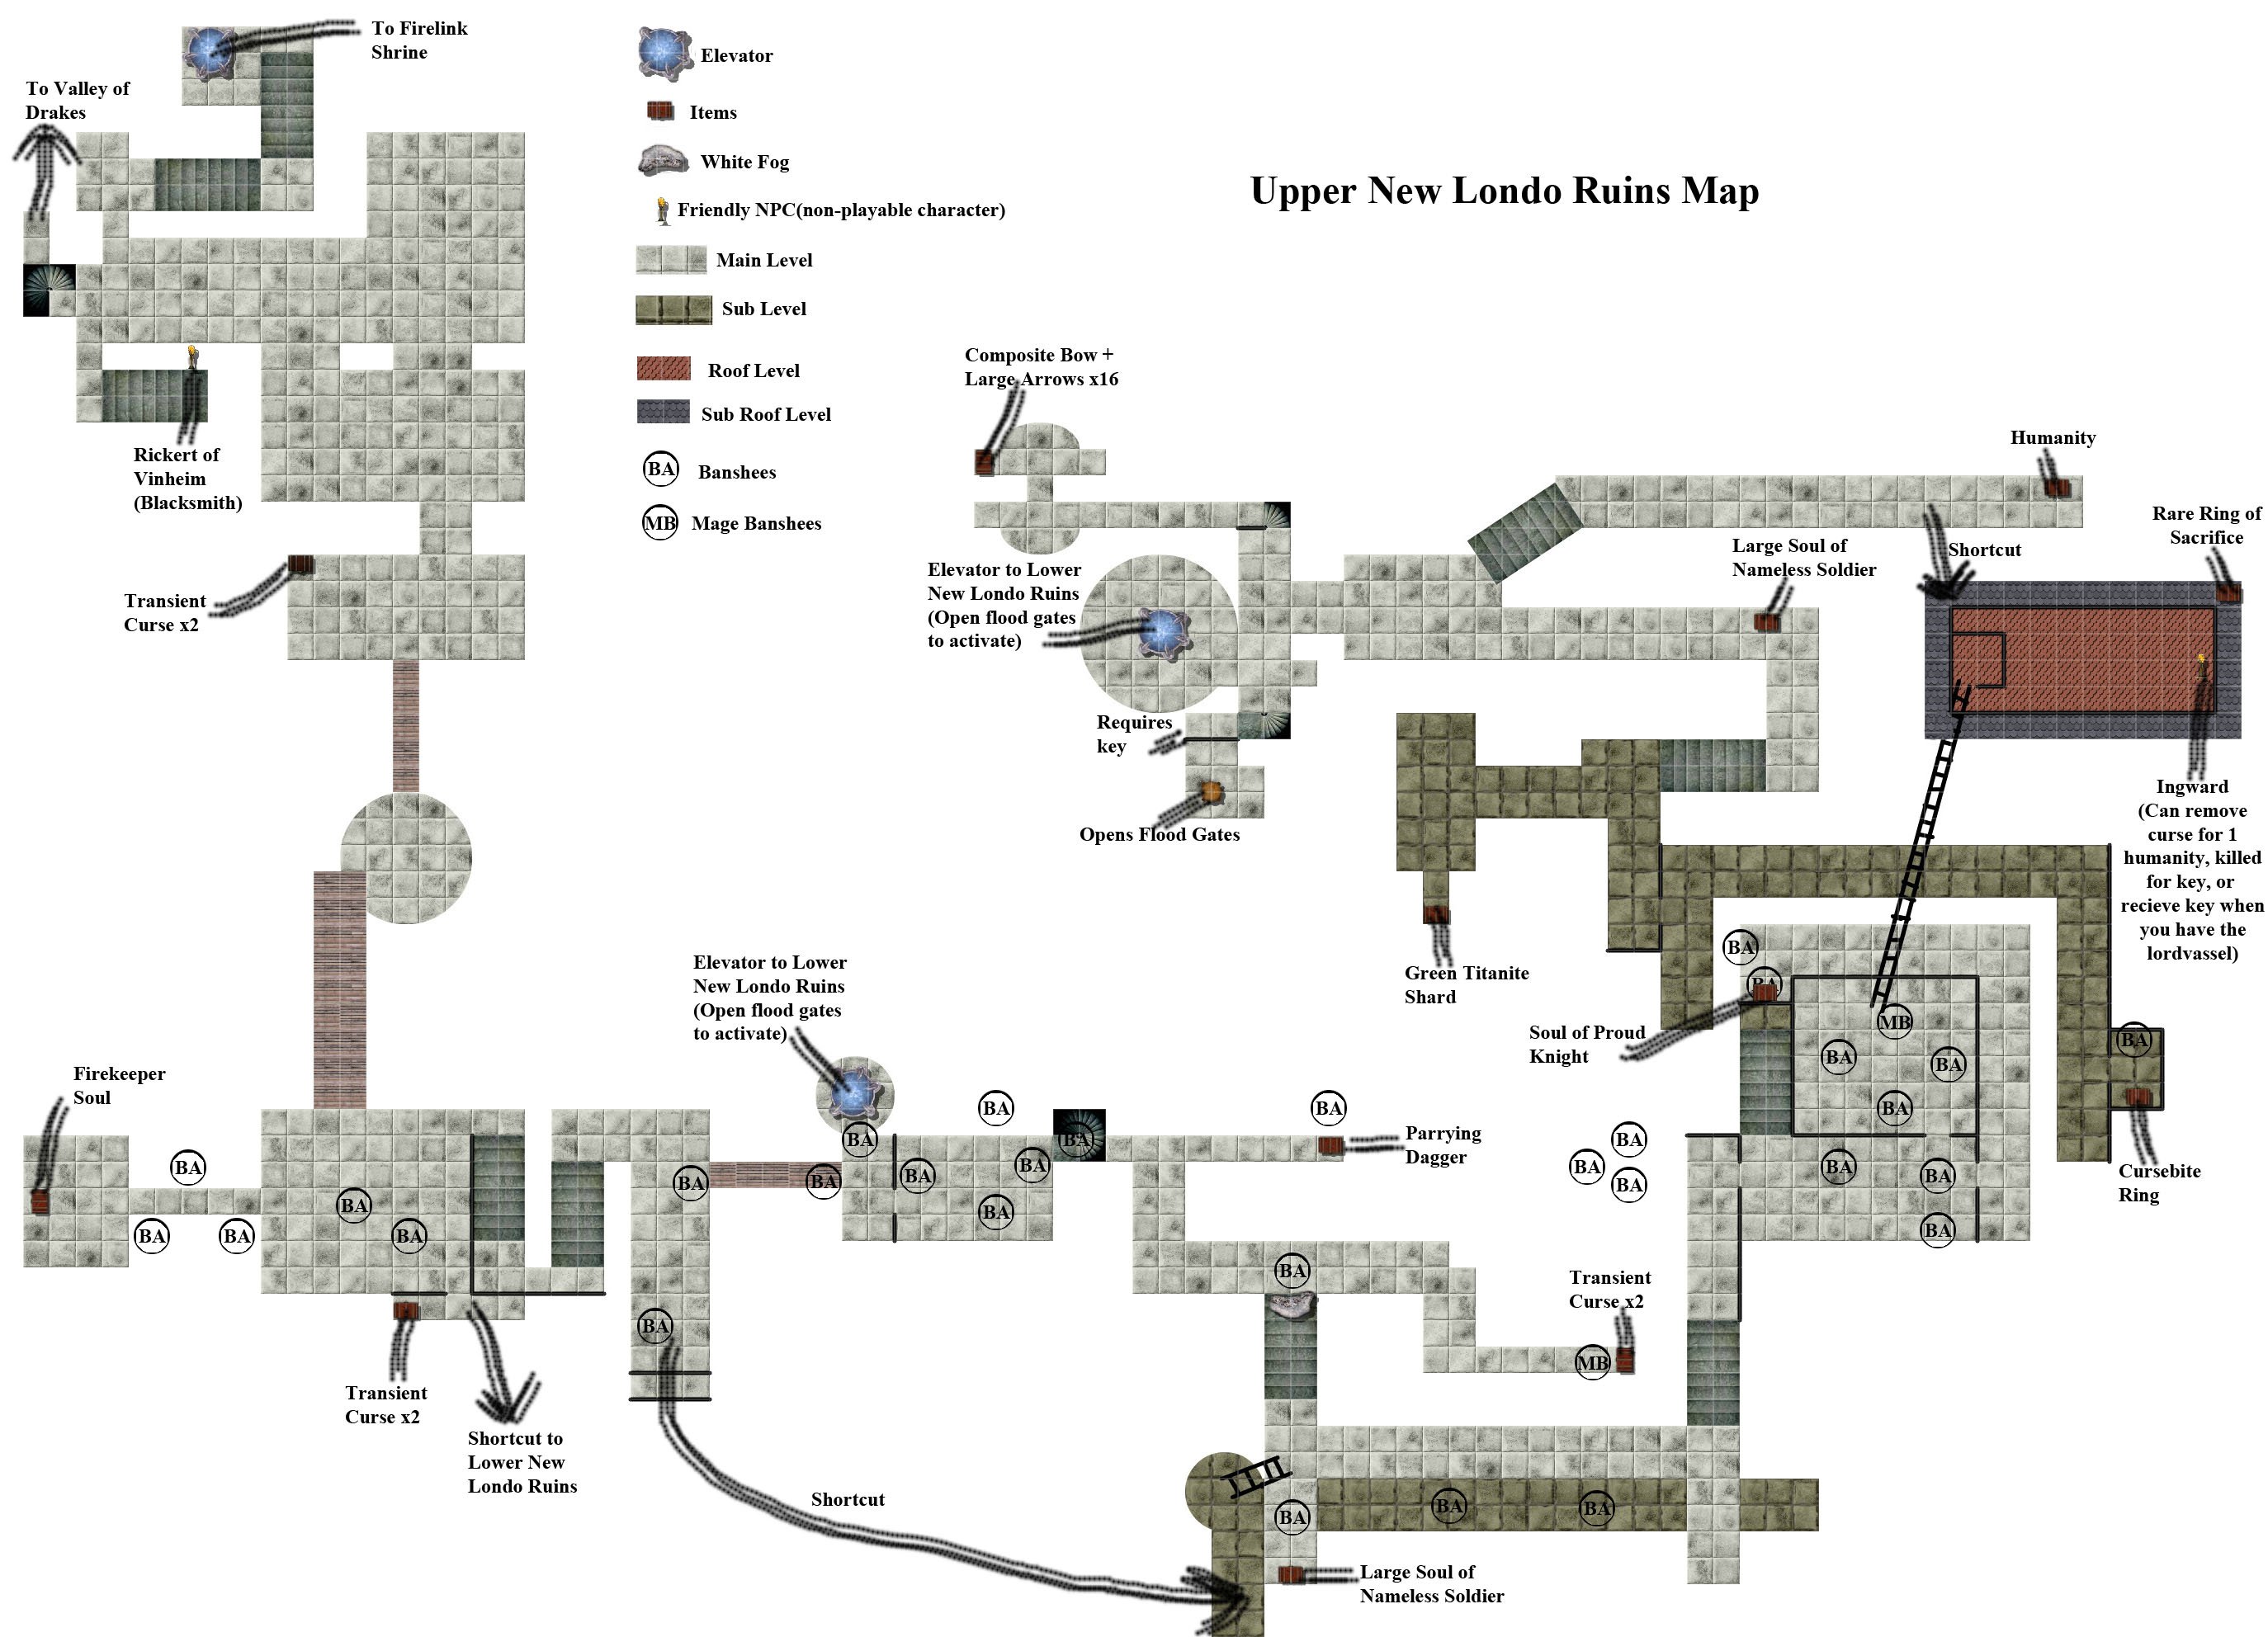
New Londo Ruins Upper Map
NPCs in the area
- Ingward (Guardian of the Seal)
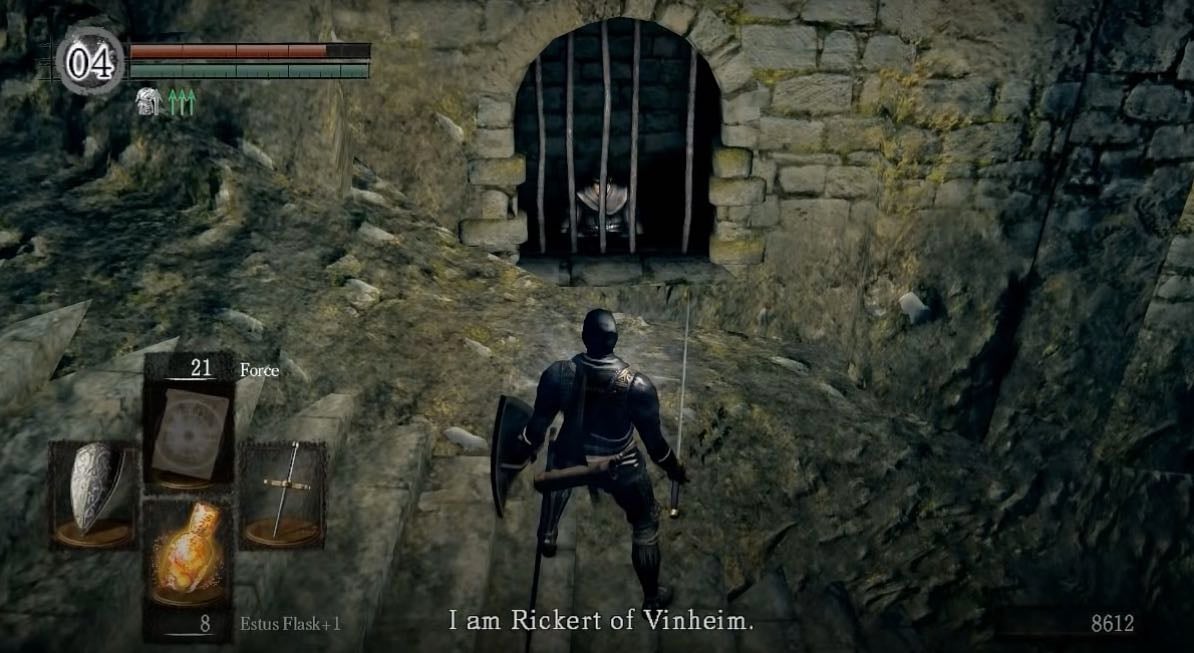
- Rickert of Vinheim (Magical Blacksmith)
- Witch Beatrice (Summonable Phantom)
Bosses
Items
Consumables
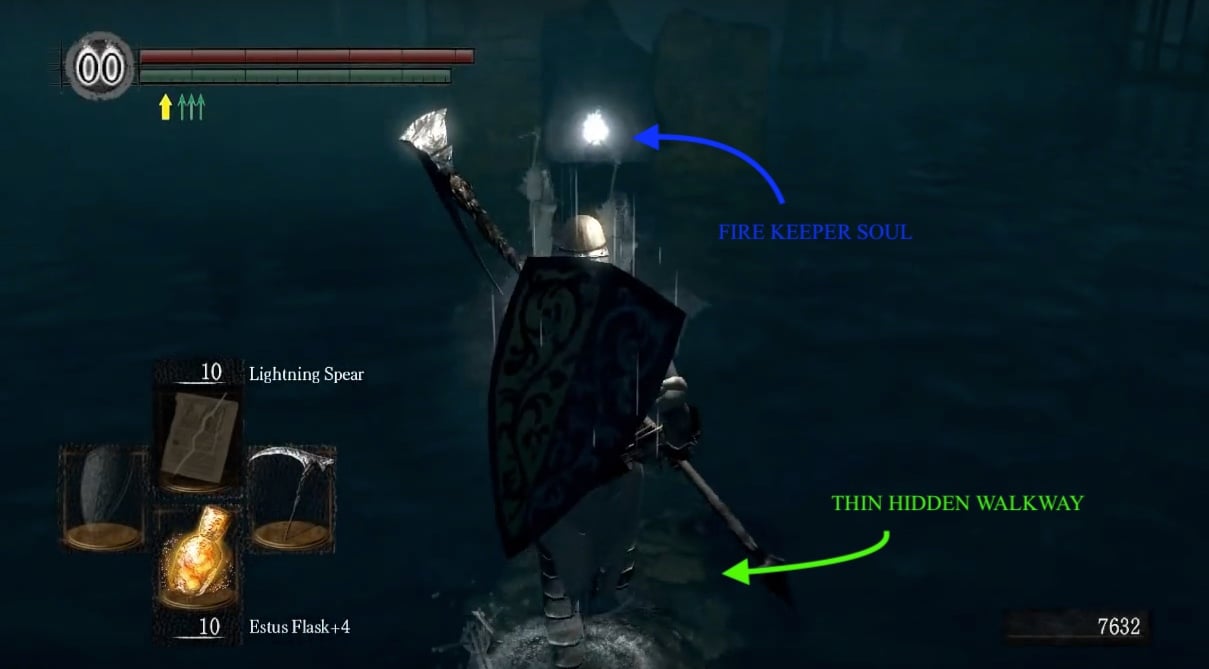
- Fire Keeper Soul
- Humanity
- Twin Humanities
- Large Soul of a Lost Undead
- Large Soul of a Nameless Soldier
- Large Soul of a Proud Knight
- Large Soul of a Lost Undead
- Purple Moss Clump
- Blooming Purple Moss Clump
- Soul of a Nameless Soldier
- Egg Vermifuge
- Divine Blessing
- Repair Powder
- Transient Curse
Weapons, Spells & Armor
- Cursebite Ring
- Transient Curse
- Rare Ring of Sacrifice
- Jagged Ghost Blade
- Dung Pie
- Prism Stone
- Copper Coin
- Gold Coin
- Silver Coin
Upgrade Materials
- Red Titanite Chunk
- Titanite Chunk
- Twinkling Titanite
- White Titanite Chunk
- Green Titanite Shard
- Large Titanite Shard
- Demon Titanite
- Dragon Scale
- Blue Titanite Chunk
Keys & Other
- --
Enemies
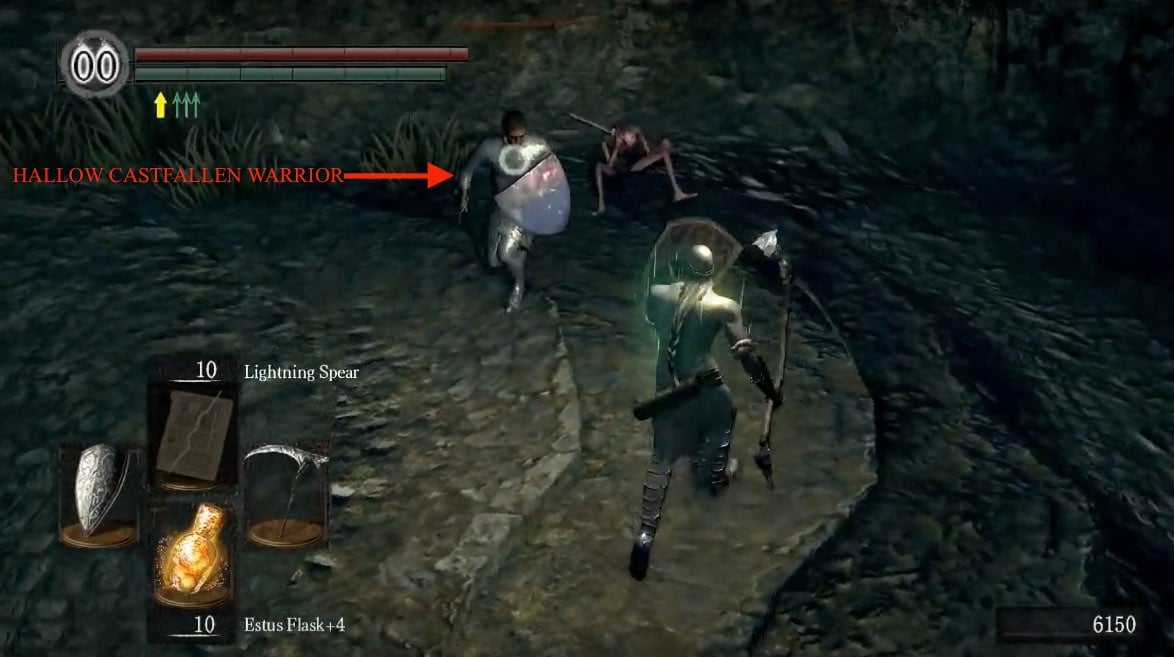
- Hollow - they do not attack you unless provoked.
- Crestfallen Warrior (Hollowed NPC) - appears in the opening section of the area (before you cross the plank bridges) as a hollow if you talk to him after Frampt appears in the Firelink ruins.
- Ghost - floating ghosts with two sickles. They cannot be hurt or blocked unless using a cursed weapon (Jagged Ghost Blade, Greatsword of Artorias (cursed version made from Straight Sword +10), the player is cursed or under the influence of a Transient Curse. They can also hide in the walls and can flank you if you're not careful.
- Banshee - similar to the ghosts, but with a little more HP and a lightning spell. You can usually kill them before they attack you because they stop to scream when they see you.
- Darkwraith Knight - Once you access Lower New Londo, these powerful enemies will be down there waiting for you. They hit hard and can perform quick combos, but are slow to turn and are thus susceptible to backstabs.
- Mass of Souls- Also residing in Lower New Londo, these enemies are just giant blobs with faces on them. They have a lot of HP and attack by vomiting on you (a thick goo that slows your movement and slowly drains health. It also reduces the amount of HP your estus flask heals) or hitting you with their spear-like tongue. They can also create Wisps. They do not respawn once killed.
- Wisp - Spawned by the Mass of Souls, these disembodied floating heads will appraoch you once you get close and will then violently explode when they get in close proximity to you.
- Vagrants
Full New Londo Ruins Upper Walkthrough
Entryway
Mad World - Once you've arrived on the Firelink elevator, go down the stairs - behind the first flight of stairs, to the left, you should find a corpse with a Soul of a Nameless Solider - until you reach an open area, through a doorway on your left. This area is filled with Hollows that have gone crazy and are not interested in picking a fight, so you can ignore them if you want but seeing as they are easy and the only targets for souls in this area, you may want to whack a few on your way through.
Convenience Is Key - Go to the right first and you'll notice the doorway that leads to the Valley of Drakes; you would've come from that doorway when passing through from Blighttown, to Firelink Shrine, earlier in the game. Go past the door toward the cliff to find a Hollow laying on his side. Proceed to the left of him, down the staircase to find Blacksmith Rickert of Vinheim - he's behind some bars on the left at the end of the stairs. This blacksmith upgrades weapons to Magic and Enchanted status (if you have the right embers) and also sells a Catalyst for 500 souls, Soul Arrow for 2000 souls and Heavy Soul Arrow for 4000 souls.
Goodbye Old Friend - Head back to the open area of crazy Hollows to find a doorway, opposite to the one you exited from, leading further into the area. Just inside this doorway you'll find the Estoc and further in you'll fight a hollowed NPC, the Crestfallen Warrior, if you rang the two Bells of Awakening and then talked to him back at Firelink - as sad as it may be, he's worth 1000 handy souls and can be defeated without too much effort.
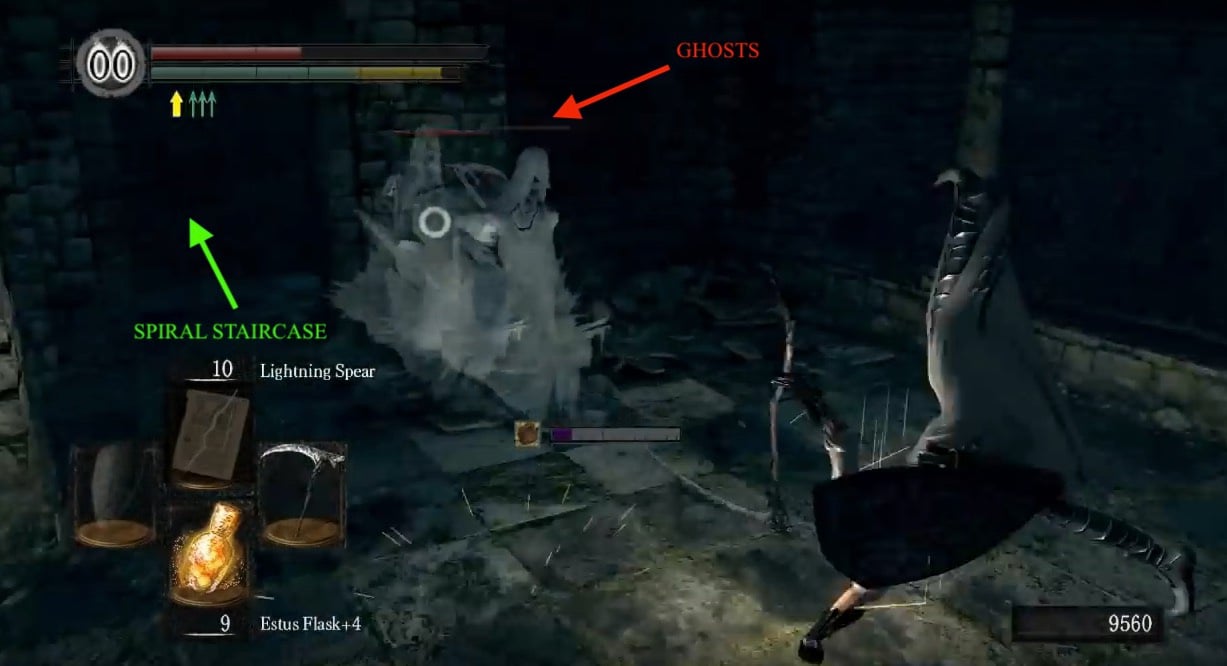
Crossover - Continue on and you'll come a short set of steps that lead to a small circular platform; here you'll find a corpse in a large pot that will drop 2 Transient Curses - these allow you to defend against and attack the ghostly inhabitants of the ruins ahead, but the effect doesn't last forever once activated (Tip: Assign this item to one of your item slots to keep track if the item's activated or not; the greyed-out icon is an indicator that it is in fact, active.). Cross the two wooden bridges, equipping the Transient Curse before stepping off the second. Look on your right as you cross the second bridge and you'll notice an item out in the water, we'll get that soon.
Watery Area
As you step off the second bridge, you'll start to see the ruins you're about to traverse in the distance and keep your eyes peeled for the two figures slowly floating toward you - these are Ghosts, and here's what you should know about them, before proceeding:
- They are floating apparitions of the previous inhabitants of New Londo, before it was flooded.
- They cannot be hit and you cannot defend against them unless you are either cursed, affected by a Transient Curse, or specific weapons.
- They have the ability to pass through walls and floors to attack you; don't rush into a seemingly empty area, and be surprised to find yourself surrounded.
- They are equipped with two jagged knives.
- They have some quick close-combat slashing moves, and a longer range grab attack. These can be countered by:
- Running straight at the Ghost performing it.
- Run/roll out of the way of their knives.
- It's advised that you take your time as you travel the New Londo Ruins to avoid Ghost ambushes, learn their spawn points, and aggravate as few of them as possible at once.
Once cursed - whether by your own hand or through an unfortunate event - you should be able to defend against the attacks of the two Ghosts. Turn right, from where you entered, to find a ruined walkway with windows. Entering it will lead you to a thin walkway, hidden just under the water, which once crossed will spawn a few Ghosts around you. Luring them back to an area with more land for you to maneuver around and then coming back for the Fire Keeper Soul, is probably the best strategy to execute.
After collecting the Fire Keeper Soul, head back across the bridge to the right side of that area and look behind a wall, close to the edge to find a pot with a corpse holding another two Transient Curses (Note: Once you lower the water level, this will become a shortcut to access the Lower New Londo Ruins).
Head to the very left side and climb the proceeding stairs. At the top you will see a bridge that you have to cross over - but because this is Dark Souls, move to the right of the platform and undo the Ghost's plan to ambush you on the bridge by triggering it early. Having dealt with the ghost, deal with the one that spawns at the doorway leading to the bridge. Cross the bridge and be ready to fight a bunch of Ghosts - but first, be sure you aren't surprised by the one waiting at the end of the bridge.
First Square Tower
Traps - Including the - clearly a bait - Ghost at the doorway on the other side of bridge, there are a total of 6 ghosts in that room; one at every exit and another 3 that come in through the walls and floor. So unless you are super confident with your combat and rolling skills, you can spring the trap by sprinting in and then immediately out, the way you came. If you're quick, you'll step right over the Ghost that means to box you in, but you should simply take this one out should she manage to get in the way and run back to the bridge. Doing this properly will bring the fight to the bridge, and as a result, the Ghosts attack you more sequentially than simultaneously.
Continue through the only other door in the room to arrive at a spiral staircase, that will take you down one floor. Straight ahead on the ledge is a corpse with the Parrying Dagger, but before picking it up, you should be able to see the arms of the Ghost poking out, next to the corpse. You can attack it at this point, then pick your loot.
Wailing - Head back to take the only other corridor and you should arrive in a room with a fog gate on the right, with a Ghost waiting to rise out the floor in front of it, and a Banshee around the corner ahead, on the right guarding another two Transient Curses. (Note: Banshees are like Ghosts but have a little more HP, and a ranged lightning attack. Good way to tell it's a Banshee is the red on their face, and the fact they stop to scream when they see you, which makes killing them a little bit easier.
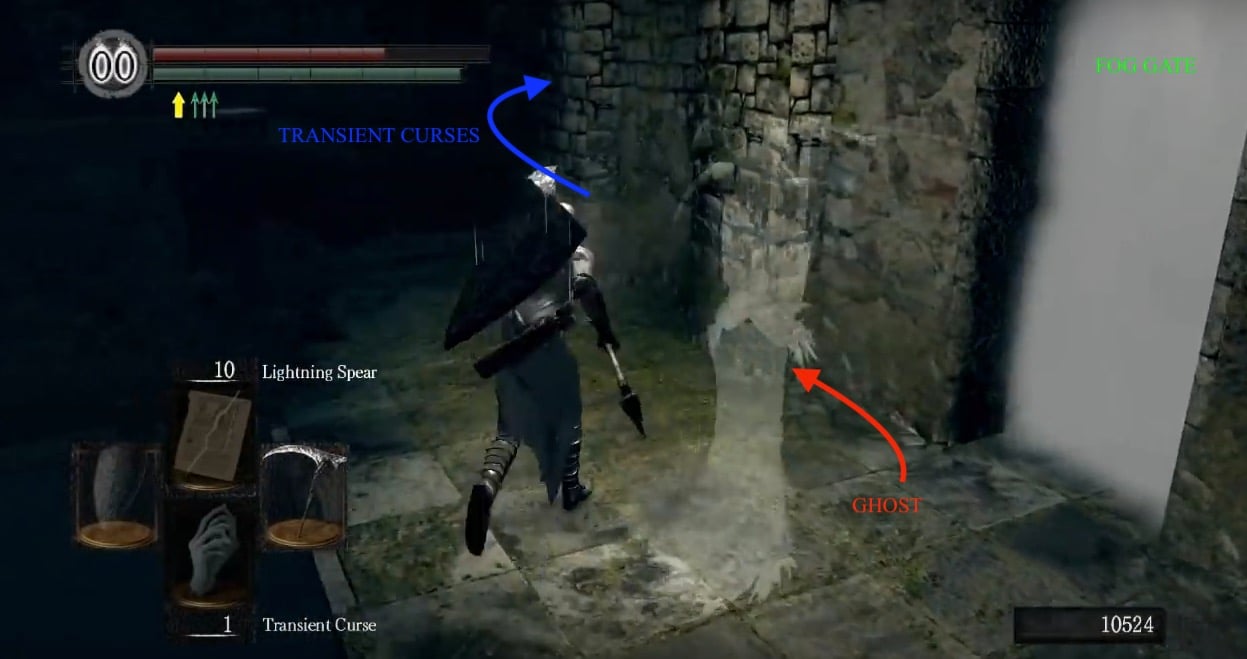
Catwalk
Fog Gate - Through the fog gate you'll climb a staircase that will lead you to an elevated catwalk. Directly in front of the stairs you just climbed, be sure to kick the ladder here and go down. There are two Ghosts down here behind the pillars on the left that would attack you through the floor as you walked above, so getting rid them first is ideal.
Once back at the top of the ladder you'll see a corpse holding a Soul of a Nameless Soldier at the end of the ledge directly next to the ladder; watch out as there is a Ghost atop the archways, leading to the corpse with the loot. Head back and continue right.
Ghostbuster - At the end of the catwalk, you will see a second square tower ahead and as you walk around the tower towards the doorway leading in, look down and to your left into the water. The instant you see Ghosts moving towards you, head back up onto the catwalk. Two Ghosts will come through the walls of the tower to attack you, but if you back up just enough you should pull only these two - leaving four more in the water. Pick off the remaining ones in the water before going inside the tower -easiest to do so with a ranged weapon.
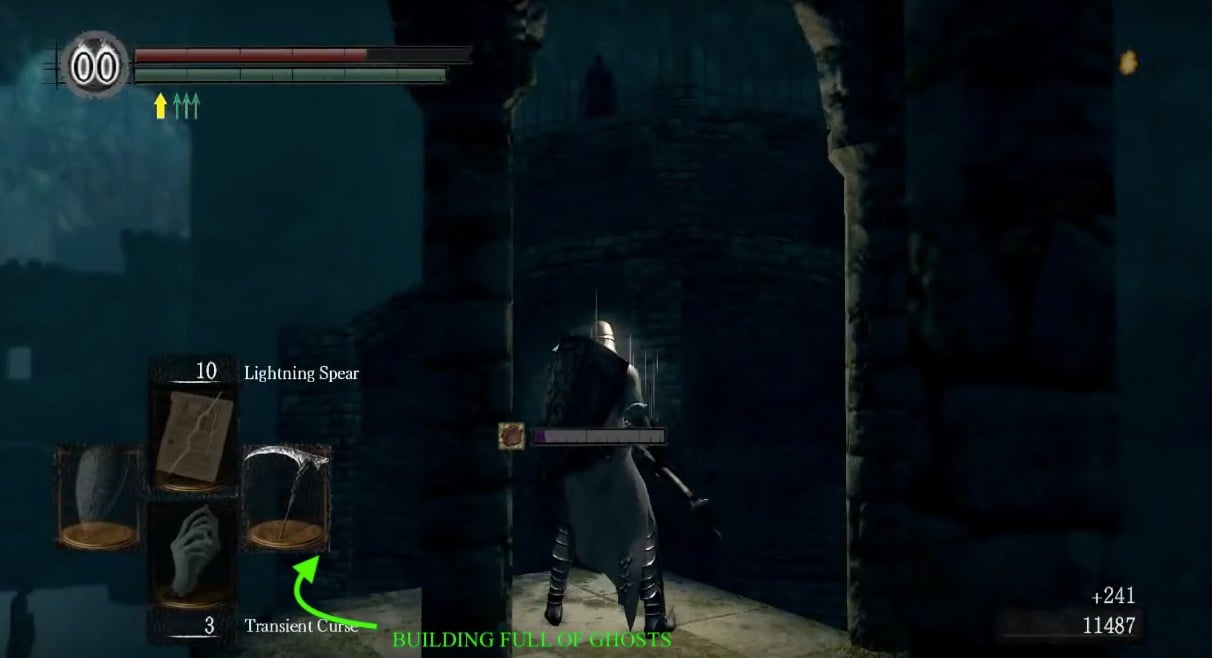
Second Square Tower
The Coast Isn't Really Clear - Once the GHOST IS CLEAR, head inside to find a door with a staircase to the left and another door ahead that goes into a room, that leads into another room (doorway at the corner on the left) containing a Banshee and another blatant trap. Ignore the stairs for the moment, enter the other door and a strategy to be employed can be to target the Banshee quick before the rest of the Ghosts appear; once the Banshee is dead, head back outdoors to lure the remaining Ghosts for easier dispatching.
Unlocking Doors - In the room where the failed trap was originally set, find a ladder in the fireplace that will take you to the roof to meet Ingward. He sells Transient Curses, the Resist Curse spell and can also cure your cursed status. If you acquired Lordvessel at the end of Anor Londo, he'll give you the Key to the Seal when you talk to him, if not, you can take it by forcing his hand through death; although, you may want to purchase all items you need from him before killing him, if you choose to do so.
Head back to the trap room, out the first door and turn left. Follow the path until you find a hole in the wall, with a corpse holding a Soul of a Proud Knight sat next to it. You can jump through the whole to land on the stairs you ignored earlier. Continue downwards into the corridors and take the second doorway to your left, out onto a ledge to find a corpse with loot, which will inevitably spawn a Ghost. Defeat it to safely loot the Cursebite Ring from the corpse and then go back to the doorway you passed by earlier and go right once you get outside.
Rare Ring - Head left to the little structure holding a Green Titanite Shard - as you may have guessed, wherever there is loot on this map, a Ghost not too far off. Now head up the other stairs, picking up the Large Soul of a Nameless Solider on the way, and continue up the second set of stairs (ignoring the straight passage momentarily) to find Humanity at the end of the ledge. When you head back, you should see a tower's roof top to your left, you can jump onto it and collect the Rare Ring of Sacrifice. Once you get it, you can either: jump through one of the windows to land in or near the room with the ladder that goes up to Ingward, or try jumping back onto the same ledge you jumped from as shown below. Either way, you'll have to make your way back to the lower ledge and continue to the passage we ignored earlier, to arrive at a door.
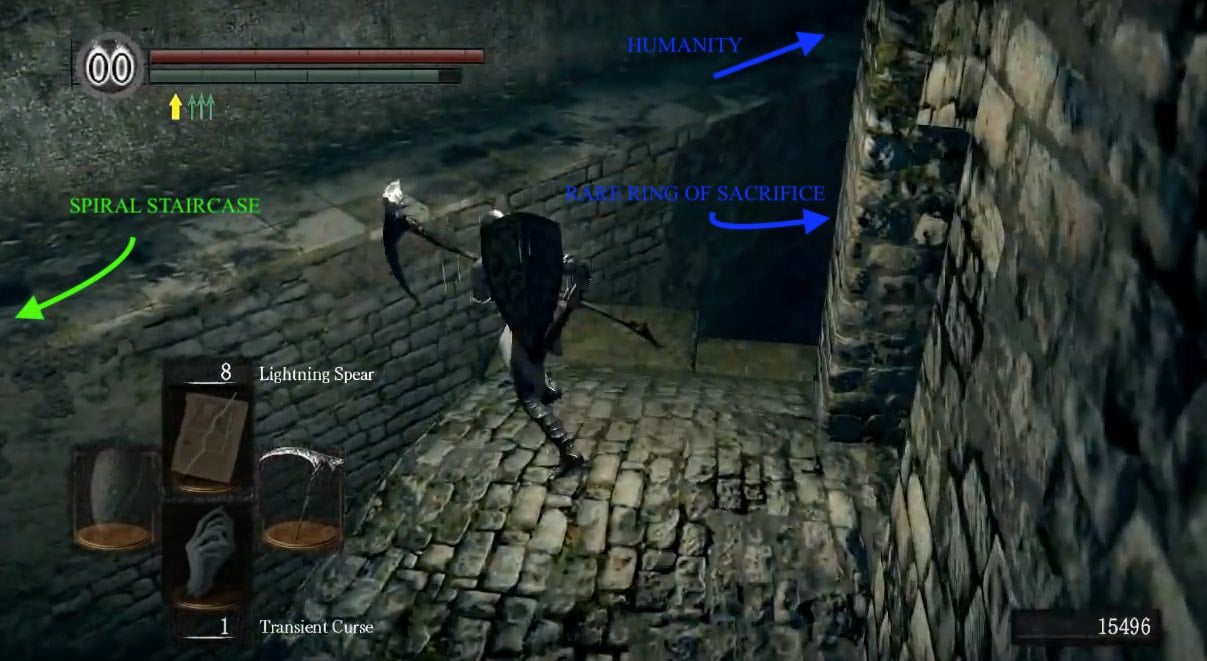
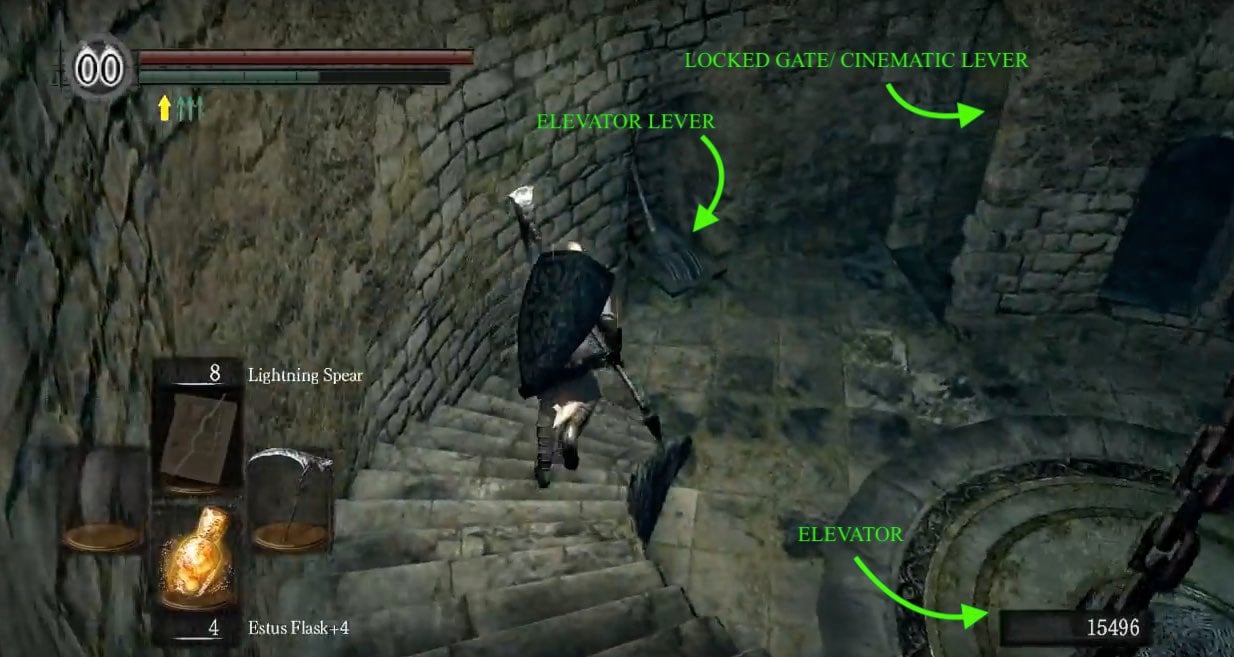
Spiral Staircase Tower
Down To The Lower - In here is a spiral staircase. Head up the stairs and take the only door to find a corpse with the Composite Bow and some Large Arrows. Head back and all the way down the stairs, to find a locked gate next to a lever which can be opened with the Key to the Seal you got from Ingward. This gate leads to a small open area, with only a large round lever; activating this lever triggers a cinematic that shows the water of New Londo Ruins being drained out to the Valley of Drakes, which also opens a shortcut between the two locations. With the water drained, you may now pull the lever in the room to call the elevator and continue down, into the Lower New Londo Ruins.
New Londo Ruins Upper Map
Speed Run Walkthrough
A fast walkthrough of how to get to the end of the level the fastest, picking up only essential items goes here.Notes & Trivia:
- ??
 Anonymous
Damn that map sucks, i cannot understand anything about about it
- Anonymous
- Anonymous
- Anonymous
- Anonymous
- Anonymous
The map here is wrong. That first spiral staircase puts you back out in the same direction it let you in.
0
+10
-1