Demon Ruins is a Location in Dark Souls and Dark Souls Remastered. These lava filled ruins are accessed via a passage beneath the bell tower in Quelaag's Domain, and so it is available quite early on in the game. However, a Golden Fog Gate blocks the way near the end and hence you cannot access all the area until you place the Lordvessel. The enemies within are quite tough (two of which were previously bosses, earlier in the game) and it also contains three separate boss fights. It serves as the gateway to Lost Izalith, once you beat all its challenges.

General Information
- Previous: Crystal Cave
- Next: Lost Izalith
- Recommended Levels: Any
- Bosses: Ceaseless Discharge, Demon Firesage, Centipede Demon
Video Walkthrough
Demon Ruins Map
Work in progress
NPCs in the area
Bosses
Items
Consumables
- Soul of a Brave Warrior
- Soul of a Proud Knight
- Humanity
- Twin Humanities
- Large Soul of a Lost Undead
- Large Soul of a Nameless Soldier
- Large Soul of a Proud Knight
- Large Soul of a Lost Undead
- Purple Moss Clump
- Blooming Purple Moss Clump
- Soul of a Nameless Soldier
- Egg Vermifuge
- Divine Blessing
- Repair Powder
- Transient Curse
Weapons, Spells & Armor
- Gold-Hemmed Black armor set
- Green Titanite Shard
- Orange Charred Ring
- Egg Vermifuge
- Demon Great Machete
- Homeward Bone
- Demon's Greataxe
- Sunlight Maggot
- Sunlight Medal
- Dung Pie
- Prism Stone
- Copper Coin
- Gold Coin
- Silver Coin
Upgrade Materials
- Red Titanite Chunk
- Titanite Chunk
- Twinkling Titanite
- White Titanite Chunk
- Green Titanite Shard
- Large Titanite Shard
- Demon Titanite
- Dragon Scale
- Blue Titanite Chunk
- Large Flame Ember
- Chaos Flame Ember
Keys & Other
Enemies
- Egg Carrier
- Taurus Demon
- Capra Demon
- Stone Demon
- Burrowing Rockworm
- Chaos Bug
- Vile Maggot
- Minor Capra Demon
- Minor Taurus Demon
- Vagrants
Full Demon Ruins Walkthrough
Cooling the Lava
Cool Down - Upon entering the Demon Ruins from Quelaag's Domain (through the broken wall door), you will find a bonfire surrounded by Egg Carriers, they are passive so long as you leave them alone. Walk past them, down the long stone path and you'll see that the area at the bottom is covered by the lava. So turn right at the bottom of the ramp to find a large stone arch next to the path you just came down, that leads towards a fog gate via a stone bridge. There are no enemies between you and this fog gate, so run over and go through it to enter the boss arena for the Ceaseless Discharge - the source of the lava.
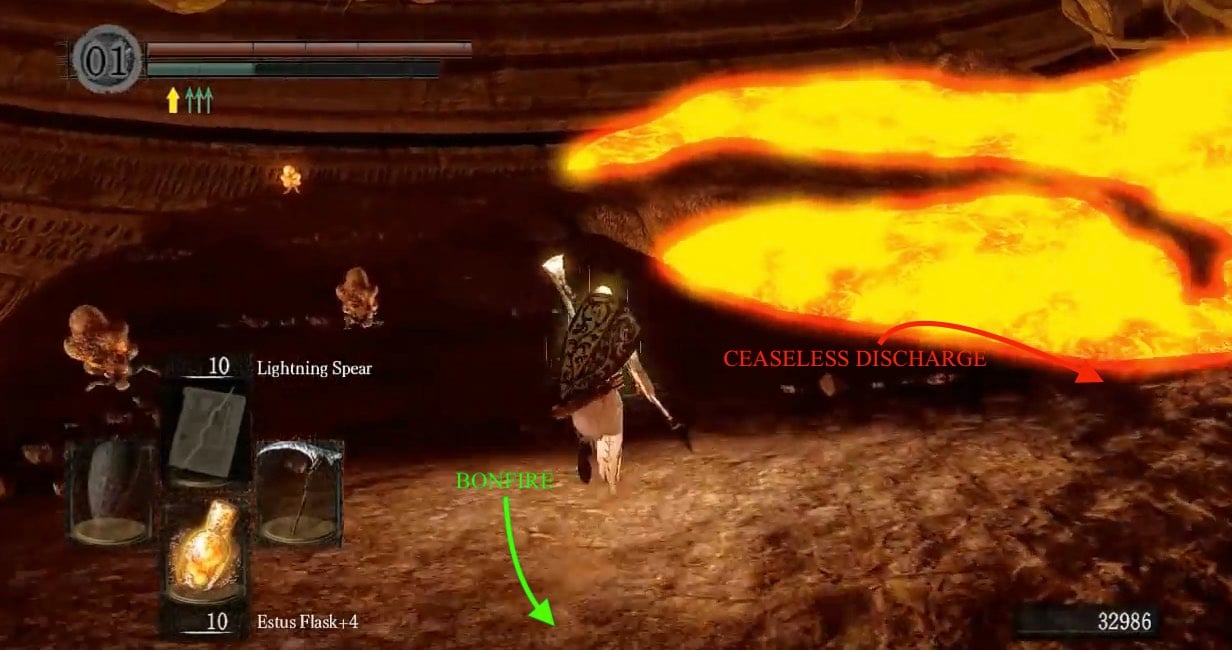
Travel forward and you will eventually see it lurking beyond the cliff's edge, but the battle won't begin until you either attack it or pick up the Gold-Hemmed Black Set at the end of the path, on the right. The armor set is worth getting for it's fire resistance and light weight. The easiest way to get past this boss is as suggested below (if you wish to learn more, or alternative methods, click here):
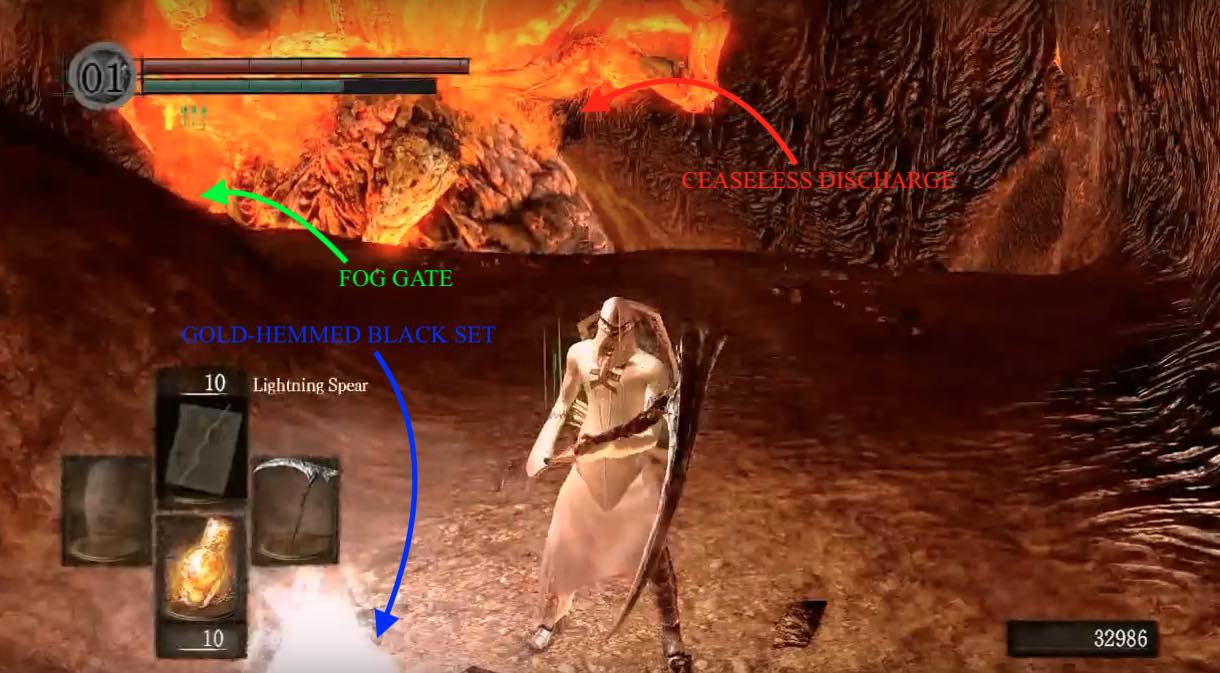
- Equip light armor before passing into the fog gate. Once you pick up the Gold-Hemmed Black Set on the far size of the zone, wait for him to do his lava spray attack, then run as fast as you can back to the fog gate. If you die en route, you must go all the way back to the altar where the loot was, and try again; if you attempt this post mortem, you will be attacked as soon as you traverse the fog gate. Once at the fog (do not proceed through yet), the Discharge will stop, hesitate, and then take a leap over the chasm in an attempt to attack you - hug the fog to avoid any needless damage. At this point, it's only hanging on by one hand, which means a few attacks to it will plummet the Ceaseless Discharge and its lifebar.
You can progress without ever killing him by dashing through the lava, but only if you have the sufficient health and Estus Flasks to reach the place where the Capra Demon stands.
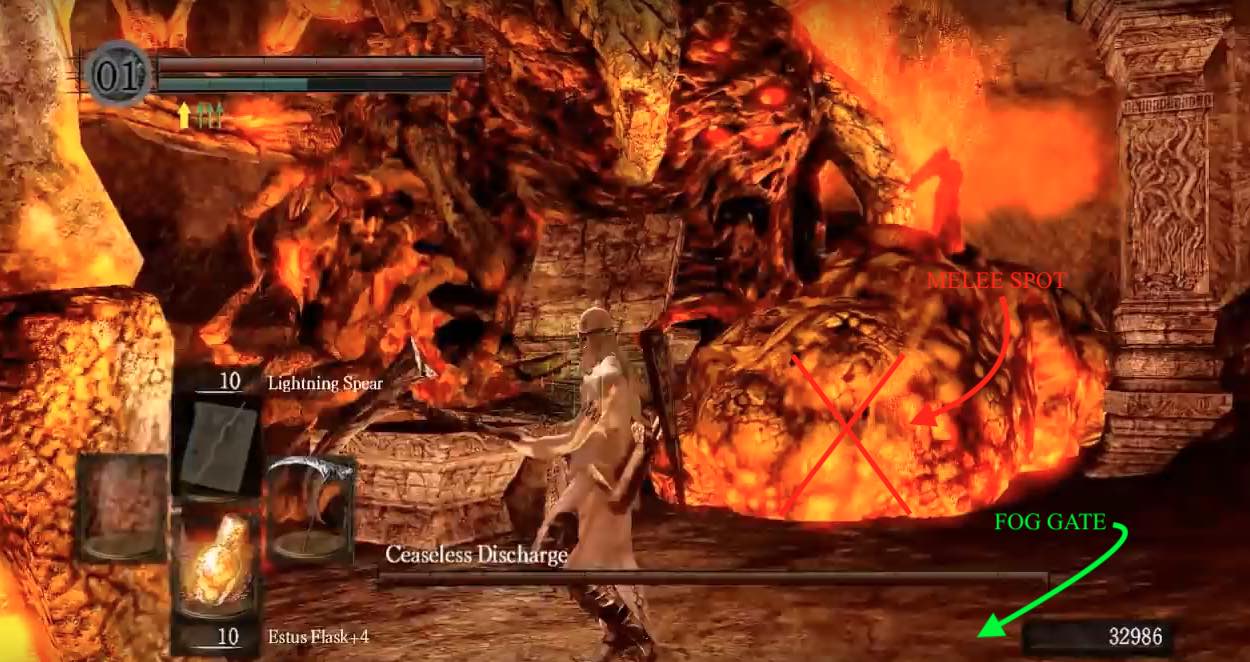
Boss Fight: Ceaseless Discharge
Defeating the Ceaseless Discharge not only grants you a Humanity, Homeward Bone, and 20,000 souls, but much of the lava in the area below will cool and turn to stone so that you can descend all the way down the long stone path to the area at the bottom.
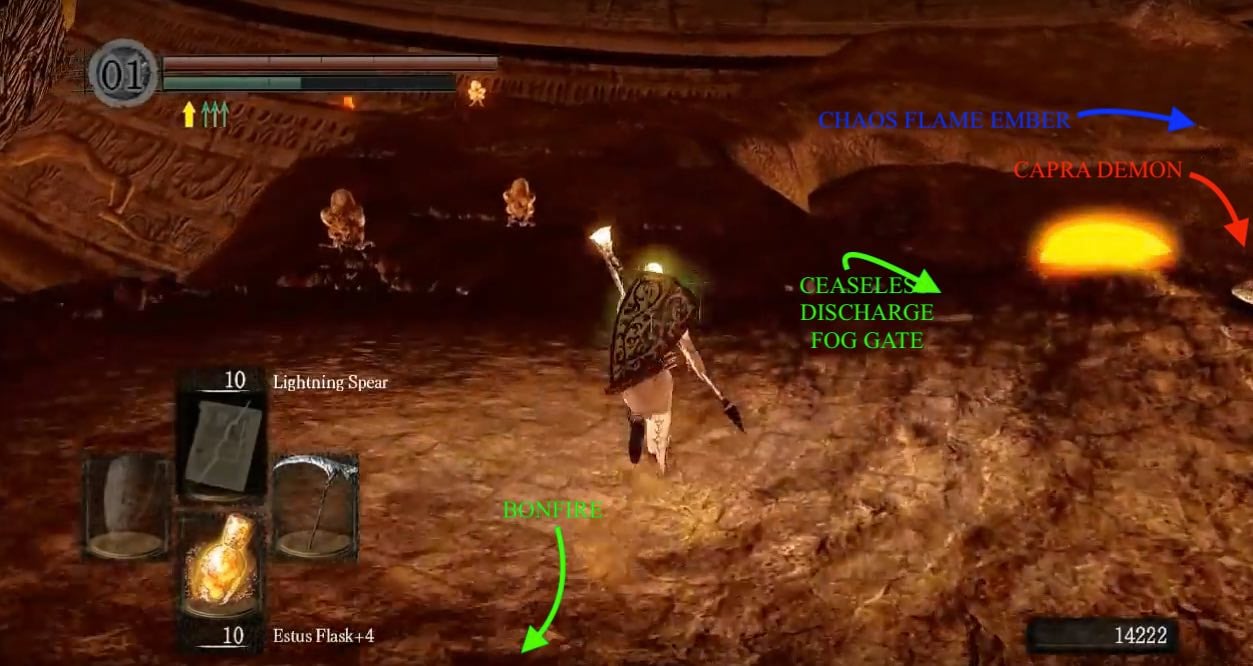
The Hardened Lava Lake
Too Many Cows - Follow the long stone path to the very bottom, looking out over the now-cooled lava, you will find a total of 7 Taurus Demons in the distance on the l. They are impossible to fight as a group, so lure them out one at a time (bow and arrows are your safest bet). There is a chance one may drop a Demon's Greataxe.
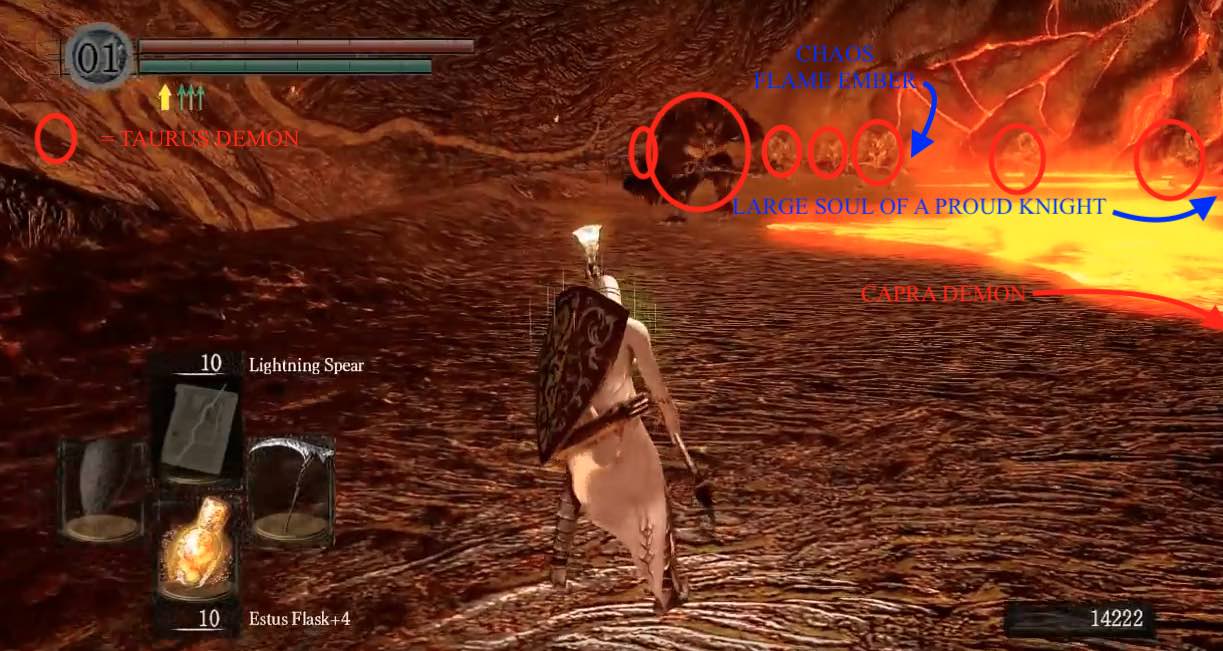
Once they are all dead, you can retrieve a couple of items from nearby corpses. The first requires a running jump over a small piece of lava to retrieve a Large Soul of a Proud Knight. Jump back over the lava again, head right and look in the middle of a nearby a pool of lava to find the other item - the Chaos Flame Ember. You'll need to go into the lava to retrieve it, so equip your most effective fire resistant gear - possibly your newly acquired Gold-Hemmed Black Set, and perhaps Flash Sweat. The aim is to get in quickly enough to obtain the item, and out if you can; you'll probably die doing this so with that in mind, consider equipping a Ring of Sacrifice as a Plan B (Tip: the Orange Charred Ring, obtained after you kill the last boss of this area, makes getting this ember a non-issue).
Too Many Goats - Now, go back towards the long stone path you originally came down but head left instead of turning right to ascend the path. As you go you'll notice an item on a corpse directly ahead of you - a Soul of a Proud Knight- and a Capra Demon making his way toward you from the left. This is only the first of many of these, in the Demon Ruins. They're quite tough customers, as you may recall from your encounter with one back in Undead Burg. However, unlike your first encounter with them, you have more space and less dogs to deal with. Once you take him out head toward where he came from to find the path that you should follow to proceed. This path will follow along a wall and as you turn the last corner you'll see it leads further into the ruins, toward an area with five more Capra Demons.
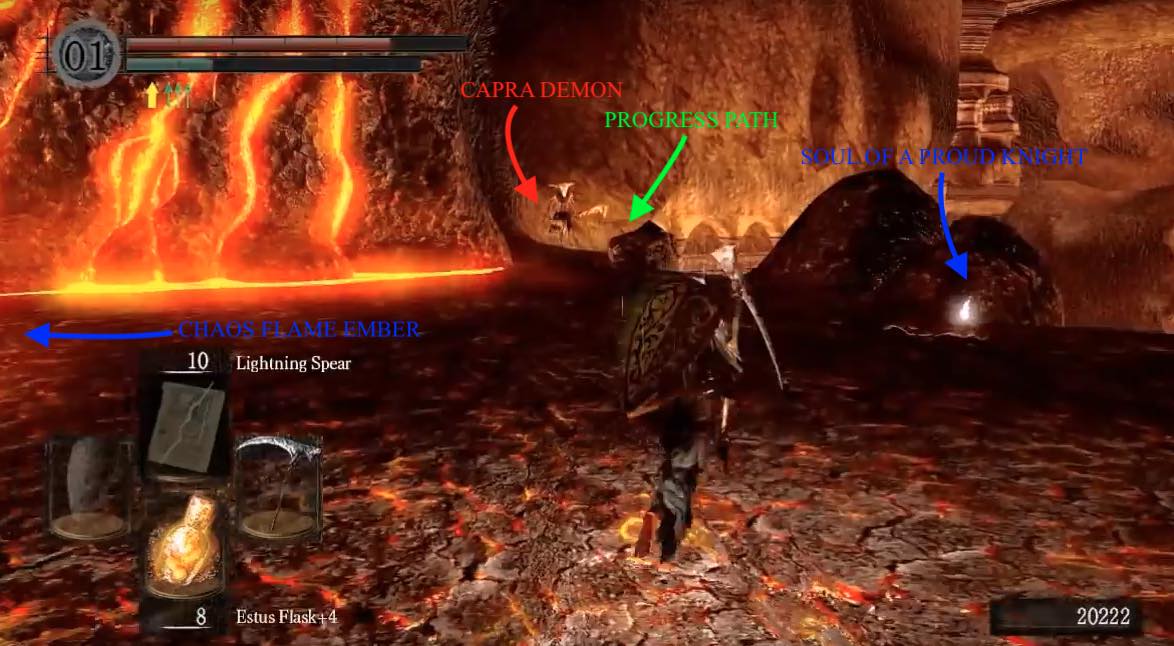
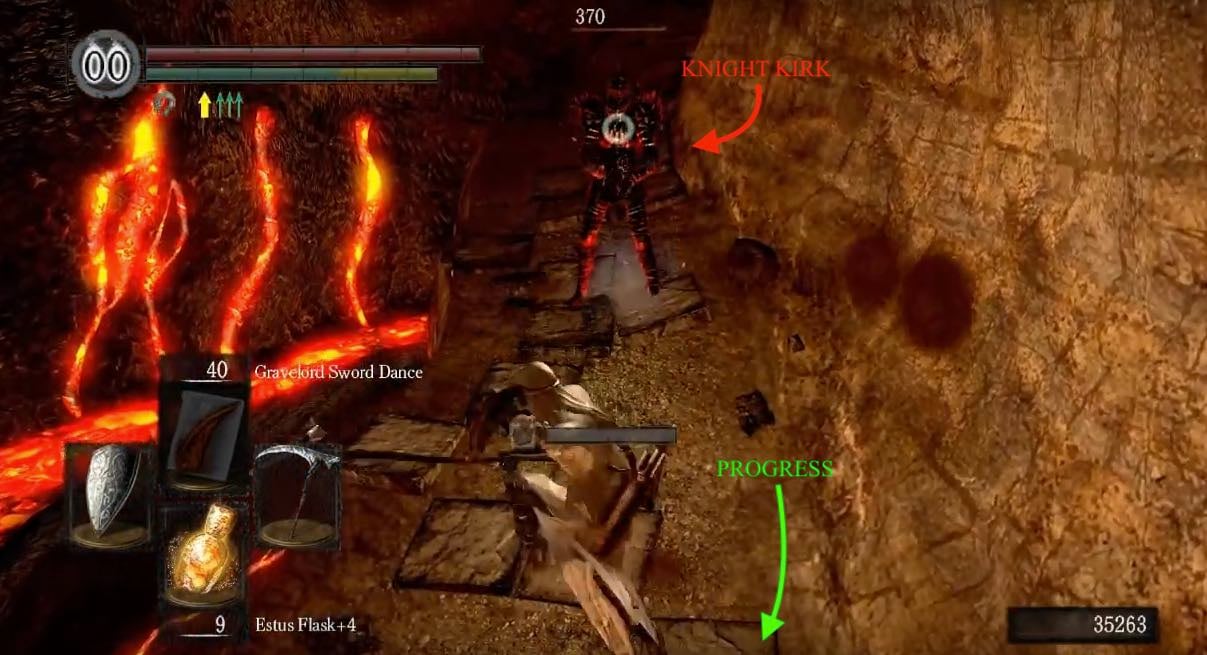
Captain Kirk - If you are in human form when following path after the first Capra Demon, the Darkwraith Knight Kirk will invade behind you. This is the second of his three invasions - the first in the Depths, and the third lies ahead in Lost Izalith. If you defeat him in all three of his invasions you'll be able to obtain his armor - the Thorns Set. Also, it would be advised to fight him on the path where he appears or back up in the hardened lava lake. Whatever you do, don't run down the path into the ruins, as the crowd of Capra Demons will make the fight impossible.
The Demon Ruins
As you know, Capra Demons can be tough - even by themselves - so taking on the group of Capras ahead, simultaneously, is ill-advised. Try to lure them out one at a time instead; another method for dealing with them is with poison arrows; shooting them a few times from up on the path, and awaiting their death is a safe because it can be achieved without any of them charging you - the Bow of Pharis can be very helpful here for its longer range. (Tip: You can avoid fighting them entirely by simply jumping off the path just before it enters into the ruins for a shortcut to the bonfire below, but beware that you'll also land beside a Burrowing Rockworm. There is a staircase nearby the bonfire to allow you to go back up and take on the Capra Demons if you wish.)
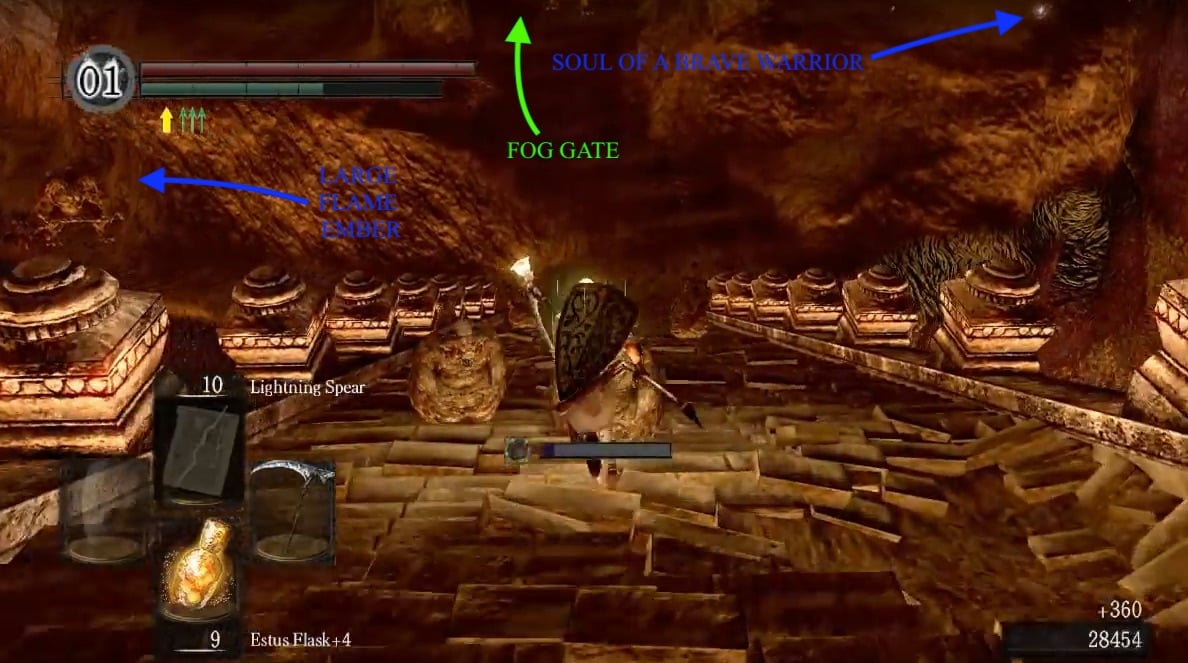
Safety In Hell - After your encounter, you'll descend a staircase and will be approached by a Stone Demon, at the bottom. These slow-moving enemies stop when they get close to do a straight forward, or a slowly turning, fairly short distance flame thrower attack that's easy to dodge. Kill that one and turn right - don't go down the wide stairs to your left yet. Go to the back wall, turn right, and navigate around the rocks under the staircase to find two Green Titanite Shards. Turn back and you'll see a bonfire and a Burrowing Rockworm (mentioned in the 'Tip' above). Take out the Rockworm with a ranged attack - lightning spears work very effectively - to access the bonfire and the nearby Soul of a Proud Knight. Now go back to descend the wide stairs, where you'll encounter four more Stone Demons on your way down.
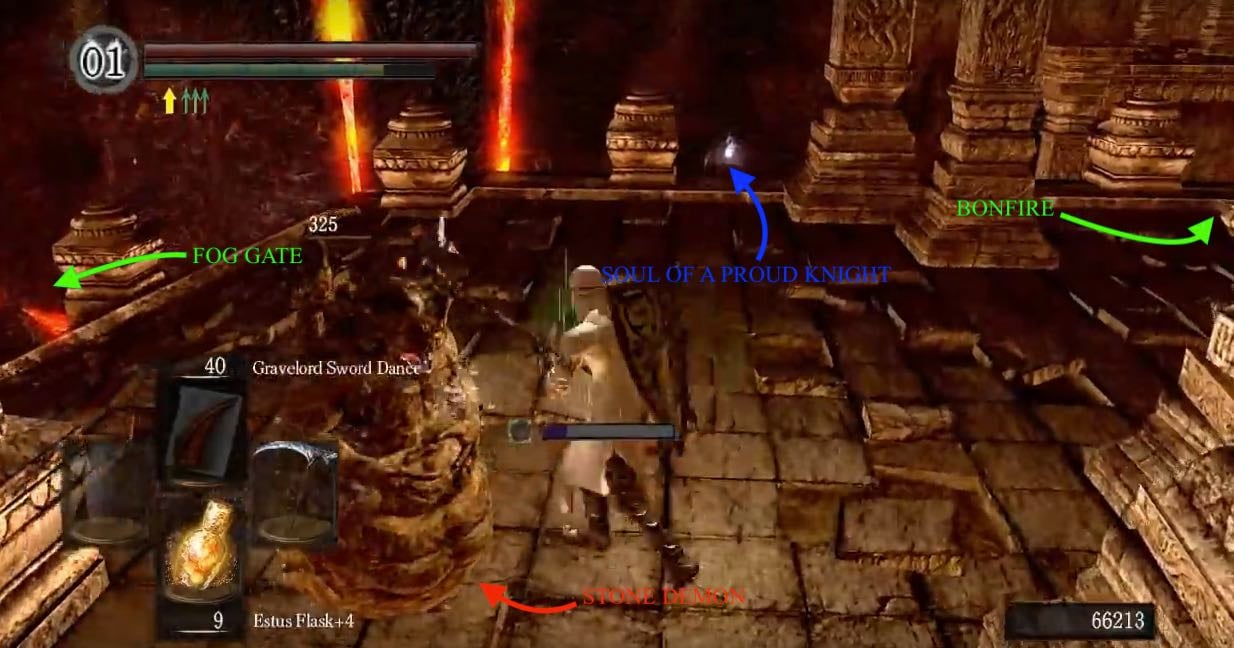
Note: From the top of the wide stairs, look over the edge on the right and you should be able to get an early glimpse of the Centipede Demon boss, prior to fighting him later.
Before getting to the bottom of the wide stairs, look around - you'll see a path ahead leading to a fog gate and path to the left leading into some more ruins. You'll likely also notice the three Taurus Demons - one on the path ahead and two on the left. As you reach the bottom of the stairs, the Taurus Demon straight ahead will start coming for you, so watch out. Once you get off the stairs another Rockworm will pop up from the ground to your right, but it doesn't actually get in the way and can be ignored if you wish. You can take out the enemies that you see in your vicinity, or to do this without attracting their attention, use the Ring of Fog or cast Hidden Body (be sure to move back up the stairs a bit so they don't see you when the spell wears off); if you have no arrows though, good luck with the melee fight.
Too Many Worms - Now go down the path to the left and take on the final Taurus Demon. The ledge he's on is not ideal for a fight so, again, poison arrows are a viable option. If you have none then you could try to pull it back to an area more conducive for a straight melee fight. Once he's gone, continue down the path and toward the chest in the distance, but be warned of the 5 Rockworms waiting to drop on you, from the ceiling.
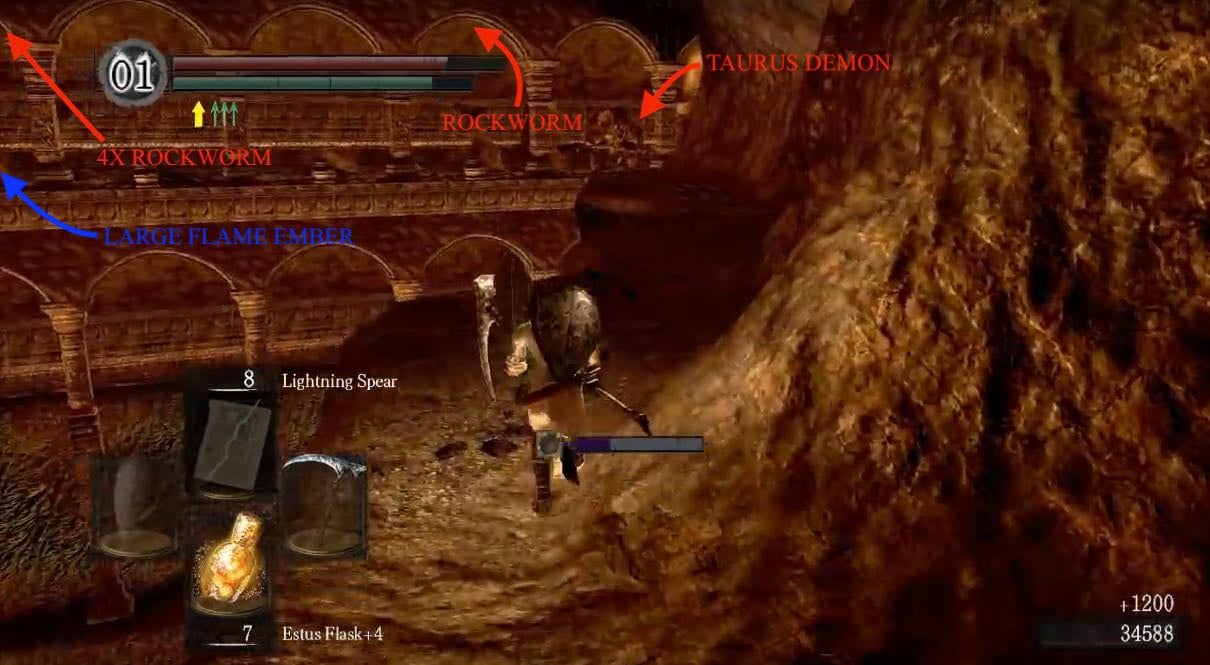
- Firstly a single one will drop, so move forward slowly, then once dropped you can dispatch it carefully.
- Then, as you near the chest at the end of this path, four more will drop down and attempt to box you in. As soon as they drop, sprint forward between the two ahead of you to get out of harms way, or if you're confident in your ability to do damage at range, get boxed in and deal your damage. As long as you don't get close to them, they are harmless. The chest past them holds the Large Flame Ember.
- An alternate path is to have less than 50% load, and run like a bat outta hell. You can get to the chest and pickup the Large Flame Ember. Then to get back, stand facing the center of the four demons and yet again run like hell. (Tip: if you get closed in by the four Rockworms that drop out of the ceiling I advise using the Silver Knight Spear to whittle away at their health, it is long enough that they won't attack you, but you can still harm them with your spear.)
The Ruins' Demons
Two Many Bosses - Back at the stairs, advance up the steps to the fog gate ahead, where you will be attacked by two more Stone Demons. For a final detour, a path to the right that leads to another Capra Demon and a Soul of a Brave Warrior (Tip: A single well placed arrow will stagger him and make him step back off the edge of the cliff he's standing beside, allowing you to get the item). Now, proceed back to the fog gate where there are two ways to go from here:
- Through fog gate you will find the Demon Firesage boss arena, then leading further into the Demon Ruins once it's defeated. This is the path that most will follow due to the specific requirements of the alternative route, detailed below.
- There's another passage to the right before the fog gate with traversable roots leading down to a big door. This door is a shortcut that allows you to easily travel back from Lost Izalith to the Demon Ruins later, but it can also be opened early from the Demon Ruins side. To enable this you must be a level 2 Chaos Servant (which will cost you 30 Humanity), otherwise it will simply not open from this side. Using this shortcut allows you to skip the Demon Firesage and Centipede Demon boss battles. It will also skip the lava field section of Lost Izalith. However, doing so will cause you to miss out on the Demon's Catalyst and Orange Charred Ring that are dropped by the bosses. You can of course come back later to kill these bosses if you wish. (Note: If the player received the status of Level 2 Chaos Servant in a previous play through, this status will be present in any future play throughs. Producing 30 Humanity for The Fair Lady is no longer necessary)
So, assuming that you're not a level 2 Chaos Servant, you'll be going to through the fog gate to take on the Demon Firesage. Otherwise you can skip right ahead to the "Walkthrough 2 (Chaos Servant Entrance)" section of the Lost Izalith page.
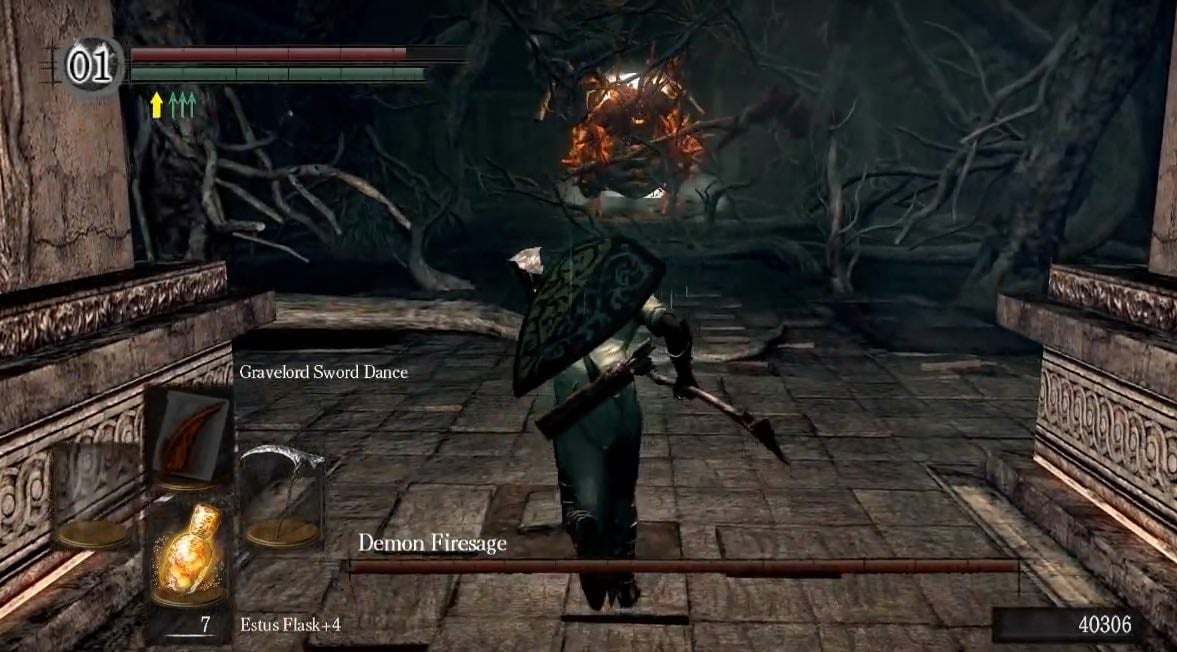
Boss Fight: Demon Firesage
After killing this boss, you gain a Humanity, the Demon's Catalyst, and access to another staircase. From here, you can progress either up or down the stairs.
- Going up the staircase will take you past more Stone Demons and a Soul of a Brave Warrior. At the top you'll find a familiar looking circular platform, and stepping onto the center of it reveals it to be an elevator that will return you to Quelaag's Domain - opening a very welcome shortcut.
- At the bottom of the staircase there is a branch that leads down to a bonfire, as well as the fog gate to the Centipede Demon's boss arena. On a ledge beside the branch that leads downward there is another Soul of a Brave Warrior. Before going through the fog gate, be aware that Knight Solaire's summon sign is nearby the bonfire if you're in human form; he can be quite helpful in the Centipede boss fight. Head through the fog gate to meet the second boss.
NOTE: You will encounter Knight Solaire twice, later in Lost Izalith. The second encounter can vary, depending on what you do at this point. If you wish to have the alternate encounter, click here, and read the last encounter under "List of Encounters".
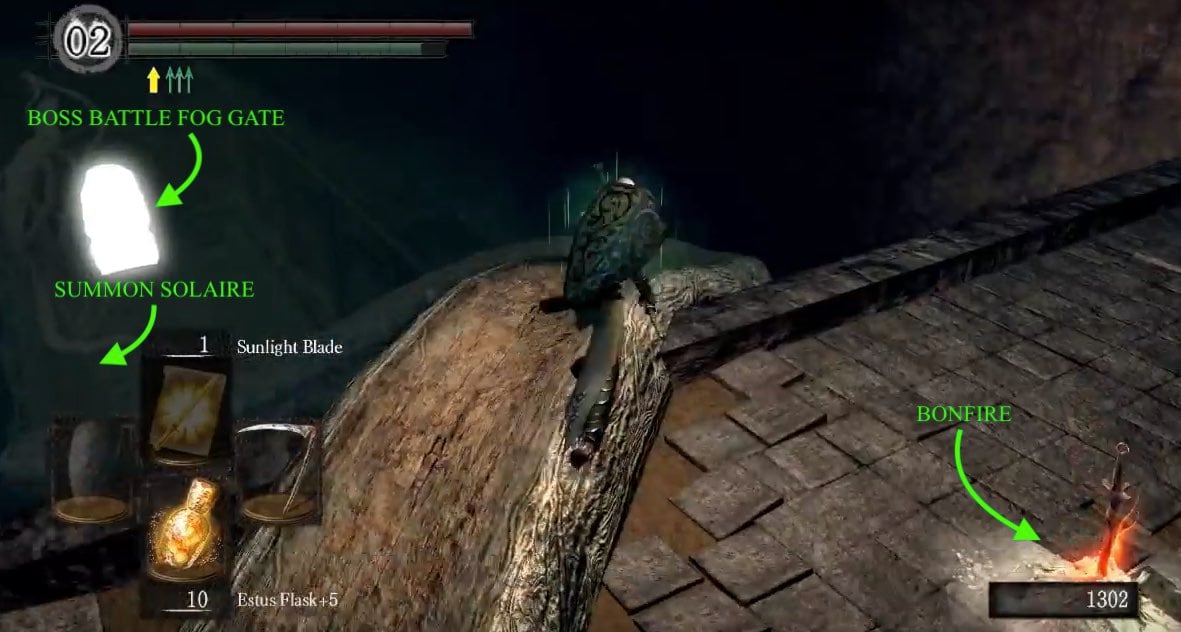
Boss Fight: Centipede Demon
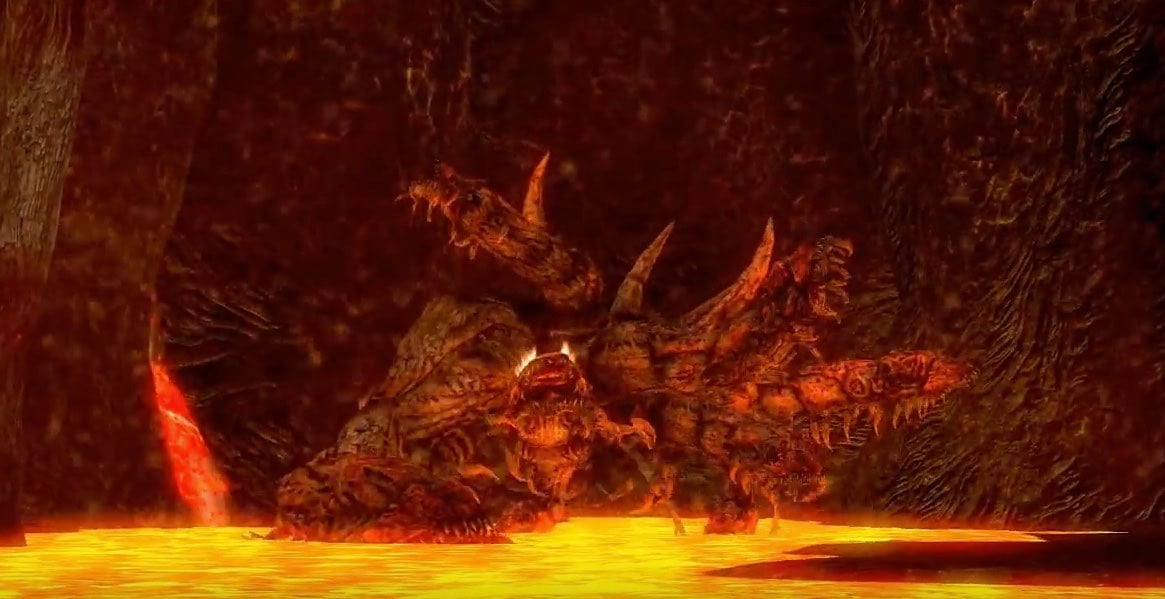
His death will bring you the Orange Charred Ring. Once equipped, this ring will allow you to walk on lava and only receive minor damage - which is a godsend for what's ahead. If you explore the arena after defeating the Centipede, you'll find a corpse with two Green Titanite Shards tucked away in an alcove (make sure to wear the ring you just received). Return to the entrance of the Centipede boss arena and continue, following the wall on your left, until you find the exit that leads to the next area: Lost Izalith
Demon Ruins Map
Speed Run Walkthrough
A fast walkthrough of how to get to the end of the level the fastest, picking up only essential items goes here.Notes & Trivia:
- Kirk, The Knight of Thorns - He appears on the path leading down to the ruin with the Capra Demons, and you must be in human form for him to invade. Please see here for more info on Kirk and his invasions.
- Demon Ruins is the heir of Demon's Souls' Stonefang Tunnel. It was later succeeded by The Smouldering Lake of DS3.
 Anonymous
Came all the way down here, to the Safety In Hell's bonfire, just to learn that you need the Lordvessel placed. Now it's gonna be hell trying to climb back :) GG Game.

 Anonymous
 Anonymous
 Anonymous
 Anonymous
Little late to the party, but to anyone STILL having issues without the lava protection ring, you can use the dark wood grain ring to sponge some of the damage you would normally take by flipping forwards. Worked for me to get the large soul of a proud night.

 Anonymous
 Anonymous
Use ledge to green shards under staircase to lure 1st Demon over edge to its death.

 Anonymous
This place always reminded me of those dungeons in korean/chinese MMOs plagued with reskinned enemies.

 Anonymous
Anyone else enjoy making ceaseless discharge fall to his doom.

 Anonymous
 Anonymous
 Anonymous
 Anonymous
Boss needs to be updated - says chaos witch Quelaag but that's for B-town.

 Anonymous
If you cut the centipede demon tail, it will give you the orange charred ring making the fight against him easier

 Anonymous
You don't need to get your equip load under 25% to run the fastest and escape ceaseless discharge. It's been proven many times the Sprint speed is the same no matter equip load even though the animation looks "slower"

 Anonymous
In my DSR playthrough, a Demon's Greataxe had not yet dropped after defeating all of the Taurus Demons here & previously, but the one guarding the stairs & entrance here respawned when resting or returning to the bonfire, and I collected the Greataxe upon defeating him again.

 Anonymous
The worm that "can be safely ignored" near the 3 taurus demons gives you a guaranteed red titanite chunk if killed.

 Anonymous
The page for demon ruins says you get their from qualaags domain which is in blighttown, but then previous location is listed as crystal cave. The duke's archive's says you get there from Anor Londo, but previous location is New Londo. And of course you get to the catabombs from firelink shrine, but previous is lost izalith... I'm sure this is part of some recommended progress route, but without it being on every page, it is just terribly confusing. And of course nito is the end boss to both the catacombs and the tomb of giants, somehow...

 Anonymous
There is a soul item in the immediate area you fight the first Capra demon. Also, if you're invaded while proceeding after killing the demon a fog wall blocks off access back to the lava lake.

 Anonymous

The elevator shortcut doesn't activate unless you kill firesage and if you enter firesage's arena in anyway other than fog gate, he doesn't attack.
2
+10
-1